
UCSD CSE29 FA25 Syllabus and Logistics
- Aaron Schulman (Instructor)
- Joe Gibbs Politz (Instructor)
Basics - Staff & Resources - Schedule - Course Components - Grading - Policies
CSE 29 introduces you to the broad field of systems programming, including 1) the basics of how programs execute on a computer, 2) programming in C with direct access to memory and system calls, 3) software tools to manage and interact with code and programs. All very cool stuff that makes every programmer better!
Basics
- Lecture (attend the one you're enrolled in):
- Joe/A section: 10am Center Hall 119
- Aaron/B section: 1pm Warren Lecture Hall 2005
- Discussions (attend either or both):
- Mon 3pm Center 115
- Mon 4pm Ledden Auditorium
- Labs: Tuesdays (check your schedule!). Either B240 or B250 in the CSE building
- Exams: AP&M Testing Center, flexible scheduling in weeks 3, 6, and 9 on PrairieTest
- Final exam: AP&M Testing Center, flexible scheduling in final exam week on PrairieTest
- Professor office hours – Joe and Aaron each have 2 hours. Come to either and
ask anything you need.
- Aaron: Monday 10am-11am and Wednesday 11am-12pm CSE3120
- Joe: Tuesday 1:00pm-2:00pm (CSE B260 in the labs: adjusted to 12:30-1:30 on Nov 18) and Wednesday 1:00-2:00pm (CSE 3206 Joe's Office)
- Office Hours: See the Office Hours Calendar
- Q&A forum: Piazza
- PrairieLearn: https://us.prairielearn.com
- Textbook/readings: Dive Into Systems, plus additional readings we will assign (all free/online)
- Free: MIT Missing Semester
- Not free but pretty cheap: Julia Evans Zines, especially The Pocket Guide to Debugging
Staff Resources
Office Hours Calendar
Schedule
The schedule below outlines topics, due dates, and links to assignments. We'll typically update the material for the upcoming week before Monday's lecture so you can see what's coming.
Week 9
-
Lecture Materials
- Monday:
- Joe's Lecture: Repository
- Monday:
Week 8
-
Readings
-
Lecture Materials
-
Friday:
- Joe's Lecture: Repository | Annotated Handout
-
Wednesday:
- Joe's Lecture: Annotated Handout
-
Monday:
- Joe's Lecture: Annotated Handout
-
-
Lab
Week 7
-
Lecture Materials
-
Friday:
- Joe's Lecture: Annotated Handout
-
Wednesday:
- Joe's Lecture: Handout | Annotated Handout
-
Monday:
- Joe's Lecture: Handout | Annotated Handout
-
Week 6
-
Readings
-
Lecture Materials
-
Friday:
- Joe's Lecture: Annotated Handout
- Aaron's Lecture: Slides
-
Wednesday:
- Joe's Lecture: Annotated Handout
-
Monday:
- Joe's Lecture: Annotated Handout
-
-
Lab
Week 5 – Structs, Memory Management
-
Readings
-
Lecture Materials
-
Friday:
- Repository
- Joe's Lecture: Annotated Handout
-
Wednesday:
- Joe's Lecture: Annotated Handout
- Aaron's Lecture: Slides
-
Monday:
- Joe's Lecture: Annotated Handout
- Aaron's Lecture: Slides
-
-
Lab
Week 4 – Processes and Memory
-
Readings
- Processes, especially fork and exec
- C Structs
makeand Makefiles
-
Lecture Materials
-
Friday:
- Repository
- Joe's Lecture: Annotated Handout
- Aaron's Lecture: Slides
-
Wednesday:
- Repository
- Joe's Lecture: Annotated Handout
-
Monday:
- Joe's Lecture: Annotated Handout
-
-
Lab
Week 3 – Where (Some) Things Are in Memory
-
Readings
-
Lecture Materials
-
Friday:
- Joe's Lecture: Annotated Handout
-
Wednesday:
- Joe's Lecture: Annotated Handout
- Aaron's Lecture: Slides
-
Monday:
- Joe's Lecture: Handout | Annotated Handout
- Aaron's Lecture: Slides | Code on
ieng6in dir/home/linux/ieng6/CSE29_FA25_B00/public/lectures/10-10-strcat-memory
-
-
Lab
Week 2 – Number Representations, Sizes, and Signs
-
Announcements
- PA 1 is due Thursday 10/9 at 11:59pm.
- Exam 1 is next week, please make a reservation ASAP for exam slots on PrairieTest by logging in with your @ucsd.edu account. See more info in the under Exams part of the syllabus below.
-
Readings
- Binary and Data Representaion (Sec 4.1-4.6)
- Arrays in C
- Scanf and fgets (though this week we'll only use
fgetswithstdin)
-
Lecture Materials
- Friday:
- Repository
- Joe's Lecture: Handout | Annotated Handout
- Aaron's Lecture: Code on
ieng6in dir/home/linux/ieng6/CSE29_FA25_B00/public/lectures/10-10-strcat-memory
- Wednesday:
- Joe's Lecture: Handout | Annotated Handout
- Aaron's Lecture: Code on
ieng6in dir/home/linux/ieng6/CSE29_FA25_B00/public/lectures/10-08-utf8
- Monday:
- Repository
- Joe's Lecture: Annotated Handout
- Aaron's Lecture: Slides
- Friday:
-
Lab
Week 1 – Strings, Memory and Bitwise Representations (in C)
-
Announcements
- Problem Set 1 will be available on PrairieLearn, after lab, due Mon Oct 6 at 11:59pm
-
Readings
-
Bitwise Videos
-
Lecture Materials
-
Friday:
- Joe's Lecture: Annotated Handout
- Aaron's Lecture: Slides
-
Wednesday:
- Repository
- Joe's Lecture: Annotated Handout
- Aaron's Lecture: Slides
-
Monday:
- Repository
- Joe's Lecture: Annotated Handout
- Aaron's Lecture: Slides
-
-
Lab
Week 0 – Welcome
-
Announcements
- Lab attendance is required and a lot happens there, make sure to go to lab.
-
Lecture Materials
Syllabus
There are several components to the course:
- Lab sessions
- Lecture and discussion sessions
- Problem sets
- Assignments
- Exams
Labs
The course's lab component meets for 2 hours. In each lab you'll switch between working on your own, working in pairs, and participating in group discussions about your approach, lessons learned, programming problems, and so on.
The lab sessions and groups will be led by TAs and tutors, who will note your participation in these discussions for credit. Note that you must participate, not merely attend, for credit.
For each lab there are 4 possible points to earn:
- 1 for being present
- 2 for being an active, professional, productive participant while present
- 1 for submitting and/or getting work checked off that was done in lab
If you miss lab, you can earn the submission/check-off point by submitting work late, but cannot earn back the 3 points related to participation. There is no way to make up a lab beyond this 1 point, even for illness, travel, or emergencies. Our preference would be to require all 9 labs for an A, and have some kind of excused absences. However, tracking excused absences doesn't really scale, so the “two for any reason” policy is how we handle it. You don't need to justify your missed labs. Contact the instructor if you'll miss more than 2 labs for unavoidable reasons.
Lecture and Discussion Sessions
Lecture sessions are on Monday, Wednesday, and Friday, and discussion sections are Monday. We recommend attending every lecture and one of the two discussion sections.
In a typical discussion section two things will happen:
- TAs will go over programming work in the problem sets, sometimes reviewing, sometimes doing work on the active problem set.
- There will be time to work on problem sets and ask questions of the TAs and your peers
Problem Sets
On Mondays of even weeks (2, 4, 6, 8, 10), a problem set is due.
Problem sets have a collection of small programming problems that provide practice on concepts and techniques from lecture, lab, and the reading. In addition, a subset of each problem set has programming problems that are directly related to completing the current assignment (e.g. some of the code may even be copy-pasteable).
Assignments
The course has 5 assignments that involve programming and writing. Individual assignments will have detailed information about submission components; in general you'll submit some code and some written work (to PrairieLearn).
For each assignment, we will give a 0-4 score along with feedback:
- 4 for a complete submission with high code and writing quality with few mistakes, and no significant errors
- 3 for a complete submission with some mistakes or some unclear writing
- 2 for a complete submission with some mistakes and some unclear writing, or a submission with high code or writing quality, but missing the other
- 1 for a submission missing key components, or with clear inaccuracies in multiple components
- 0 for no submission or a submission unrecognizable as a partial or complete submission
After each assignment is graded, you'll have a chance to resubmit it based on the feedback you received, which will detail what you need to do to increase your score. You can increase your score by up to 2 points on resubmit (e.g. 0 to 2, 1 to 3, 2 to 4, 3 to 4)
This is also the only late policy for assignments. Unsubmitted assignments are initially given a 0, and can get a maximum of 2 points on resubmission.
Exams
Exams will use the testing facility in AP&M B349, which is a computer lab. You will schedule your exam on PrairieTest by logging in with your @ucsd.edu account. You can schedule the exam at a time that's convenient for you in the given exam week, and you will go to that lab and check in for your exam at the time you picked. The exam will be proctored by staff from the Triton Testing Center (not by the course staff from this course). No study aids or devices are allowed to be used in the testing center. You will need only a photo ID and something to write with (scratch paper is available on request).
The Triton Testing Center has shared a document of rules and tips for using the testing center.
The exams will be administered through PrairieLearn; we will give you practice exams and exercises so you can get used to the format we'll use before you take the first one. The exams will have a mix of questions; they will typically include some that involve programming and interacting with a terminal.
There are three exams during the quarter in weeks 3, 6, and 9. On each you'll get a score from 0-4.
We don't have a traditionally-scheduled final exam for this course (you can ignore the block provided in Webreg). Instead, in final exam week, you'll have the opportunity to retake exams from during the quarter to improve your score up to a 4, regardless of the score on the first attempt. The retakes may be different than the original exam, but will test the same learning outcomes. This is also the only make-up option for missed exams during the quarter: if you miss an exam for any reason it will be scored as 0, and you can use one of your retake opportunities on that exam.
Exams during the quarter are all 45m long, the make-up slot is 2h long and gives the opportunity to make up any or all 3 of the in-quarter exams.
Grading
Each component of the course has a minimum achievement level to get an A, B, or C in the course. You must reach that achievement level in all of the categories to get an A, B, or C.
- A achievement:
- ≥30/36 lab points
- ≥16/20 assignment points
- ≥10/12 exam points
- B achievement:
- 26-29 lab points
- 13-15 assignment points
- 8-9 exam points
- C achievement:
- 20-25 lab points
- 10-12 assignment points
- 6-7 exam points
Problem sets: Problem set performance will determine pluses and minuses. We don't publish an exact number for these in advance, but it's consistent across the class.
Some general examples: if you complete all the problem sets completely, correctly, and on time, you'll get a + modifier. If you submit no problem sets on time or don't get any of them done completely or correctly, you will get a - modifier.
Requests to change this grading policy (for a specific student or class-wide) will be denied with a link to this syllabus section. Consider this: we may, as instructors, decide for academic reasons that the most accurate way of assigning letter grades in the class needs to change (and we tend to only make changes that improve letter grades relative to this starting policy). However, it would be inappropriate for us to do so in response to student requests: that could create an appearance that we give students the grades they ask for rather than the grades they earned.
Policies
Individual assignments describe policies specific to the assignment. Some general policies for the course are here.
Assignments and Academic Integrity
You can use code that we provide or that your group develops in lab as part of
your assignment. If you use code that you developed with other students (whether
in lab or outside it), got from Piazza, or got from the internet, say which
students you worked with and a sentence or two about what you did together in
CREDITS.txt. All of the writing in assignments (e.g. in open-ended written
questions) must be your own.
You can use an AI assistant like ChatGPT or Copilot to help you author
assignments in this class. If you do, you are required to include in
CREDITS.txt:
- The prompts you gave to the AI chat, or the context in which you used Copilot autocomplete
- What its output was and how you changed the output after it was produced (if at all)
This helps us all learn how these new, powerful, and little-understood tools work (and don't).
If you don't include a CREDITS.txt and it's clear you included code from
others or from an AI tool, you may lose credit or get a 0 on the assignment, and
repeated or severe violations can be escalated to reports of academic integrity
violations.
Exams and Academic Integrity
Problem sets are the best preparation for the exams. You're free to collaborate with others on preparing for the exam, trying things out beforehand, and so on.
You cannot share details of your exam with others until after you receive your grade for it. You cannot communicate with anyone during the exam.
Problem Sets and Academic Integrity
You can work on problem sets with other students.
Device Policy
To a large degree, you are responsible for managing your time, attention, and learning in lecture, and I hesitate to make policies that attempt to govern or restrict your choices with respect to note taking or device use. However, lecture is a communal space, and your actions can affect others' learning. In particular, what you have on your screen may be unavoidably in the field of view of other students. Because of this, you are responsible for a fragment of the attention of everyone in a cone of space behind you. With this in mind, the policy for lecture is that if you use a device, you must have lecture-related content onscreen. There is even research that shows that the content of screens in the classroom, even quite far away, can have a detrimental affect on learning. If you cannot resist checking social media, playing a game, or doing other off-topic tasks during lecture, sit in the back 2 rows so that you are only having an affect on your own attention, or the attention of others with a similar mindset.
FAQ/AFQ (Anticipated Frequent Questions)
Can I attend a lab section other than the one I'm enrolled in?
No, please do not try to do this. The lab sections have limited seating and are full. We cannot accommodate switching.
How can I switch sections?
You have to drop and re-add (which may involve getting [back on] the waitlist). Sorry.
Can I leave lab early if I'm done or have a conflict?
The labs are designed to not be things you can “finish”. Labs have plenty of extension and exploration activities at the end for you to try out, discuss, and help one another with. Co-located time with other folks learning the same things is precious and what courses are for. Also, if you need an extrinsic motivation, you won't get credit for participation if you don't stay, and participate, the whole time. We can often accommodate one-off exceptions – if you have a particular day where you need to leave early, it's a good idea to be extra-engaged in your participation so your lab leader can give you participation credit before you leave.
Do I have to come to lab?
Yes, see grading above.
What should I do if I'm on the waitlist?
Attend and complete all the work required while waitlisted (this is consistent with CSE policy).
I missed lab, what should I do?
The lab page will have instructions on how to submit the make-up, which can get you 1 (of 4 possible) points.
I missed a problem set deadline, what should I do?
You can submit it late until the end of the quarter. Generally we allow lots (think like 1/3 to 1/2) of the psets to be late without it impacting your grade. They are there to give you focused practice and to prepare you for the exams and the assignments.
I missed an assignment deadline, what should I do?
Some time after each assignment deadline (usually around 2 weeks) there is a late/resubmission deadline. You can resubmit then. See the assignment section above for grading details about resubmissions.
I missed a assignment resubmission deadline, what should I do?
You cannot get an extension on assignment resubmissions; we cannot support multiple late deadlines and still grade all the coursework on time.
I missed my exam time, what should I do?
Stay tuned for announcements about scheduling make-ups in final exam week.
Where is the financial aid survey?
We do this for you; as long as you submit a quiz or do a lab participation in the first two weeks, we will mark you as commencing academic activity.
When are the midterms scheduled?
The midterms will be flexibly scheduled during the quarter using a testing center. More details will come; you will need to set aside some outside-of-class time to do them, but there is not a specific class-wide time you have to put on your calendar.
I have a conflict with the final exam time, what can I do?
The final exam will also be flexibly scheduled during final exam week using the testing center.
Lab 1
September 30, 2025
Fill out the Lab 1 Form
References
Terminal
On the lab machines, you can open a terminal either one of two ways:
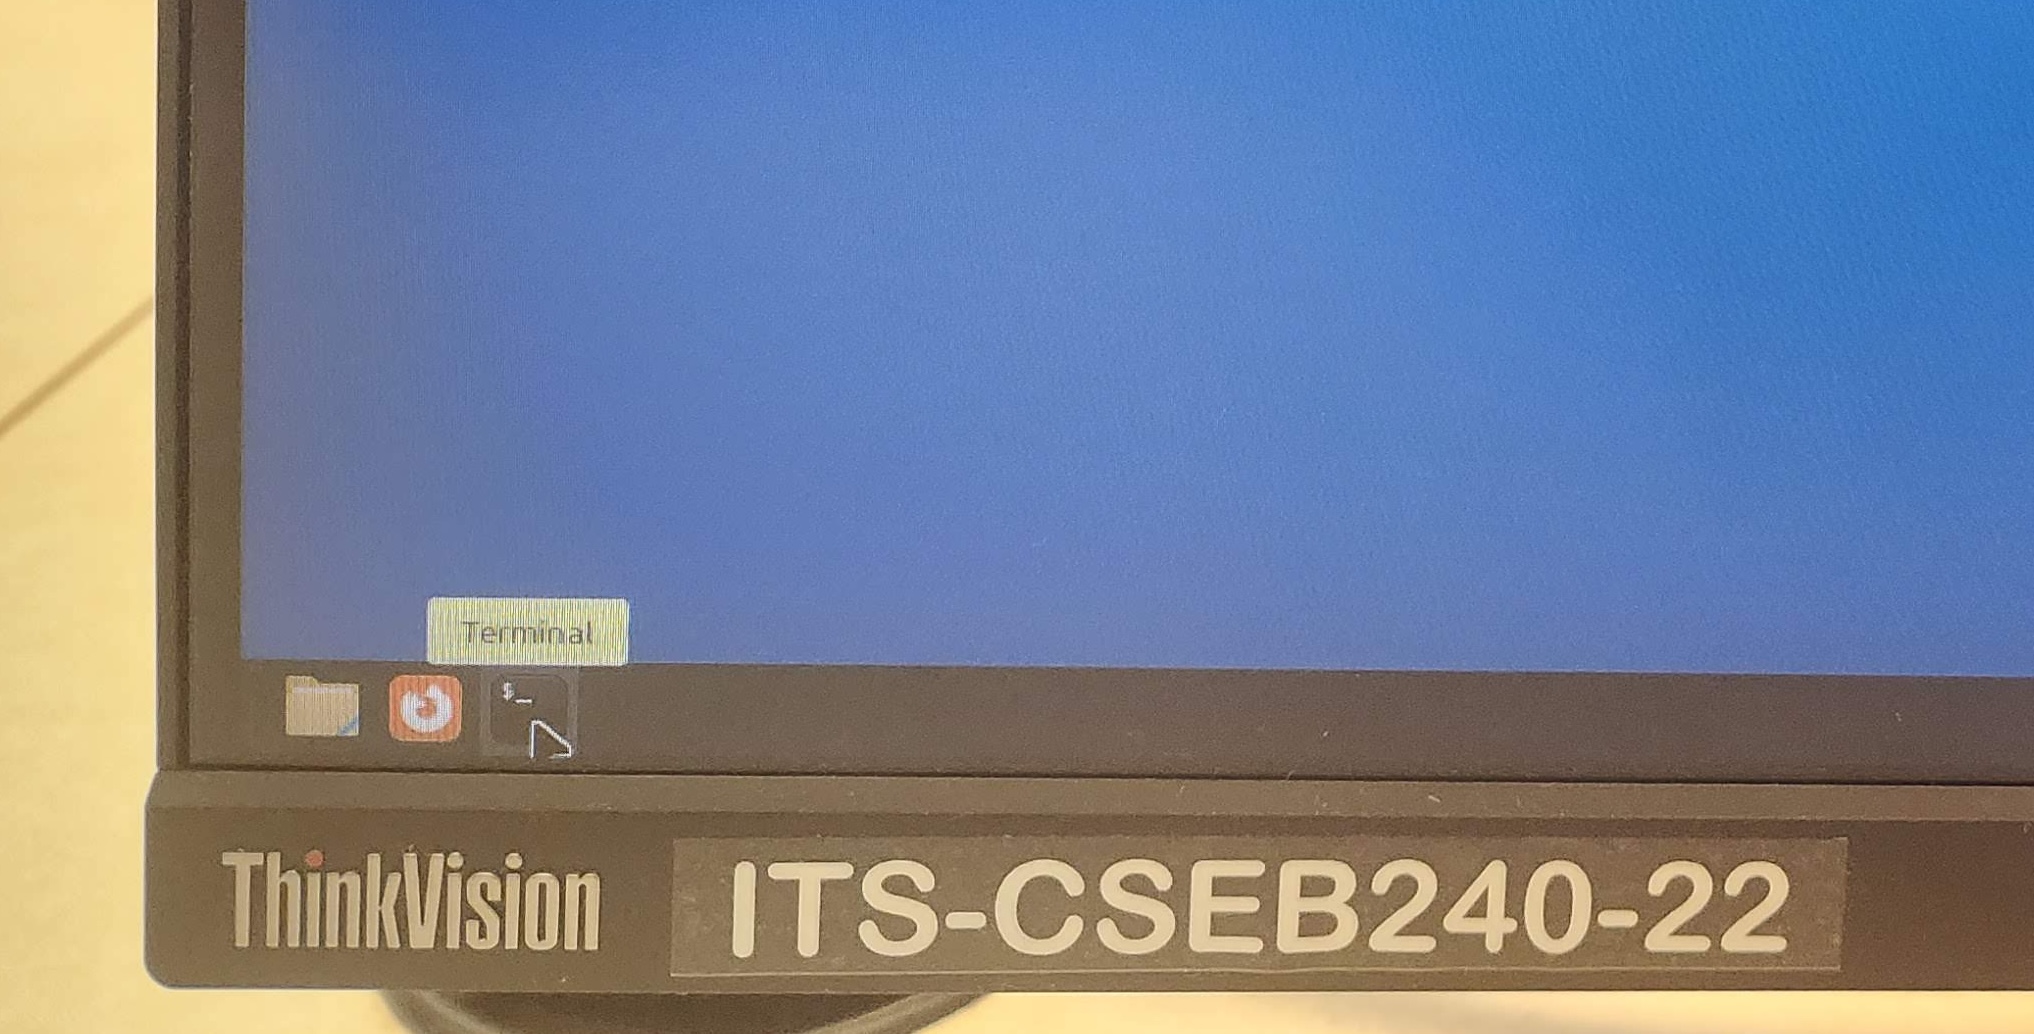
- On the toolbar at the bottom of the screen, there are a few icons on the far right. The last one (shaped like a black rectangle) will open a new terminal.
⠀
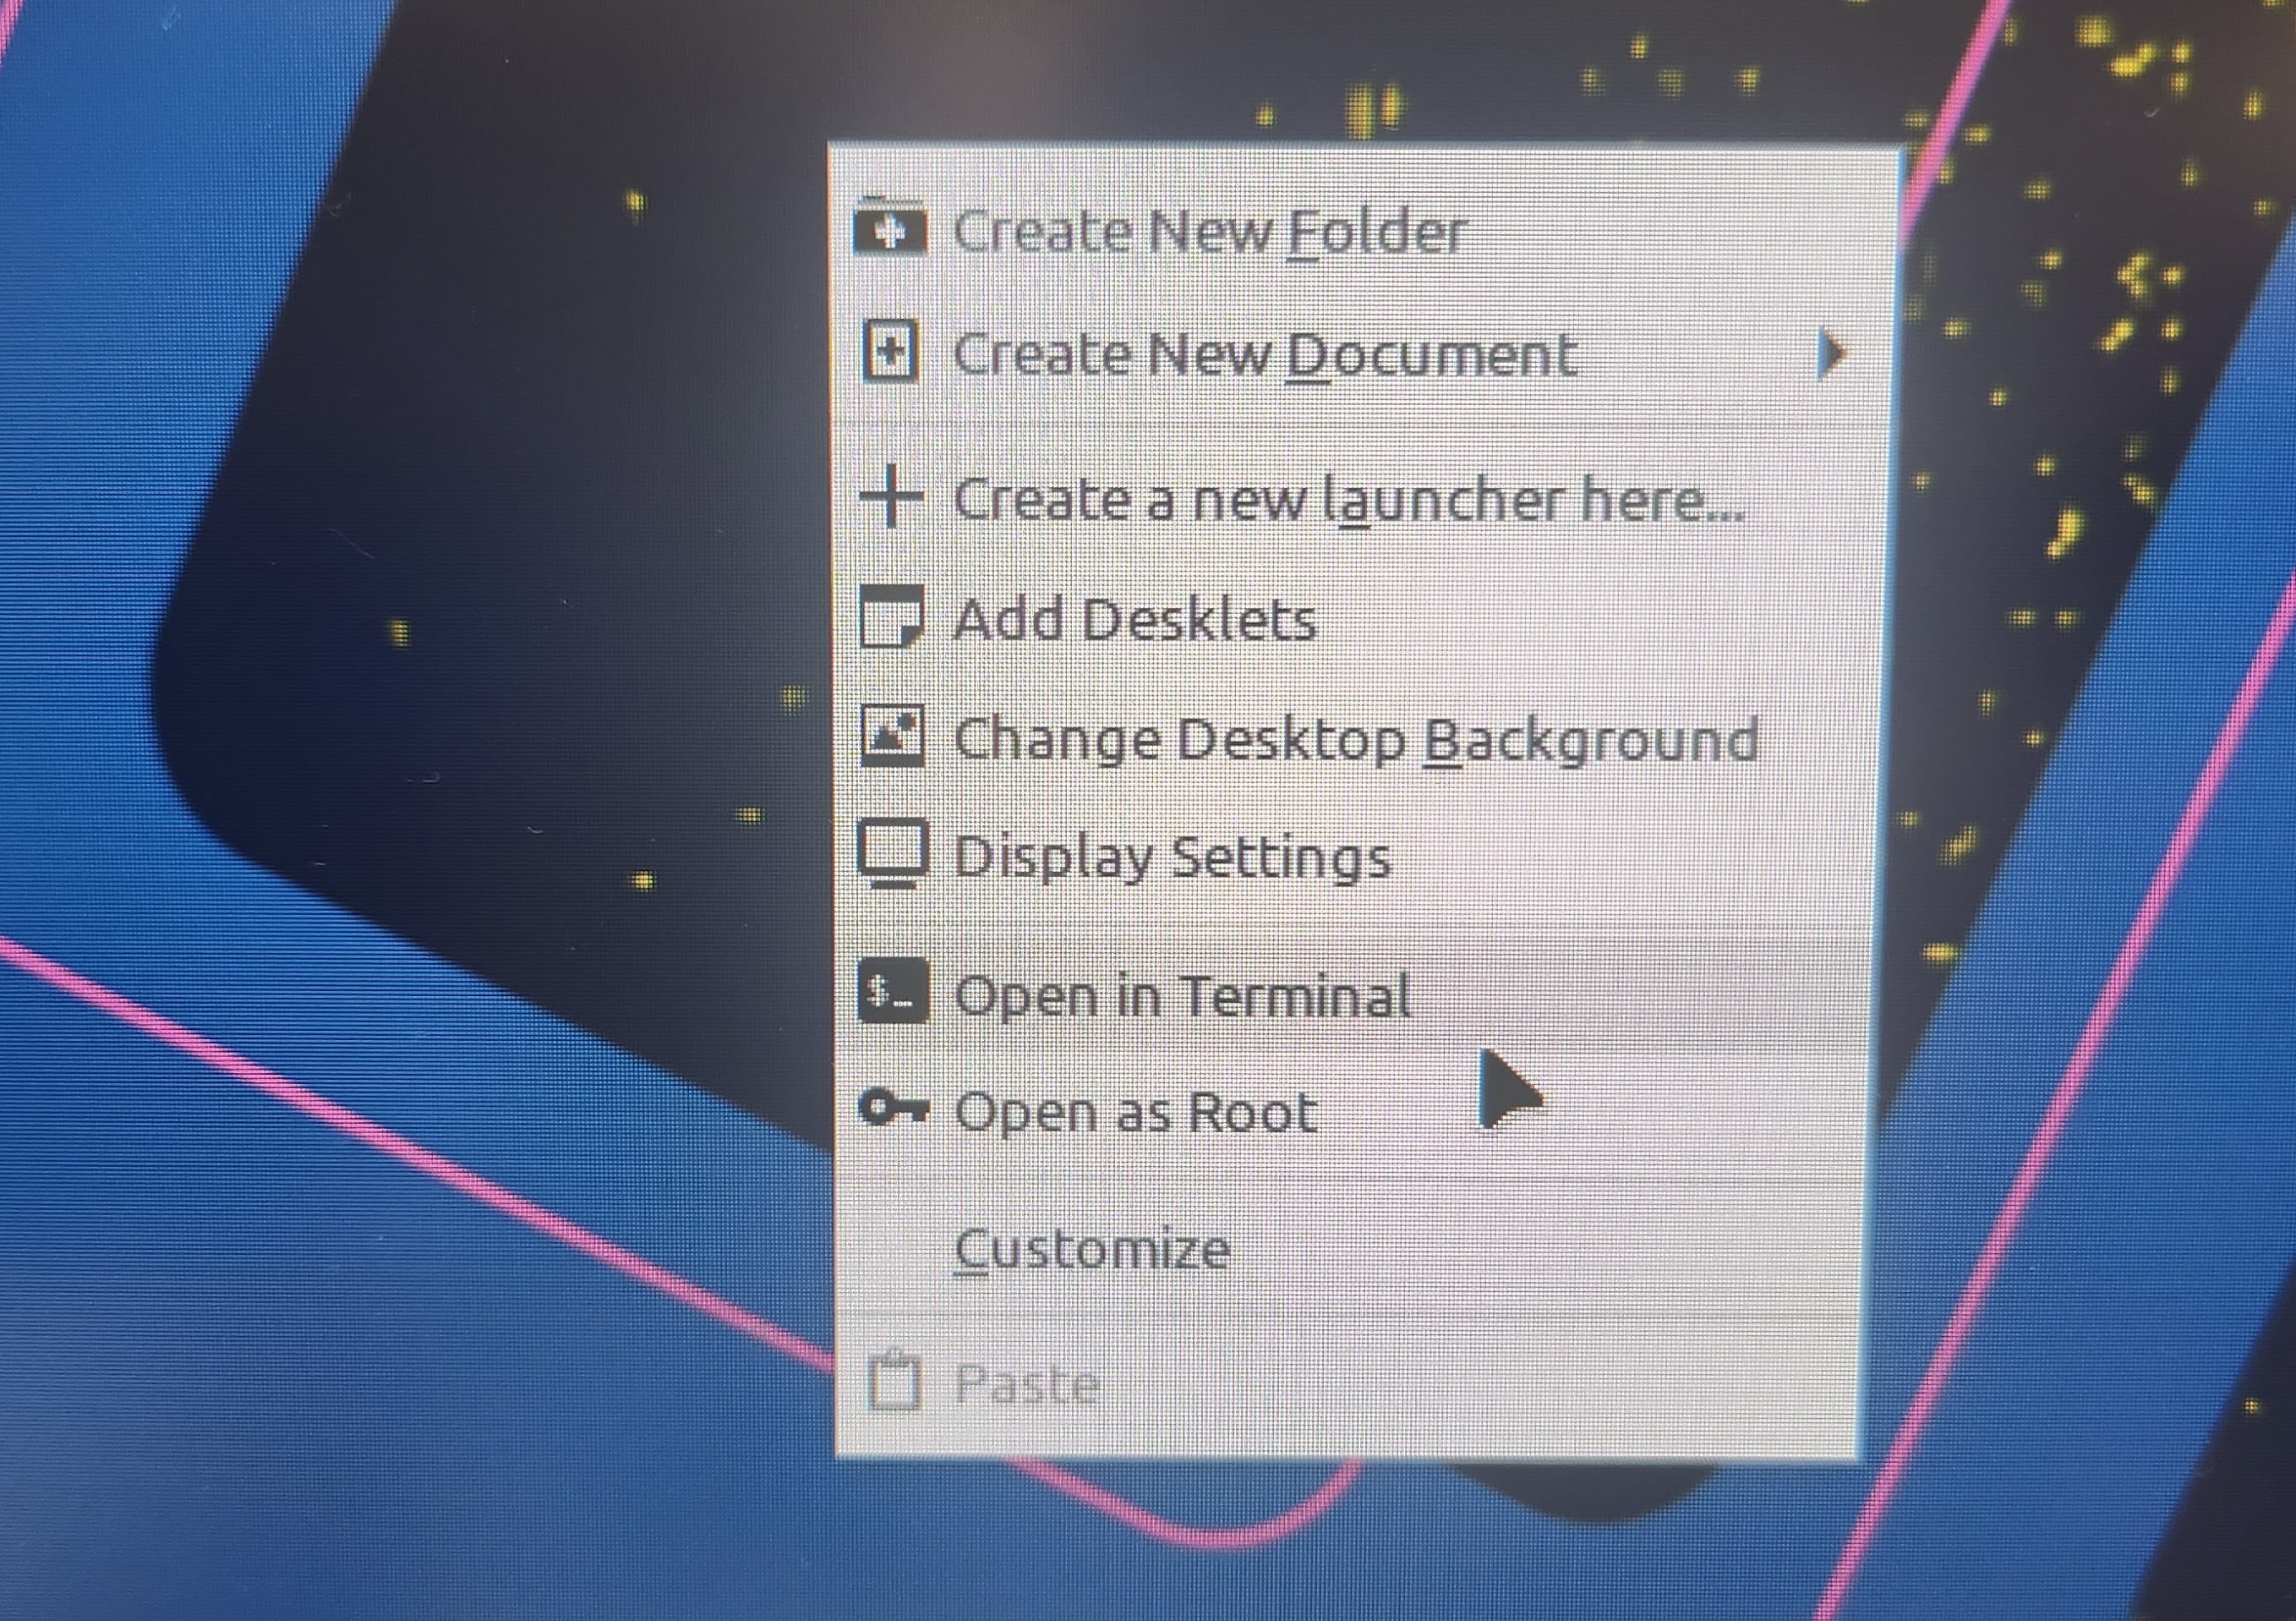
- Right-click on the desktop, and a menu of options will appear. Select the option to create a new terminal.
⠀
The following are some commands you can run in your terminal. To run a command, type it in and press enter.
pwd
Prints the name of the working directory, which is the location in the file system that the terminal is currently in.
whoami
Prints the username of the account you are using on the computer.
uname -a
Prints information about the computer that the terminal is connected to.
cd [directoryname]
Changes to the directory named [directoryname]. The special directory .. takes you up one level.
ls
Prints a list of all the files and directories that are in the working directory.
mkdir [directoryname]
Creates a new directory called [directoryname].
touch [filename]
Creates a new file called [filename].
rm [filename]
Removes the file called [filename].
man [commandname]
Displays a documentation page for the terminal command [commandname].
Logging into ieng6
ssh yourusername@ieng6.ucsd.edu
Your account name is the same account name as the one that’s used for your school Google account, i.e. it is the string that precedes “@ucsd.edu” in your school email address. In case you need to check the status of your student account, refer to the UCSD Student Account Lookup page.
- Your password is the same password that you use for your student account on other websites (i.e. Canvas). The terminal does not show the characters that you type when you enter your password.
- The first time you use this command, you will get a message like this:
⠀$ ssh yourusername@ieng6.ucsd.edu
The authenticity of host 'ieng6.ucsd.edu (128.54.70.227)' can't be established.
RSA key fingerprint is SHA256:ksruYwhnYH+sySHnHAtLUHngrPEyZTDl/1x99wUQcec.
Are you sure you want to continue connecting (yes/no/[fingerprint])?
Copy and paste the one of the corresponding listed public key fingerprints and press enter. 1
- If you see the phrase ED25519 key fingerprint answer with: SHA256:8vAtB6KpnYXm5dYczS0M9sotRVhvD55GYz8EjN1DYgs
- If you see the phrase ECDSA key fingerprint answer with: SHA256:/bQ70BSkHU8AEUqommBUhdAg0M4GaFIHLKq0YQyKvmw
- If you see the phrase RSA key fingerprint answer with: SHA256:npmS8Gk0l+zAXD0nNGUxr7hLeYPn7zzhYWVKxlfNaeQ
Getting the fingerprint from a trusted source is the best thing to do here. You can also just type “yes”, as it's pretty unlikely anything nefarious is going on. If you get this message when you're connecting to a server you connect to often, it could mean someone is trying to listen in on or control the connection. This answer is a decent description of what's going on and how you might calibrate your own risk assessment: Ben Voigt's answer
PrairieLearn
PrairieLearn URL: us.prairielearn.com
Enroll in CSE 29: Systems Programming and Software Tools, Fall 2025 at https://us.prairielearn.com/pl/enroll
Complete parts 1 and 2 of the vimtutor demo. (Run “vimtutor” in the terminal)
Part 1: git motivated
git: command line program that enables version control (in case you break it)
Repository: folder containing code
GitHub: website that holds (repos)itories; can contribute and share with others
Part 2: SSH Keys on GitHub
Command to get the Github People repo
$ git clone git@github.com:Monip1/lab2-people.git
This command should fail. We need to set up SSH Keys on GitHub to fix that!
Setting up SSH Keys on GitHub
Recall from last lab how to log into your ieng6 account:
$ ssh yourusername@ieng6.ucsd.edu
Please log into ieng6. Within your ieng6 account, use the following command to generate a new key pair, replacing github_email with your GitHub email address:
$ ssh-keygen -t rsa -b 4096 -C github_email
You’ll be prompted to “Enter a file in which to save the key”. Press Enter to accept the default location. You’ll then be prompted to enter a passphrase, which isn’t really necessary. Press Enter twice to continue without setting a passphrase. Though if you really want to set a passphrase, refer to GitHub docs on passphrases.
Adding your SSH key to GitHub
By default, the public SSH key is saved to a file at ~/.ssh/id_rsa.pub.
Instead of typing out the whole filename, you can type out some prefix of the name (e.g. ~/.ssh/id), and press Tab to autocomplete the name.
In this case, tab complete won’t complete the full filename, since the private key happens to be named id_rsa.
Please be too lazy to type out entire filenames and use tab complete instead!
View the contents of ~/.ssh/id_rsa.pub (using cat), then copy the contents of the public key file to your clipboard.
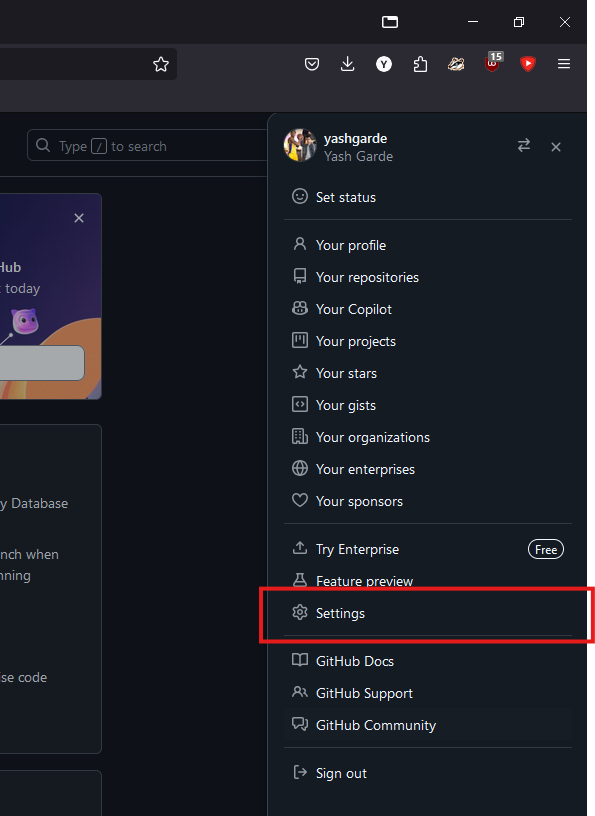
On the GitHub website, click your profile picture in the top right to open a menu, and click on “Settings”.
On the left, open “SSH and GPG keys”, then click on “New SSH key”.
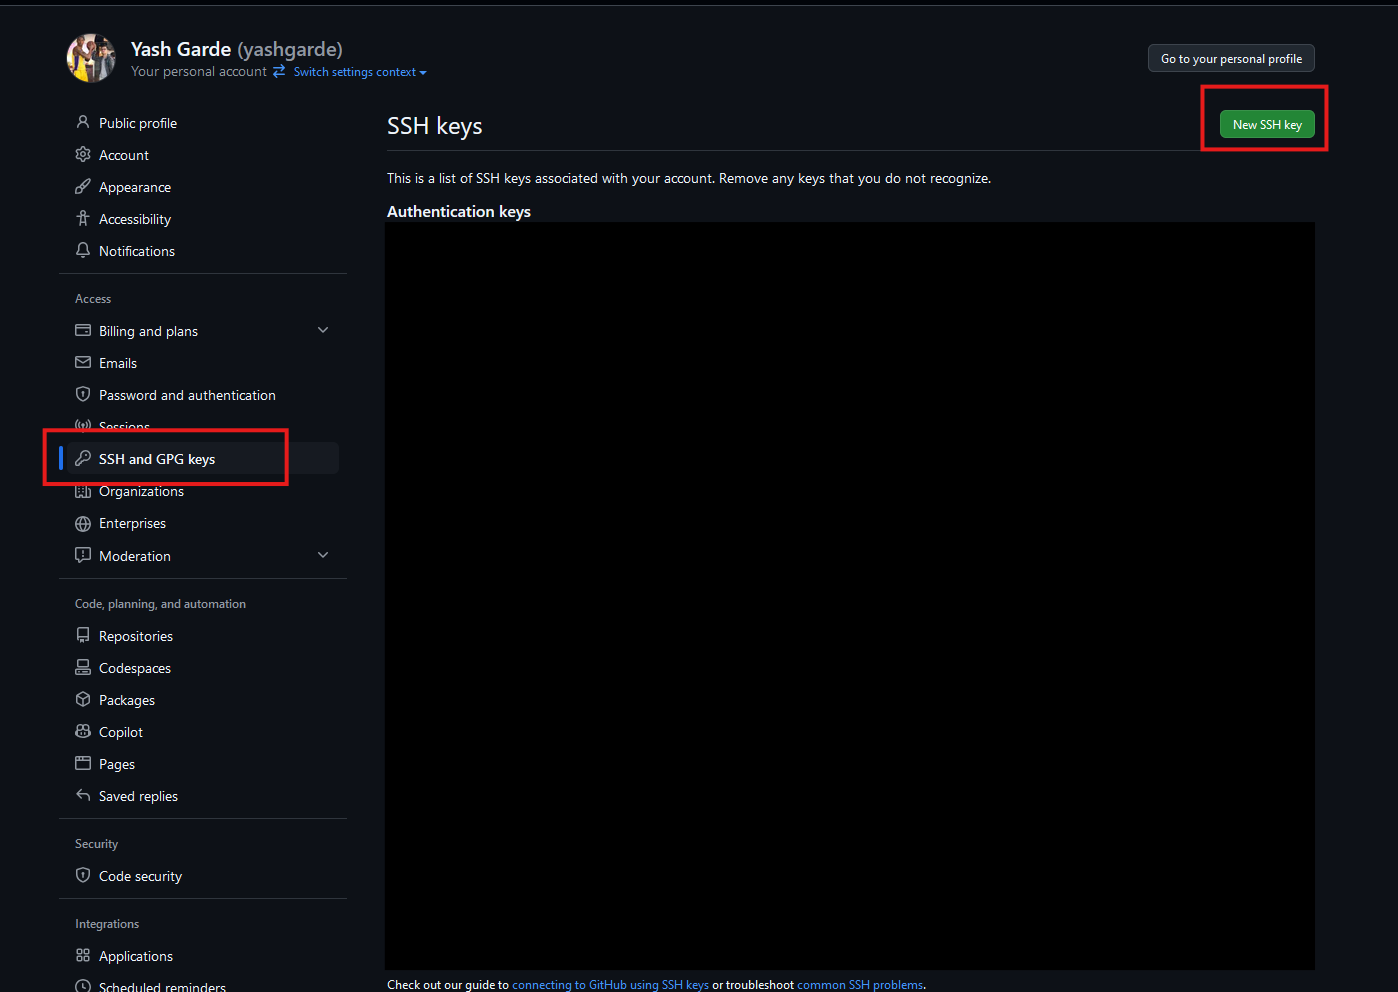
Populate the fields as follows:
- Title: “ieng6”
- The title doesn’t affect the functionality of the key, it’s just a note for you that this key is tied to your ieng6 account.
- Key type: “Authentication key”
- Key: Paste the contents of the public key file here (entire block including the email portion).
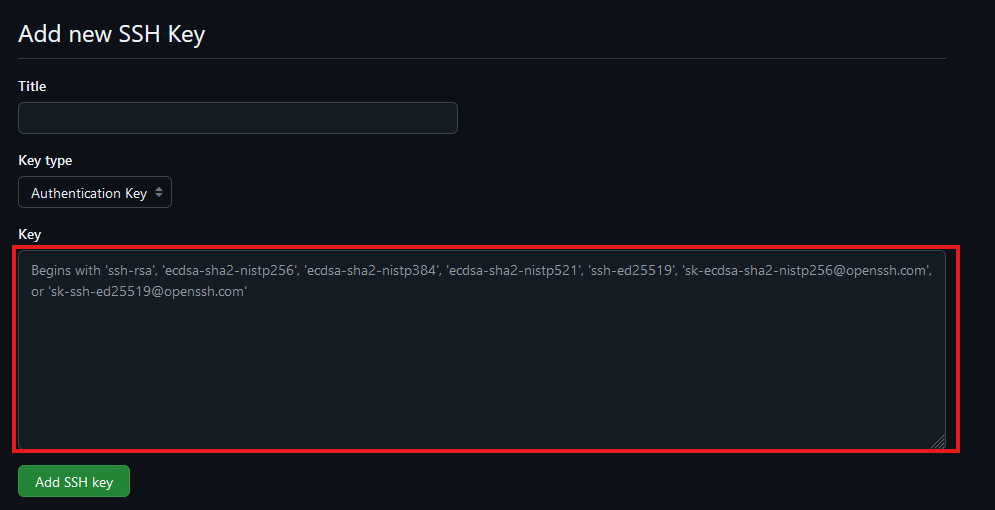
Click “Add SSH key”. You may need to confirm access to your account on GitHub at this point.
Testing your SSH key
Finally, test your connection to GitHub with the command:
$ ssh -T git@github.com
If this is your first time connecting to GitHub, you might get a warning about the “authenticity of host can’t be established”. This is a warning for you to make sure that you’re connecting to the right thing. For the purposes of this lab, we assume that GitHub didn’t suddenly get hacked, so you can safely respond with “yes”. But if you’re really paranoid, you can check GitHub’s public key fingerprint here.
After a successful connection, it should output Hi <your-username>! You've successfully authenticated, but GitHub does not provide shell access.
Command to get the Github People repo (Take 2!)
If you set up the SSH Keys correctly in the previous steps, now you should be able clone the repo:
$ git clone git@github.com:Monip1/lab2-people.git
Part 3: Whiteboard Activity - UTF-8 Strings
- ★彡:)
- ¿Sí?
- ㅋ😂!
- Jé😀
Part 4: Submitting the PA (Lab Work Checkoff)
PA 1 GitHub Classroom Link: https://classroom.github.com/a/pGoD-4Uz
To get the final 1 point for lab work checkoff this week (out of 4 total points), you just need to make a submission on Gradescope for pa1!
Important git commands
$ git status
Gets the status of our repository. It returns which files are untracked (new) modified (changed) and deleted.
$ git add [filename(s)]
When we are done making changes to a file, we "stage" it to mark it as ready to be committed. Using the git add command with the path of the changed file(s) will stage each to be included in the next commit.
$ git commit -m “message”
A commit is a package of associated changes. Running the git commit command will take all of our staged files, and package them into a single commit. We specify the -m option to specify we want to write a commit message, and write our commit message in the “”. Without -m, git opens a vim window to write the commit message.
$ git push
Pushes the commit with our changes to the remote repository (i.e. GitHub).
Part 1: SSH Keys to ieng6
Note: if you have a personal laptop you can set up ssh keys on it to be able to ssh to ieng6. If you're on windows, you’ll need a linux-like terminal, so use the terminal in VSCode, a program like git bash, or WSL for this.
If you don’t have a laptop or it isn’t set up with a linux terminal, work from your lab computer for today. You can set up ssh keys on your laptop at home on your own time.
- Generate a new pair of ssh keys (on your laptop, or on your lab computer)
cdto your.sshdirectory, (if it doesn’t exist, first create it withmkdir ~/.ssh)- IF YOU ALREADY HAVE AN 'id_rsa', SKIP THIS STEP (otherwise you'll overwrite your github keys)
- If you don't have an id_rsa, run:
ssh-keygen -t rsa -b 4096 -C YOUR_EMAIL_ADDRESS- You'll be using the default filename and no password, so just press enter twice
- Copy the contents of your new public key (you can print out the contents with
cat)
- Copy your public key onto ieng6, into the file
~/.ssh/authorized_keys
- On
ieng6, in your.sshdirectory, create a file calledauthorized_keys(or open it if it exists already) - Use
vimto paste in the contents of the new public key into theauthorized_keysfile- (if your
authorized_keysalready existed, paste the new key on a new line at the end)
- (if your
- Log out from
ieng6(useexit), and make sure you can ssh into it without typing your password
Part 2: Debugging with -Wall
Clone the repository we’ll be using for this lab (you’ll need to get the ssh URL). You’ll be working with one of the three programs, depending on your group: https://classroom.github.com/a/X-DdsPq-
Many common errors can be caught by the compiler, but a lot of these checks aren't enabled by default. We can ask the compiler to warn us by adding the -Wall flag ("- W(arn) all") when you compile:
$ gcc -Wall YOUR_CODE.c -o YOUR_CODE
Part 3: Debugging with gdb
Intro to gdb commands:
- To use gdb, make sure you’ve compiled your program with “debug symbols”
$ gcc -g YOUR_CODE.c
- Run your compiled code in gdb
$ gdb YOUR_BINARY
- This puts you into a gdb prompt: normal terminal commands don’t work here, and you can instead run gdb-specific commands
(gdb) run # starts running your program
- If your program stops running or segfaults in gdb, print out the backtrace (also called a “stack trace”)
(gdb) backtrace
or
(gdb) bt
Use the following commands to print out values at the point the program stopped:
(gdb) info locals(gdb) info args(gdb) print VALUE (or p VALUE)- You can print any variable or expression, e.g.
print x,p arr[5],p ((x & 0b1111) << 3)
- You can also specify a format to print in
print/t(binary),print/x(hex),print/d(decimal)
- You can print any variable or expression, e.g.
(gdb) x ADDRESS- This prints out memory at an address, e.g. strings / arrays / pointers
(gdb) x/16cb str1- This prints the first 16 bytes of
str1as characters
- This prints the first 16 bytes of
(gdb) x/20xb str2- This prints 20 bytes of
str2in hex
- This prints 20 bytes of
(gdb) x/4dw arr- This prints 4 “words” (i.e. int32s) of
arr, as decimal numbers
- This prints 4 “words” (i.e. int32s) of
- You can use the following reference card for reference on gdb commands, and format commands for x and print.
If you’re done early, use the reference card to try exploring other gdb commands!
Lab 3 Work Check-Off (due Monday, Oct 20):
In your copy of the lab3-buggy repo: fix the bugs in your assigned program, then commit and push your changes so they show up on GitHub.
Lab 4 Reference Document
Part 1: .vimrc and .bash_profile
In the file ~/.bash_profile on ieng6, add:
alias ls="ls --color"
Create the file ~/.vimrc on ieng6, and copy in:
set tabstop=4
set softtabstop=4
set shiftwidth=4
set autoindent
set number
Part 2: Writing a Search Program
(clone the github classroom repo from here: https://classroom.github.com/a/nzV8A2UB)
For this lab, you'll be testing your program on the "rockyou" password list from your PA2, you can copy it over from this path on ieng6:
/home/linux/ieng6/CSE29_FA25_A00/public/pa2/rockyou_clean.txt
You'll be writing "mysearch.c". Your program should take 1 argument (the string to search for). It should read lines from standard input, and print out all of the input lines that contain the search string.
./mysearch PATTERN
You can use the strstr() function to search for a string within another string.
Part 3: Extra Options
Expand your program to handle extra flags:
./mysearch -n PATTERN : print line numbers before each line
./mysearch -v PATTERN : print only lines that don't contain PATTERN
./mysearch -c PATTERN : don't print pattern matches, just print out the count of matching lines at the end
Each person in your group should implement a different one of these; you'll need all three to do the whiteboard activity.
You can use the strcmp() function to check whether two strings are equal.
Work Check-off
Make sure your program supports at least one of -n, -v, or -c, and commit/push your code.
Make sure you have committed and pushed the code you were working on for your -n, -v, or -c file from the lab activity.
If done early, implement some of the following (in no particular order)
-
Make your program handle all 3 of
-n,-v, and-c. -
Add the option
-i, for case-insensitive search (i.e.search -i patternshould match lines containing "Pattern" or "PATTERN") -
Use ANSI Escape Codes to make your program bold or highlight the matches in every matching line, either always or with a
--coloroption. (more info on Wikipedia) -
Add the option
-Ato print extra context after a match, so e.g.search -A 2 patternwould print an extra 2 lines after every match. -
Add the option
-Bto print extra context before a match (search -B 2 patternwould print an extra 2 lines before every match.) (Note: to be able to do this in C with the tools we've seen so far, you might need to set an upper limit on how many lines back your program will be able to support) -
Make your program handle options more flexibly, e.g. it could:
-
be able to handle multiple options simultaneously
-
accept arguments in any order
-
exit with a help message for unrecognized options (e.g. -f, -o) instead of treating them as search patterns. (Or if you pass it the -h or --help options)
-
if it sees the option "--", treat all following arguments as search patterns, even if they start with a "-". (This is how actual command line programs allow you to search for the string "-n" instead of specifying the "-n" option.)
-
allow long versions of options, e.g.
--invert-match,--line-number,--count, etc
-
Lab 5 Reference Document
Part 1: .vimrc addendum and ssh config
In the file ~/.vimrc on ieng6, add:
set cindent
On Your computer (not ieng6) create the file ~/.ssh/config:
Host <shortcut> <possibly more shortcuts>
    HostName <the host name of the ssh server>
    User <your username on the ssh server>
Part 2: GDB Debugging
New GDB commands
start [ARGUMENTS]
Starts the program with the specified arguments and pauses at the first line of main.
break LINE_NUMBER
Sets a breakpoint at the specified line number. (Breakpoint: a line in the program at which GDB will stop at before the line executes.)
next
Executes to the next line of code.
step
If the next line contains a function call, steps into the first line of the function. Otherwise, behaves the same way as next.
continue
Continues running the program until the next breakpoint.
--

The line that is shown above the (gdb) prompt has not run yet. It is the line that will run if you type next.
Activity
(clone the github classroom repo from here: https://classroom.github.com/a/iSlIHwXP)
Part 3: Hacking
3.1. Background
Imagine that you're a less ethical student than I'm sure you actually are. You overhear from some other students in lab that there's a binary available on the pi-cluster that can show you your grades on assignments before we formally release them. You hear quieter whispers that someone found a way to use it to change their grade. Given our less-than-ethical assumption about your state of mind, you might be tempted to exploit this for yourself.
3.2. The Plot Thickens
You see some code open on the professor's laptop during office hours. You do
your best to commit it to memory and write it down (remember, you're acting
quite unethically in this story), because it strikes you that the code was
something regarding assignment scores.
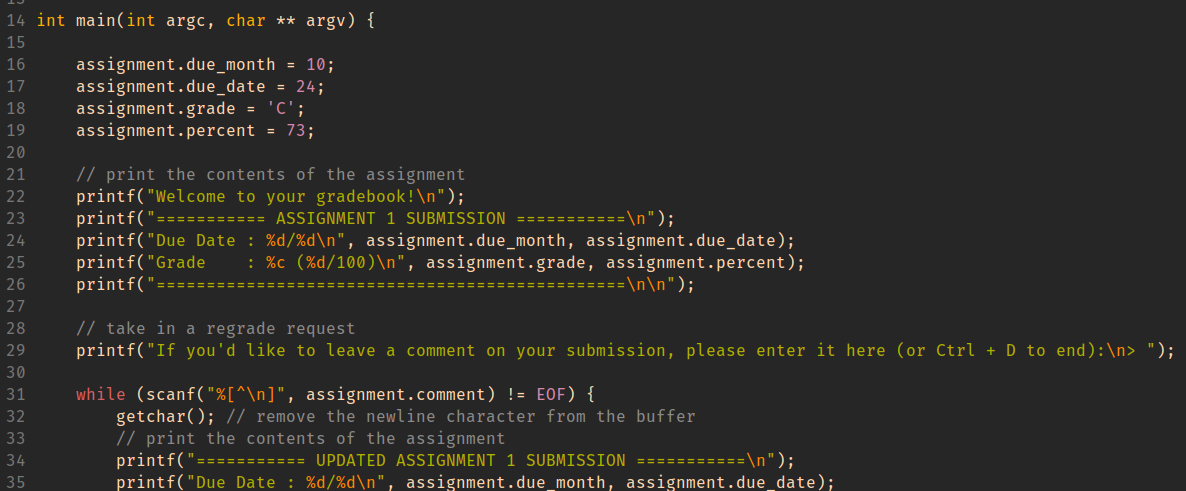
Using this information, you decide to give yourself and A with a score
to match while maintaining a real due date.
HINT
When important values are adjacent on the stack, overflowing an array with
values that you control can let you assign into other stack-allocated values.
GDB commands that may be useful for this activity:
-
(gdb) info locals -
(gdb) info args -
(gdb) print VALUE (or p VALUE)You can print any variable or expression, e.g. -
print x,p arr[5],p ((x & 0b1111) << 3) -
You can also specify a format to print in
-
print/t(binary),print/x(hex),print/d(decimal) -
(gdb) x ADDRESSThis prints out memory at an address, e.g. strings / arrays / pointers -
(gdb) x/16cb str1This prints the first 16 bytes ofstr1as characters -
(gdb) x/20xb str2This prints 20 bytes ofstr2in hex -
(gdb) x/4dw arrThis prints 4 "words" (i.e.int32s) ofarr, as decimal numbers -
You can use the following reference card for reference on gdb commands, and format commands for x and print.
Work Check-off
Push a copy-paste or screenshot of your gdb session from part 2 when investigating index_of_E to the github classroom assignment for this lab.
Lab 6 Reference Document
(clone the GitHub Classroom repo from here: https://classroom.github.com/a/oTFGxPnL)
Part 1: Valgrind
How to Run valgrind
Compile your code, filling in PROGRAM with your actual program name, and ARGS if your program takes any command-line arguments:
$ gcc -Wall -g PROGRAM.c -o PROGRAM
Then, run the Valgrind command:
$ valgrind --leak-check=full ./PROGRAM ARGS
We can add the --leak-check=full flag to instruct Valgrind to report the locations where leaked memory had been allocated.
For search.c, we could search for alp:
$ gcc -Wall -g search.c -o search
$ valgrind --leak-check=full ./search alp < alpaca.txt
For student.c:
$ gcc -Wall -g student.c  -o student
$ valgrind --leak-check=full ./student < students.txt
time command
You can add time to the beginning of a command to report the actual time it takes for that command to run! i.e.
time valgrind ./PROGRAM
Valgrind Memory Errors
Notice how the heap summary gives you information on where each memory error occurs:
- Definitely lost: Besides myself, memory leaks are also considered "definitely lost" when the pointer to the memory becomes inaccessible. This can happen when the pointer is deleted when a function ends and its stack frame is deleted, or when the pointer is set to another value.
- Indirectly lost: Blocks of memory are considered "indirectly lost" when there exists a pointer in another leaked memory to the block. In this case, the memory pointed to by
pp(i.e.*pp) is definitely lost, and the memory pointed to by*pp(i.e.**pp) is indirectly lost. - Possibly lost: "Possibly lost" memory leaks occur when we have a pointer to some part of the leaked memory, but not to the base of the memory block, likely because the pointer was modified. In this case, we allocate an array of integers, then move the pointer to point to the middle of the array.
- Still reachable: Memory leaks are "still reachable" when the pointer is not lost when program exits, but the memory is still unfreed. This can occur when a global variable contains a pointer to leaked memory.
- Suppressed: Users can specify the flag
--suppressions=<filename>to Valgrind to intentionally ignore leaks that are known to be harmless or unavoidable. If you want to learn how to use this flag, you can check out this StackOverflow post, although in our (at least one tutor and at least one TA) experience this flag is seldom used, if at all.
Part 2: Header Guards and Makefiles
Header Guards
#ifndef EXAMPLE_H
#define EXAMPLE_H

struct example {
    char *str;
};

#endif
Header guards prevent the content within them from being processed multiple times by the compiler.
This can be problematic if the header file intends to define any symbol, not just declare them.
In the example above, the header guard ensures that struct example is defined at most once.
Let's illustrate the utility of header guards with a concrete example.
After cloning the Github classroom repository onto ieng6, cd into 2lab6-headers-and-makefiles. Then cd into headers and inspect the contents of the five files inside. These files together represent 3 "modules" with the following dependency graph:

When the compiler reads test.c, its preprocessor will process span.h twice: once through the direct arrow pointing to span.h and once through queries.h, which also points to span.h. As a result, the contents of span.h will be "pasted" into the source file twice. Since span.h contains a struct definition for struct string_span, this definition will be repeated twice. Try the following compilation command to see what this causes:
$ gcc span.c queries.c test.c -Wall -o test
The compiler seems to be confused by the duplicated definition for struct string_span, which is the first error it reports.
To Do: Use what you have learned about header guards to fix this compiler error! Please note that by convention, everything in a header file is wrapped in a header guard.
Makefiles
Part 2-0: Recipes and Dependencies
Exit the headers directory and enter the part2-0 directory. We have given you an example Makefile that illustrates its basic structure. A Makefile mostly consists of "rules", which have the form:
target: dependencies
	recipe
In a lot of ways, you can think of defining rules in Makefiles like defining functions in C, but there are important differences.
- The target could be thought of as the name of the rule. We use the target to tell
makewhich rule should be used. Unlike functions, Makefiles expect targets to be the names of files. - The dependencies are files or other targets that the creation of the target depends on. For C programs, these dependencies are usually source code and object files.
- The recipe contains the commands that are executed when
makeuses this rule. Recipes can have one or more different commands to be executed sequentially.
Use this explanation to understand the contents of the Makefile in part2-0. Try running make with the cse100 target to ask Make to build cse100 along with its dependencies:
$ make cse100
Pretty cool! It might also be useful to clean out and remove any files that got produced if we want to run make again, like all the cse files that we just made in this Makefile. We do that using:
$ make clean
This will remove all the files that start with cse. Now, after running make clean, we can run:
$ make cse30
$ make cse100
See what files get made at each step! Try out the other targets as well, like cse12 and cse29.
Part 2-1: Makefile for One
Exit the part2-0 directory and enter the part2-1 directory, where we are given a single, very simple source code file program.c. You can look at its contents, but there’s nothing there to see (or do).
It’s not necessary to define dependencies, but we often do because Makefile automatically checks if any of its dependencies have changed more recently than the target file. If not (and if the target file already exists), then make does not bother to execute the recipe, because the target file must already be up to date. This means that make will only execute the recipe if the target file doesn’t exist, or one of its dependencies is more recently updated than the target file.
A typical example of a rule for C is the one below:
program: program.c
	gcc -Wall -g -o program program.c
In this rule, the target is program, which is the executable file we want to create with this rule. The recipe is a gcc command to produce program, which you would normally run manually in the terminal. Since we define program.c to be a dependency of this rule, this means that program will only be recompiled if program.c is more recently updated than program.
This rule example just so happens to work perfectly for the Makefile we want to write in this section, so fill in your Makefile with this rule. Please note you should create your Makefile, for example, using the command touch Makefile.
After writing this rule into the Makefile, you can then run make with the target to run the compilation command in the recipe:
$ make program
Notice that make prints out the recipe command, and, if you check the contents of the directory, executes that command to compile program.c. Try running make program again to see that make refuses to recompile program, because it’s already up to date. Then make a small change to program.c, and run make program again to see that it recompiles if program.c is changed.
This Makefile has already greatly simplified our workflow: instead of typing 33 characters to compile the program, you can type just 12 characters instead. But we can do even better! Add the following rule to the top of the Makefile:
default: program
This rule creates the default target with the program target as the sole dependency and no recipe. Since it is the first rule to appear in the Makefile, running make by itself will default to executing it, which in turns executes the "program" rule as needed. Technically, you could rename the target from default to something else, and the behavior of the make command by itself would stay the same.
Running and Cleaning
Although recipes typically contain commands used to create their corresponding target files, recipes can also contain any other commands you could run in the terminal. As such, some other common uses for Makefiles are to run a program and clean up after a program.
For this program, the rule for running program could be defined as:
run: program
	./program
This simple rule depends on the program target, meaning that it will automatically recompile program if necessary, and run the program. In this case, the target is not a file that we expect to compile, just a convenient name that we use to use this rule.
Similarly, we also often define a rule to clean up files that are produced from the build process. This specific example does not produce any, but sometimes it is also desirable to clean up the target file itself in order to recompile without changes to the source code.
clean:
	rm program
In most cases, this will work without issue, but in the rare case that you create a file called “run” or “clean”, the corresponding rule won’t work properly anymore. This occurs because make does not recognize that “run” and “clean” are not supposed to be files. So when a file of that name is created, the standard behavior of make causes our intended functionality of these two rules to fail: make will not use these rules unless that file no longer exists or a dependency updates. If you want to, try making a file called “run” or “clean” to see this happen.
In order to account for this edge case, we can manually define run and clean to be phony targets. A phony target doesn't really refer to a file; rather it is just a recipe to be executed when requested.
.PHONY: run clean
After defining these rules, your Makefile might look something like this:
default: program

program: program.c
	gcc -Wall -g -o program program.c

.PHONY: run clean

run: program
	./program

clean:
	rm program
All the rules (and phony target definition) can be defined in any order, except default must be placed at the top in order to be executed when you run $ make by itself.
Part 2-2: Makefile for Many
In this section, we’ll show multiple valid Makefiles for the programs in the part2-2 directory. As you follow along, pick one and use it to compile all three programs.
When we have multiple programs to be compiled in a single project, we could create a Makefile with rules for each:
default: program1 program2 program3
program1: program1.c
	gcc -Wall -g -o program1 program1.c
program2: program2.c
	gcc -Wall -g -o program2 program2.c
program3: program3.c
	gcc -Wall -g -o program3 program3.c
Notice how much repetition there is between each rule here. In this case, the repetition is just mildly annoying, but if you have more independent programs (like I do when designing lab activities), mildly annoying becomes very annoying! We’ll see how we can reduce repetition in two different ways that we’ll use together to create a very concise and flexible Makefile.
Variables
Like in C programs, you can also define variables in Makefiles. But unlike C programs, where defined variables are allocated in some memory when the program is run, variables in Makefiles just represent some string value. This lets us reduce the amount of repetition when we want to, for example, change the gcc flags to use in all rules. As such, some common values we can define as variables are the compiler command and its flags:
CC = gcc
CFLAGS = -Wall -g

default: program1 program2 program3

program1: program1.c
	$(CC) $(CFLAGS) -o program1 program1.c
program2: program2.c
	$(CC) $(CFLAGS) -o program2 program2.c
program3: program3.c
	$(CC) $(CFLAGS) -o program3 program3.c
The variables CC and CFLAGS are defined with the values gcc and -Wall -g, respectively. Then we use these variables in each of the recipes. Note that there is a special syntax when we use the variables: $(X), where X is the variable name. This syntax tells the Makefile to expand the variable X to use its value, instead of interpreting "X" as a literal string.
Pattern Rules
Each of these three rules have a similar pattern: each one is identical to the others except for a single number that changes. To eliminate this repetition, we can merge these rules into one pattern rule:
CC = gcc
CFLAGS = -Wall -g

default: program1 program2 program3

program%: program%.c
	$(CC) $(CFLAGS) -o $@ $<
A couple of new symbols were introduced in this pattern rule:
-
A target with a "%" character creates a pattern rule. The "%" in the target can match any non-empty string, then for each corresponding match, the "%" has that same value in the dependencies. For example, this rule matches
program1,program2, andprogram3and defines their respective dependenciesprogram1.c,program2.c, andprogram3.c. This will also define dependencies for any valid match to the target:program4depends onprogram4.c,programaaadepends onprogramaaa.c, etc. -
In a pattern rule, we use automatic variables to refer to the target and dependencies, since their exact value is not determined explicitly.
$@is an automatic variable which represents the target of the rule.$<is an automatic variable which represents the first dependency of the rule.
Other useful automatic variables are given here.
If we were really bold (which we are), we could generalize this Makefile further:
CC = gcc
CFLAGS = -Wall -g

default: program1 program2 program3

%: %.c
	$(CC) $(CFLAGS) -o $@ $<
This pattern rule now matches any name (not just names that begin with "program") to be a target, and defines its dependency to be a file with that name plus the ".c" suffix.
In this section, we’ve developed a Makefile to be increasingly more flexible, both in making future changes easier and expanding the scope of valid targets. An important point to make (pun intended?) is that each of these Makefiles is a valid Makefile for compiling the three programs given in this directory, and they have their own pros and cons. For example, a Makefile similar to the last one was used in last week’s lab to easily compile programs with different names, where the compilation process is the same across programs. However, it might be undesirable to enable the programmer to attempt compiling any file ending in “.c”. On the other hand, the first Makefile might be a good fit for a use case where we know we will customize the build process for each program, but this could lead to a very large Makefile.
Part 2-3: Linking Object Files
When we use gcc to manually compile programs, we typically compile directly from the source file to the executable program. But, the build process involves multiple steps with intermediary files. One of these intermediary files are object files, which contain machine code from a particular module (.c and .h combo) and are linked into the eventual executable file. If .class files from Java sound familiar to you, object files are like .class files. To instruct gcc to compile a source file into an object file, we add the -c flag.
 (Credit: Cloudflare)
The linking process resolves symbol references between object files, meaning that functions defined in one file can be used in another. In part2-3, a long program with 50000 adder functions (each of which adds the integer in its name to the parameter and returns it) is given in adders.c. The corresponding header file, adders.h, contains function declarations to be shared between source files. Then, in main.c, we print the return value of run_adders, which calls all of the adder functions and sums their results.

We can use the following gcc commands to create then link the object files (we will run the time command so it will tell us how long each of these commands took to run):
$ time gcc adders.c -o adders.o -c
$ time gcc main.c -o main.o -c
$ time gcc adders.o main.o -o adders
We create adders.o from adders.c, create main.o from main.c, then link the two produce the executable adders. My fingers hurt from all that typing; I wish there was an easier way to MAKE all these files...
CC = gcc
CFLAGS = -Wall -g
TARGET = adders
OBJS = adders.o main.o

default: $(TARGET)

adders.o: adders.c adders.h
	$(CC) $(CFLAGS) -c -o $@ $<

main.o: main.c
	$(CC) $(CFLAGS) -c -o $@ $<

$(TARGET): $(OBJS)
	$(CC) $(CFLAGS) -o $(TARGET) $(OBJS)

run: $(TARGET)
	./$(TARGET)

clean:
	rm $(TARGET) $(OBJS)
Here, we make extensive use of variables for the ultimate target (adders) and its prerequisite object files (adders.o and main.o) so that we can easily use these strings in multiple places, e.g. in both the compile command and in the rm command. Examine this Makefile and feel free to ask your groupmates, tutors, or TA about anything unclear.
Part 2-4: Makefile challenge in headers directory
Let's go back to the headers directory from the Header Guards section and open the Makefile there, which is partially completed. Complete the Makefile according to the requirements listed inside it. Feel free to copy code segments from above. Once you're done, try make to see your Makefile in action!
Lab 6 Work Check-off (Due Monday, November 10)
Commit and push your fix for student.c from the Part 1 Valgrind section to your Github Classroom repo!
Lab 8 Reference Document
Part 1: git good
Partner Activity
Get into groups of 2, and decide who will be Partner 1 and Partner 2.
Partner 1 ONLY:
- Create a new team on the Github Classroom assignment for you and your partner (DO NOT accept until we do this together in class): https://classroom.github.com/a/IcKc8biR
Partner 2 ONLY:
- Join the team that Partner 1 created.
Both:
- Clone the repo to ieng6
- Edit
hello.cto fill in your own name in the print statement
Partner 1 ONLY:
- Commit and push this change
Partner 2 AFTER PARTNER 1 HAS PUSHED:
- Commit and then attempt to push this change
Work together on Partner 2's computer. Resolve the merge conflict so that the program prints Hello [PARTNER 1 NAME] and [PARTNER 2 NAME]!. Commit and push when done.
(Hint: git pull and git config pull.rebase false may be useful)
Once finished:
Repeat starting from step 4 with goodbye.c and switch roles (i.e. Partner 2 commits and pushes first, then Partner 1 tries to push. Resolve conflict on Partner 1's computer)
Part 2: More Terminal Commands
mv [FILE] [PATH]
Move the file [FILE] to the location specified by [PATH].
cp [FILE] [PATH]
Copy the file [FILE] to the location specified by [PATH].
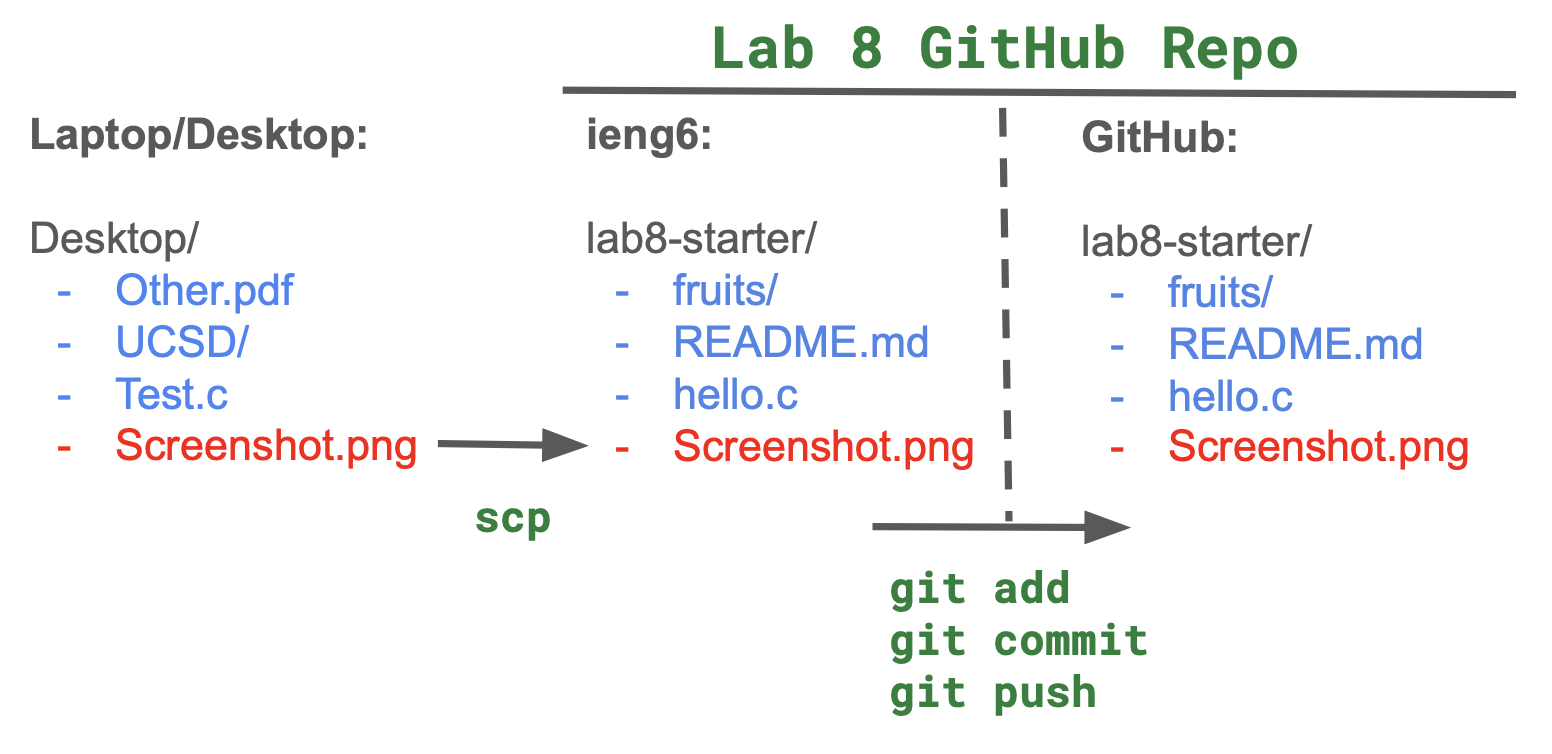
scp [FILE] [PATH]
Copy the file [FILE] to the location specified by [PATH]. [FILE] and [PATH] can both be located on a server. So for example, if you had Screenshot.png in your working directory, you could scp it to the home directory on ieng6 by (also filling in USERNAME with your actual username):
scp Screenshot.png USERNAME@ieng6.ucsd.edu:~/
And then you can move the screenshot to your lab8-starter repo using mv.
Here's the diagram of what that looks like to scp from your laptop/desktop to the repo on ieng6, and then push to GitHub:
Work Check-off
Run git log, which shows the commit history of the repo. Take a screenshot to show that both partners made commits, and push that screenshot to the repo. (Hint: scp) Each partner should push their own screenshot to receive credit for the checkoff.
Lab 9 Reference Document
(Accept and clone the github classroom assignment at this link)
Part 1 - Connecting to the chat server
Run ./chat-client NAME HOST PORT
Connect to the host and port of the chat server being run by your lab TA. Try sending some chats, and reacting to some messages.
Try sending HTTP requests directly by putting the following urls into your browser (after changing the uppercased portions)
- http://ieng6-201.ucsd.edu:PORT/chats
- http://ieng6-201.ucsd.edu:PORT/post?user=NAME&message=MESSAGE
- http://ieng6-201.ucsd.edu:PORT/react?user=NAME&message=MESSAGE&id=ID
You can also make requests from the terminal using curl “URL”
- you may need to put quotes around the url if it contains special characters like = or &
- using the -v option will show extra info like request and response headers.
- Connecting to the special hostname “localhost” will connect to the computer you are currently on, useful for testing your own servers
Part 2: Basic Server
Basic Server
- Modify handle_request in main.c to print incoming requests to the terminal,
- Connect to your and your groupmates server using curl and your browser (does a phone browser work?)
Responses
- Send a response back to whoever made the request by using the send function on the client_socket that was given to you.
send(client_socket, message, size, 0);
You’ll have to first send an appropriate HTTP response header, then send the body of the response.
HTTP/1.1 200 OK
Content-Type: text/plain

... body of response ...
(remember, the ends of lines in HTTP are "\r\n", not just "\n", and there has to be one blank line before the body of the response to mark that the headers have ended)
Some useful string methods
snprintf(buffer, sizeof(buffer), “format string %d”, 5);
like printf, but writes the formatted string to buffer, useful for formatting responses before you send them
sscanf(str, “number=%d”, &x);
uses similar format strings to printf, but can parse numbers out of a string like “number=12”.
strstr(s, substr)
find substring in a larger string
Part 3 - Number Server
Add a global variable int num to your server.
Make your server handle the following paths: (You can also make the responses fancier if you like)
-
/shownum
- responds with the current value of num.
-
/increment
- adds one to num, responds with the new value of num.
-
/add?value=NNN- adds value encoded in NNN (a decimal integer) to num responds with the new value of num
Work Check-Off
Commit and push your number server
Bonus
If you’re done early, you can use curl to add custom headers to your http request with curl -H “SomeHeader: SomeValue” ... . Modify your number server to detect the custom header “SetNumber: NN” and set the number accordingly. (NOTE: this isn’t a defined HTTP header, but it should work fine for this lab)
Lab 10 Reference Document
Room 1: B240 will be the activities room. Activities include but may not be limited to:
Scripting and Pokemon mailtime – learn how to bash script and use Unix Mail to send each other pokemon, and how to add pokemon to your ieng6 sign in process
Staff AM(Almost)A – you may ask staff members questions about cse29, UCSD, and more
Room 2: B250 will be the preparations room. Activities include:
Going over old exam or pset problems to prepare for the makeup exam
Reviewing PA5 or PA4 resubmission topics
Room 1
Pokemon and scripting.
There is a lab which has been taught many times in this class which involves bash scripting and pokemon. Specifically, it focuses on how to make bash scripts and ends with using a fancy bash script from the internet that prints out pokemon.
The starter code for this lab can be found in the github classroom here
This lab can be found here.
If you would just like the pokemon part of the lab:
Pokemon
If you would like a list of pokemon for reference: here.
Staff AM(Almost)A
If you would like to ask us questions, please fill out this form:
Staff AMA Form
Room 2
Work on PAs / Exam prep
Free time to work on your PAs or prepping for the final exams. If you would like to go over any problems from past exams or problem sets, we can go over them like in discussion. If you have any questions about PA5 or the PA4 resubmit, we can go over that as well.
You've got Mail!
The mail command, unlike other commands we’ve taught you in this lab and previous ones, is especially unique: literally no one* uses this! As such, this section is not relevant to any course material. But the idea of sending each other mail via the terminal, all 1970s-core, is too appealing to pass up on.
*By "literally no one", I mean "literally no one, except for at least one person at this university", so I've been told.
Throughout this section, we’ll use myname and friendname to refer to your and your partner’s UCSD username, respectively. This is the username you use for your UCSD email, and the one you use to log into ieng6.
In order for mail to work, you and whoever you are mailing to must be on the same cluster on ieng6. You do not need to know what a cluster is, but you do need to know how to SSH into a specific one on ieng6. If each line of your command prompt starts with this:
[myname@ieng6-640]:~:500$
Then ieng6-640 is the cluster you are logged into. In order to SSH into a specific cluster, exit out of your current SSH session, and in your local machine terminal, type:
$ ssh myname@ieng6-640.ucsd.edu
And enter your password as usual. Make sure both you and your partner are on cluster 640.
In the following instructions, you will use the
ieng6-2xxservers. Please make sure to log out ofieng6and then sign intoieng6-640.ucsd.edu! This specific cluster runs an older operating system that still has the
Once you and your partner are in the same cluster, try using the mail command to begin composing an e-mail (electronic mail). Either command below works:
$ mail friendname@ieng6-640.ucsd.edu
$ mail friendname@ieng6-640
This will prompt you with Subject: so you can type your email’s subject. The subject is only one line of test, so when you press Enter you are now typing the contents of your mail. When done writing your message, press Ctrl+D to finish and send.
Now, your partner can use the mail command by itself to see that they have received mail! It will have a number next to it as it enumerates messages every time you open the mail shell. Type this number and press Enter to see the message.
Now that you have mail and therefore can enter the mail shell, you can type ? to get a list of commands that you can use.
type <message list>          type messages
next                         goto and type next message
from <message list>          give head lines of messages
headers                      print out active message headers
delete <message list>        delete messages
undelete <message list>      undelete messages
save <message list> folder   append messages to folder and mark as saved
copy <message list> folder   append messages to folder without marking them
write <message list> file    append message texts to file, save attachments
preserve <message list>      keep incoming messages in mailbox even if saved
Reply <message list>         reply to message senders
reply <message list>         reply to message senders and all recipients
mail addresses               mail to specific recipients
file folder                  change to another folder
quit                         quit and apply changes to folder
xit                          quit and discard changes made to folder
!                            shell escape
cd <directory>               chdir to directory or home if none given
list                         list names of all available commands

A <message list> consists of integers, ranges of same, or other criteria
separated by spaces.  If omitted, Mail uses the last message typed.
Note that when the help dialog says "folder", this is a bit of a misnomer. The "folder" is actually the filename that the command will use. For the save and copy commands, you can give it a valid path to a file and it will save or copy the contents of the email into the file. The path is relative to wherever you opened the mail shell.
You will likely not need to use all of these commands but at least a few are worth noting:
type <message list>can be used to print out the contents of selected messages. For example,type 3 4prints out the contents of messages 3 and 4.headerswill print out the list of enumerated messages along with their senders, subjects, and statuses.- You can respond to a message with
Reply <message list>, which will open a response to the message to type in a reply. Again, you can finish and send withCtrl+D. For example,Reply 5opens a response to message 5.
There also exists another method to send mail from outside the mail shell, using the pipe operator we learned earlier. This command also makes use of the echo command, which outputs its argument to stdout. Sounds redundant, but it’s intended to be used in this way to input strings into other commands, or to be used as print statements in bash scripts.
$ echo "email body here" | mail -s "subject here" friendname@ieng6-640.ucsd.edu
Trading Pokemon
We can also use email to send attachments in the form of files. In this section, we’ll trade Pokemon with each other via mail. We will use the pokeget.sh script provided in your lab starter code for fun to generate some files with Pokemon in them. First, let one person be the sender, and the other will be the receiver. After you can successfully send and receive Pokemon from one to the other, swap roles and try sending one the other way.
Sender
Use the below command to generate a ".pk" file with the name of the Pokemon you picked. For example, if you picked Pikachu, #25, you would call this file pikachu.pk. Alternatively, if you want the receiver to not know what the Pokemon is until they open the file, you can call it mystery.pk. Feel free to replace 25 with the National Dex number of any Pokemon.
./pokeget.sh 25 > pikachu.pk
If the
pokeget.shscript seems to take more than a few seconds to finish running, try usingCtrl+Cto interrupt the program and try running the same command again.
Once you have a ".pk" file, use the following command to send it to your partner, using the -a option. Replace "pikachu.pk" with the name of your Pokemon file if it is different.
$ echo "email body here" | mail -s "subject here" -a pikachu.pk friendname@ieng6-640.ucsd.edu
Receiver
Open up your mail shell with the mail command. You should have a new email if the sender did their job properly. Type the following command to save the email you received as a file, with n replaced by the ID number of the email. Note that the "&" is the prompt, and does not need to be typed, just like "$" in the terminal.
& save n pokemon.mail
Extracting the attachment in a readable form from the email itself is quite involved, so please use the provided script to get your Pokemon:
./extract_pokemon.sh pokemon.mail > pokemon.pk
cat pokemon.pk
If you get an error running
extract_pokemon.shthat mentions something about a bad interpreter, this is likely because the file hasn't been formatted for unix correctly yet. Runsed -i 's/\r$//' extract_pokemon.shto reformat the file and try again.
If everything went well, you should get the Pokemon your partner sent you! Have a bit of fun with this and send each other some cool Pokemon.
Adding Pokemon to .bash_profile
If you would like your Pokemon to appear when you open ieng6, you may do the following.
If you would like 1 Pokemon, add the line cat ./path/to/pokemon.pk (replace the path with the entire path to your Pokemon file, starting with ~) to the end of the .bash_profile file in your home directory.
If you would like 2 Pokemon, add the line paste ./path/to/pokemon/bigPoke.pk ./path/to/pokemon/smallPoke.pk (replace the path with the actual path to your Pokemon file) to the end of the .bash_profile file in your home directory. Note that if you paste the smaller Pokemon first, the larger one will be cut in half. You are welcome to try to troubleshoot this.
If you want to do the same thing on your own computer, you can add this same line to your .bash_profile or .bashrc file. Just make sure to download the referenced .pk files using pokeget.sh and edit the paths as needed!
PA1 - UTF-8:
Due Date: Thursday 10/9 at 11:59pm
Looking for resubmission? Click here
UTF-8
Representing text is straightforward using ASCII: one byte per character fits well within char[] and it represents most English text. However, there are many more than 256 characters in the text we use, from non-Latin alphabets (Cyrillic, Arabic, and Chinese character sets, etc.) to emojis and other symbols like €, to accented characters like é and ü.
The UTF-8 encoding is the default encoding of text in the majority of software today. If you've opened a web page, read a text message, or sent an email in the past 15 years that had any special characters, the text was probably UTF-8 encoded.
Not all software handles UTF-8 correctly! For example, Joe got a marketing email recently with a header “Take your notes further with Connect​” We're guessing that was supposed to be an ellipsis (…), UTF-8 encoded as the three bytes 0x11100010 0x10000000 0x10100110, and likely the software used to author the email mishandled the encoding and treated it as three extended ASCII characters.
This can cause serious problems for real people. For example, people with accented letters in their names can run into issues with sign-in forms (check out Twitter/X account @yournameisvalid for some examples). People with names best written in an alphabet other than Latin can have their names mangled in official documents, and need to have a "Latinized" version of their name for business in the US. Joe had trouble writing lecture notes because LaTeX does not support UTF-8 by default.
UTF-8 bugs can and do cause security vulnerabities in products we use every day. A simple search for UTF-8 in the CVE database of security vulnerabilities turns up hundreds of results.
It's useful to get some experience with UTF-8 so you understand how it's supposed to work and can recognize when it doesn't. To that end, you'll write several functions that work with UTF-8 encoded text, and use them to analyze some example texts.
Getting Started
You can do your programming however you like; using vim on ieng6 will give you good
practice for labs, exams, and problem sets, but you are not required to use any
particular environment (we'd have no way to check anyway).
To get started, follow the instructions in lab 2 and create a GitHub Classroom assignment.
UTF-8 Analyzer
You'll write a program that reads UTF-8 input and prints out some information about it.
Here's what the output of a sample run of your program should look like:
$ ./utf8analyzer
Enter a UTF-8 encoded string: My 🐩’s name is Erdős.
Valid ASCII: false
Uppercased ASCII: MY 🐩’S NAME IS ERDőS.
Length in bytes: 27
Number of code points: 21
Bytes per code point: 1 1 1 4 3 1 1 1 1 1 1 1 1 1 1 1 1 1 2 1 1
Substring of the first 6 code points: My 🐩’s
Code points as decimal numbers: 77 121 32 128041 8217 115 32 110 97 109 101 32 105 115 32 69 114 100 337 115 46
Animal emojis: 🐩
You can also test the contents of files by using the < operator:
$ cat utf8test.txt
My 🐩’s name is Erdős.
$ ./utf8analyzer < utf8test.txt
Enter a UTF-8 encoded string:
Valid ASCII: false
Uppercased ASCII: MY 🐩’S NAME IS ERDőS.
Length in bytes: 27
Number of code points: 21
Bytes per code point: 1 1 1 4 3 1 1 1 1 1 1 1 1 1 1 1 1 1 2 1 1
Substring of the first 6 code points: My 🐩’s
Code points as decimal numbers: 77 121 32 128041 8217 115 32 110 97 109 101 32 105 115 32 69 114 100 337 115 46
Animal emojis: 🐩
Using the Problem Set for your PA
Most of the needed functionality for the PA is in the problem set problems! So part of your workflow for this PA should be to move code over from the appropriate part of your problem set and into your PA code.
A good first task is to move over only is_ascii, and then write the
corresponding part of main needed to read input and print the result for
is_ascii, and make sure you can test that. Then move onto capitalize_ascii,
and so on.
You can and should save your work by using git commits (if you're comfortable
with that), or even just saving copies of your .c file when you hit important
milestones. We may ask to see your work from an earlier milestone if you ask us
for help on a function from a later one.
Here we give some hints about how specific problem set problems correspond to specific lines of output.
-
Valid ASCII:– HW1.15. is_ascii -
Uppercased ASCII:– HW1.13. capitalize_asciiHere it is important to avoid changing the string that's going to be used for the rest of the printing!
-
Length in bytes:– Are there any built-instring.hfunctions that can help? -
Number of code points:– HW1.17. Count UTF-8 String Length -
Bytes per code point:– HW1.16. UTF8 Codepoint SizeHere it could be useful to use the function from the problem set inside a loop!
-
Substring of the first 6 code points:– HW1.18. utf8_substring -
Code points as decimal numbers:– HW1.5. Find UTF-8 Codepoint at IndexAnother use of a loop with a problem set problem!
-
Animal emojis:– HW1.19. is_animal_emoji_atAnother use of a loop, maybe also combined with some conditionals!
Testing
We provide 3 basic tests in the tests folder - which contain simple tests identifying valid ASCII and converting ASCII lowercase to uppercase characters.
You can see the result for a single test by using:
./utf8analyzer < test-file
Here are some other ideas for tests you should write. They aren't necessarily comprehensive (you should design your own!) but they should get you started. For each of these kinds of strings, you should check how UTF-8 analyzer handles them:
- Strings with a single UTF-8 character that is 1, 2, 3, 4 bytes
- Strings with two UTF-8 characters in all combinations of 1/2/3/4 bytes. (e.g.
"aa","aá","áa","áá", and so on) - Strings with and without animal emojii, including at the beginning, middle, and end of the string, and at the beginning, middle, and end of the range
- Strings of exactly 5 characters
We recommend saving your input in files and using redirection to test so you don't have to figure out how to type the same UTF8 characters over and over.
PA Design Questions
You will answer the following questions in your DESIGN.md file.
Answer each of these with a few sentences or paragraphs; don't write a whole essay, but use good writing practice to communicate the essence of the idea. A good response doesn't need to be long, but it needs to have attention to detail and be clear. Examples help!
-
Another encoding of Unicode is UTF-32, which encodes all Unicode code points in 4 bytes. For things like ASCII, the leading 3 bytes are all 0's. What are some tradeoffs between UTF-32 and UTF-8?
-
UTF-8 has a leading
10on all the bytes past the first for multi-byte code points. This seems wasteful – if the encoding for 3 bytes were instead1110XXXX XXXXXXXX XXXXXXXX(whereXcan be any bit), that would fit 20 bits, which is over a million code points worth of space, removing the need for a 4-byte encoding. What are some tradeoffs or reasons the leading10might be useful? Can you think of anything that could go wrong with some programs if the encoding didn't include this restriction on multi-byte code points?
Resources and Policy
Refer to the policies on assignments for working with others or appropriate use of tools like ChatGPT or Github Copilot.
You can use any code from class, lab, or discussion in your work.
What to Hand In
- Any
.cfiles you wrote (can be one file or many; it's totally reasonable to only have one). We will rungcc *.c -o utf8analyzerto compile your code, so you should make sure it works when we do that. - A file
DESIGN.md(with exactly that name) containing the answers to the design questions - Your tests are in files
tests/*.txt
Hand in to the pa1 assignment on Gradescope. You can either submit a link to your GitHub Classroom Repository or upload
the files from your computer.
The submission system will show you the output of compiling and running your program on the test input described above to make sure the baseline format of your submission works. You will not get feedback about your overall grade before the deadline.
PA1 Resubmission: Due Date 10/23 at 11:59pm
If you want to resubmit PA1, please read this section carefully. You need to pass all the tests in the original PA1, while also implementing an extra function described below.
void next_utf8_char(char str[], int32_t cpi, char result[])
Takes a UTF-8 encoded string and a codepoint index. Calculates the codepoint at that index. Then, calculates the code point with value one higher (so e.g. for ”é“ U+00E9 that would be “ê” (U+00EA), and for “🐩” (U+1F429) that would be “🐪” (U+1F42A)). Saves the encoding of that code point in the result array starting at index 0.
Example Usage:
char str[] = "Joséph";
char result[100];
int32_t idx = 3;
next_utf8_char(str, idx, result);
printf("Next Character of Codepoint at Index 3: %s\n",result);
// 'é' is the 4th codepoint represented by the bytes 0xC3 0xA9
// 'ê' in UTF-8 hex bytes is represented as 0xC3 0xAA

=== Output ===
Next Character of Codepoint at Index 3: ê
Now, Your final output on running the utfanalyzer code that will be graded should contain this extra line:
Next Character of Codepoint at Index 3: FILL
Note: If the number of codepoints in the input string is less than 4, this added line would only have the prompt without any character as follows:
Next Character of Codepoint at Index 3:
The complete program output for example, should look like:
$ ./utf8analyzer
Enter a UTF-8 encoded string: My 🐩’s name is Erdős.
Valid ASCII: false
Uppercased ASCII: "MY 🐩’S NAME IS ERDőS."
Length in bytes: 27
Number of code points: 21
Bytes per code point: 1 1 1 4 3 1 1 1 1 1 1 1 1 1 1 1 1 1 2 1 1
Substring of the first 6 code points: "My 🐩’s"
Code points as decimal numbers: 77 121 32 128041 8217 115 32 110 97 109 101 32 105 115 32 69 114 100 337 115 46
Animal emojis: 🐩
Next Character of Codepoint at Index 3: 🐪
(All our tests will check for this newly added line, in addition to lines from the original PA)
You will also need to answer the following updated DESIGN question in your resubmission
Consider the 3-byte sequence 11100000 10000000 10100001. Answer the following questions:
- What code point does it encode in UTF-8, and what character is that?
- What are the three other ways to encode that character?
- Give an example of a character that has exactly three encodings (but not four, like the one in the previous example does)
- What are some problems with having these multiple encodings, especially for ASCII characters? A web search for “overlong UTF-8 encoding” may be useful here.
PA2 - Hashing and Passwords: Due 10/23 at 11:59pm - Github Classroom Link
Looking for resubmission? Click here
Cryptographic hash functions take an input of arbitrary length and produces a fixed length output. The special features are that the outputs are deterministic (the same input always generates the same output) and yet the outputs are apparently “random” – two similar inputs are likely to produce very different outputs, and it's difficult to determine the input by looking at the ouput.
A common application of hashing is in storing passwords. Many systems store only the hash of a user's password along with their username. This ensures that even if someone gains access to the stored data, users' actual passwords are not exposed. When a user types in a password on such a system, the password handling software grants access if the hash value generated from the user's entry matches the hash stored in the password database.
We said above that it is difficult to determine an input given an output. Password cracking is a family of techniques for accomplishing this difficult (but possible!) task. That is, let's say we have access to a user's password hash only. Can we figure out their password? We could then use it to log in, and it may also be shared across their accounts which we could also access.
In some cases, password cracking can exploit the structure of a hash function; this is a topic for a cryptography class. In our case, we will take a more brute-force approach: trying variations on existing known passwords, under the assumption that many passwords are easy to guess.
Getting Started
To get started, visit the Github Classroom assignment link. Select your username from the list (or if you don't see it, you can skip and use your Github username). A repository will be created for you to use for your work. This PA should be completed on the ieng6 server. Refer this section in Week 1's Lab for instructions on logging in to your account on ieng6 and working with files on the server.
Note - The autograder uses the C11 standard of the C programming language.
Overall Task
We'll start by describing the overall task and goal so it's clear where you're going. However, don't start by trying to implement this exactly – use the milestones below to get there.
pwcrack, a Password Cracker
Write a program pwcrack that takes one command-line argument, the SHA256 hash of a password in hex format.
The program then reads from stdin potential passwords, one per line (assumed to be in UTF-8 format).
The program should, for each password:
- Check if the SHA256 hash of the potential password matches the given hash
- Check if the SHA256 hash of the potential password with each of its ASCII characters uppercased or lowercased matches the given hash
If a matching password is found, the program should print
Found password: SHA256(<matching password>) = <hash>
If a matching password is not found, the program should print:
Did not find a matching password
Compiling Your Code
On ieng6
Because the OpenSSL libraries on ieng6 are not in the default library search path, you need to use this command:
gcc -L/usr/lib/x86_64-linux-gnu/ *.c -o pwcrack -lcrypto -lssl
The -L flag tells the compiler where to find the crypto libraries during linking.
On Other Systems
On most other Linux systems or macOS, you can compile with:
gcc *.c -o pwcrack -lcrypto
Examples
seCret has a SHA256 hash of a2c3b02cb22af83d6d1ead1d4e18d916599be7c2ef2f017169327df1f7c844fd, and notinlist
has a SHA256 hash of 21d3162352fdd45e05d052398c1ddb2ca5e9fc0a13e534f3c183f9f5b2f4a041
$ ./pwcrack a2c3b02cb22af83d6d1ead1d4e18d916599be7c2ef2f017169327df1f7c844fd
Password
NeverGuessMe!!
secret
Found password: SHA256(seCret) = a2c3b02cb22af83d6d1ead1d4e18d916599be7c2ef2f017169327df1f7c844fd
$ ./pwcrack 21d3162352fdd45e05d052398c1ddb2ca5e9fc0a13e534f3c183f9f5b2f4a041
Password
NeverGuessMe!!
secret
<Press Ctrl-D for end of input>
Did not find a matching password
We could also put the potential passwords in a file:
$ cat guesses.txt
Password
NeverGuessMe!!
secret
$ ./pwcrack a2c3b02cb22af83d6d1ead1d4e18d916599be7c2ef2f017169327df1f7c844fd < guesses.txt
Found password: SHA256(seCret) = a2c3b02cb22af83d6d1ead1d4e18d916599be7c2ef2f017169327df1f7c844fd
Note that we only consider single-character changes when trying
uppercase/lowercase variants of the guesses (i.e. we DON'T try all possible
capitalizations of the string): In the example below, the correct password is
NOT found because going from SECRET to seCret would require 5 characters to be changed.
$ ./pwcrack a2c3b02cb22af83d6d1ead1d4e18d916599be7c2ef2f017169327df1f7c844fd
SECRET
<Press Ctrl-D for end of input>
Did not find a matching password
Using the Problem Set for your PA
Most of the needed functionality for the PA is in the problem set problems! So part of your workflow for this PA should be to move code over from the appropriate part of your problem set and into your PA code.
- PSet 2 11. cap_variants helps create all the variants of the strings needed for checking
- PSet 2 15. sha256_stdin helps with the main loop that does SHA on values from input and has examples of calling SHA256 (problems 14 and 16 are also related)
- Pset 2 9. shacheck helps with understanding how to compare SHA values
Design Questions
-
Real password crackers try many more variations than just uppercasing and lowercasing. Do a little research on password cracking and suggest at least 2 other ways to vary a password to crack it. Describe them both, and for each, write a sentence or two about what modifications you would make to your code to implement them. (You don't have to actually implement them).
-
How much working memory is needed to store all of the variables needed to execute the password cracker? Based on your response would you say that a password cracker is more memory-limited or is it more limited by how fast the process can run the code?
What to Hand In
- Any .c files you wrote (can be one file or many; it's totally reasonable to only have one). We will compile your code, so you should make sure it works when we do that.
- A file DESIGN.md (with exactly that name) containing the answers to the design questions
You will hand in your code to the pa2 assignment on Gradescope. An autograder will give you information about if your code compiles and works on some simple examples like the ones from this writeup. Your implementation and design questions will be graded after the deadline with a mix of automatic and manual grading.
Fun (and Authentic!) Testing
To help testing your PA, we are providing you with a file containing 3 million real plaintext passwords famously found a data breach of the RockYou
social network in 2009. You can use the password file present in the ieng6 servers by reading it into pwcrack using
the following commandline if you're in Joe's section:
$./pwcrack a2c3b02cb22af83d6d1ead1d4e18d916599be7c2ef2f017169327df1f7c844fd < /home/linux/ieng6/CSE29_FA25_A00/public/pa2/rockyou_clean.txt
and the following command if you're in Aaron's section:
$./pwcrack a2c3b02cb22af83d6d1ead1d4e18d916599be7c2ef2f017169327df1f7c844fd < /home/linux/ieng6/CSE29_FA25_B00/public/pa2/rockyou_clean.txt
Note: these are real human-generated passwords, so they may contain profane words (and offensive concepts). We are providing a censored version of the RockYou password list. Our filtering methodology was to remove any passwords that matched a widely-used 2,800 profane word list. If you read the contents of the password file, note that you are doing so at your own risk, as we can not guarantee that we removed all offensive passwords from the list.
Staff Passwords Scenario
You see in the news and on social media that there was a “data breach” of PrairieLearn, and the passwords of all instructors and TAs were exposed on the “dark web”. A classmate sends you a mysterious link that clearly contains usernames for the CSE29 staff and gibberish after each name.
Can you figure out the passwords of each of the staff members using your pwcrack program, the data at that link, and the rockyou dataset shared above?
Cracking these is ungraded, and just provided for fun and to get your attention with a provocative scenario where password cracking would be interesting (if unethical). They aren't our real passwords.
It also gives us a moment to discuss something important: just because you can crack passwords doesn't mean you should. There are plenty of laws prohibiting the use of passwords that aren't yours to access data that isn't yours, regardless of how you obtained the password. Responsibility and ethics are another – it may simply be wrong to reverse-engineer (access to) someone else's private data, even if it happens to be legal. Of course, there are good uses for doing this – cracking can recover a lost password needed for access to critical data, for example, if the hash is available. Like any powerful tool, your knowledge of C programming and passwords should be used with care and appropriately in context!
In many cases, finding and reporting security issues is possible to do responsibly – there's an entire theory and practice of responsible disclosure. Researchers like Prof Aaron do work on responsibly informing companies, governments, and the public about vulnerabilities in real-world systems. So it's critical to learn about how systems work, how secure systems fail, and how to navigate the surrounding ethical, legal, and social issues!
Resources and Policy
Refer to the policies on assignments for working with others or appropriate use of tools like ChatGPT or Github Copilot.
You can use any code from class, lab, or discussion in your work.
PA2 - Hashing and Passwords: Resubmission Due 11/6 at 11:59pm
If you want to resubmit PA2, please read this section carefully. You need to pass all the tests in the original PA2, while also implementing an extra functionality and answering a new design question described below.
Implement pwcrack as originally described below. Also update pwcrack to check if the SHA256 hash of the potential password with each of its numeric digits '0'-'9' replaced by all possible numberic digits '0'-'9' (considering only single digit changes) matches the given hash.
As before, only one character change at a time is tested, so if Secret111 is a potential password:
- This does NOT check
secret101as it would combine changing the case of a character and replacing a digit SeCreT111is NOT a valid variation to check as it modifies the case of two characters at the same timeSecret123is NOT a valid variation to check as it modifies two digits at the same timesecret111,Secret112,SecreT111, etc. are some valid variations to hash and check for a match
For example,
Secret112 has a SHA256 hash of b54051d1abdba8656126f85f96d9270283d34b1cb8787b78c50646d9eb4a502d
$ ./pwcrack b54051d1abdba8656126f85f96d9270283d34b1cb8787b78c50646d9eb4a502d
NeverGuessMe!!
Secret
Secret111
Found password: SHA256(Secret112) = b54051d1abdba8656126f85f96d9270283d34b1cb8787b78c50646d9eb4a502d
$ ./pwcrack b54051d1abdba8656126f85f96d9270283d34b1cb8787b78c50646d9eb4a502d
NeverGuessMe!!
secret
secret222
<Press Ctrl-D for end of input>
Did not find a matching password
You will also need to answer the following updated DESIGN question in your resubmission:
Consider the following run of your updated pwcrack:
$ ./pwcrack b54051d1abdba8656126f85f96d9270283d34b1cb8787b78c50646d9eb4a502d
secret118
secret111
<Press Ctrl-D for end of input>
Did not find a matching password
- How many password variations were hashed and tested for a match?
- How many duplicate password variations were hashed and checked?
- What are ways you might change your implementation to avoid this repeated and redundant work?
PA3 - The Pioneer Shell: Due Thursday, November 6 at 11:59pm - Github Classroom Link
Looking for resubmission? Click here
This assignment is from CSE29 SP24, which has its own list of acknowledgments!
Learning Goals
This assignment calls upon many of the concepts that you have practiced in previous PAs. Specifically, we will practice the following concepts in C:
- string manipulation using library functions,
- command line arguments,
- process management using fork(), exec(), and wait(), and of course,
- using the terminal and vim.
We'll also get practice with a new set of library functions for opening, reading from, and writing to files.
Introduction
Throughout this quarter, you have been interacting with the ieng6 server via the terminal – you've used vim to write code, used gcc and make to compile, used git to commit and push your changes, etc. At the heart of all this lies the shell, which acts as the user interface for the operating system.
At its core, the shell is a program that reads and parses user input, and runs built-in commands (such as cd) or executable programs (such as ls, gcc, make, or vim).
As a way to wrap up this quarter, you will now create your own shell (a massively simplified one of course). We shall call it– (drumroll please)
The Pioneer Shell
The PIoneer SHell, or as we endearingly call it, pish (a name with such elegance as other popular programs in the UNIX world, e.g., git).
Getting Started
The starter code for this assignment is hosted on GitHub classroom. Use the following link to accept the GitHub Classroom assignment:
Github Classroom: https://classroom.github.com/a/qGin5nO-
Overall Task
Interactive Mode
Your basic shell simply runs on an infinite loop; it repeatedly:
- prints out a prompt,
- reads keyboard input from the user
- parses the input into a command and argument list
- if the input is a built-in shell command, then executes the command directly
- otherwise, creates a child process to run the program specified in the input command, and waits for that process to finish
This mode of operation is called the interactive mode.
Batch Mode
Shell programs (like bash, which is what you have been using on ieng6) also support a batch execution mode, i.e., scripts. In this mode, instead of printing out a prompt and waiting for user input, the shell reads from a script file and executes the commands from that file one line at a time.
In both modes, once the shell hits the end-of-file marker (EOF), it should call exit(EXIT_SUCCESS) to exit gracefully. In the interactive mode, this can be done by pressing Ctrl-D.
Parsing Input
Every time the shell reads a line of input (be it from stdin or from a file), it breaks it down into our familiar argv array.
For instance, if the user enters "ls -a -l\n" (notice the newline character), the shell should break it down into argv[0] = "ls", argv[1] = "-a", and argv[2] = "-l". In the starter code, we provide a struct to hold the parsed command.
Handling Whitespaces
You should make sure your code is robust enough to handle various sorts of whitespace characters. In this PA, we expect your shell to handle any arbitrary number of spaces ( ) and tabs (\t) between arguments.
For example, your shell should be able to handle the following input: " \tls\t\t-a -l ", and still run the ls program with the correct argv array.
strtok will be VERY helpful for this.
Built-In Commands
Whenever your shell executes a command, it should check whether the command is a built-in command or not. Specifically, the first whitespace-separated value in the user input string is the command. For example, if the user enters ls -a -l tests/, we break it down into argv[0] = "ls", argv[1] = "-a", argv[2] = "-l", and argv[3] = "tests/", and the command we are checking for is argv[0], which is "ls".
If the command is one of the following built-in commands, your shell should invoke your implementation of that built-in command.
There are three built-in commands to implement for this project: exit, cd, and history.
Built-in Command: exit
When the user types exit, your shell should call the exit system call with EXIT_SUCCESS (macro for 0). This command does not take arguments. If any is provided, the shell raises a usage error.
Built-in Command: cd
cd should be run with precisely 1 argument, which is the path to change to. You should use the chdir() system call with the argument supplied by the user. If chdir() fails (refer to man page to see how to detect failure), you should use call perror("cd") to print an error message.
Built-in Command: history
When the user enters the history command, the shell should print out the list of commands a user has ever entered in interactive mode.
(If you are on ieng6, open the ~/.bash_history file to take a look at all the commands you have executed. How far you've come this quarter!)
To do this, we will need to write the execution history to a file for persistent storage. Just like bash, we designate a hidden file in the user's home directory to store the command history.
Our history file will be stored at ~/.pish_history. (You will find a function in the starter code that will help you get this file path.)
Important: When adding a command to history, if the user enters an empty command (0 length or whitespace-only), it should not be added to the history.
When the user types in the history command to our shell, it should print out all the contents of our history file, adding a counter to each line:
▶ history
1 history
▶ pwd
/home/jpolitz/cse29fa25/pa3/Simple-Shell
▶ ls
Makefile  script.sh  pish  pish.c  pish.h  pish_history.c
pish_history.o  pish.o
▶ history
1 history
2 pwd
3 ls
4 history
Note that the number before each line is added by history. The contents of .pish_history should not contain the leading numbers.
Running Programs
If, instead, the command is not one of the aforementioned built-in commands, the shell treats it as a program, and spawns a child process to run and manage the program using the fork() and exec() family of system calls, along with wait().
Excluded Features
Now because our shells are quite simple, there are a lot of things that you may be accustomed to using that will not be present in our shell. (Just so you are aware how much work the authors of the bash shell put into their product!)
You will not be able to:
- use the arrow keys to navigate your command history,
- use Tab to autocomplete commands,
- use the tilde character (~) to represent your home directory,
- use redirection (> and <),
- pipe between commands (|),
- and many more…
Don't be concerned when these things don't work in your shell implementation!
If this were an upper-division C course, we would also ask you to implement redirection and piping.
Handling Errors
Because the shell is quite a complex program, we expect you to handle many different errors and print appropriate error messages. To make this simple, we now introduce:
Usage Errors
This only applies to built-in commands. When the user invokes one of the shell's built-in commands, we need to check if they are doing it correctly.
- For
cd, we expectargc == 2, - For
historyandexit, we expectargc == 1.
If the user enters an incorrect command, e.g. exit 1 or cd without a path, then you should call the usage_error() function in the starter code, and continue to the next iteration of the loop.
Errors to handle
You need to handle errors from the following system calls/library functions using perror(). Please pay attention to the string we give to perror() in each case and reproduce it in your code exactly.
fopen()failure:perror("open"),chdir()failure:perror("cd"),execvp()failure:perror("pish"),fork()failure:perror("fork")
The Code Base
You are given the following files:
- pish.h: Defines
struct pish_argfor handling command parsing; declares functions handling the history feature. - pish.c: Implements the shell, including parsing, some built-in commands, and running programs.
- pish_history.c: Implements the history feature.
- Makefile: Builds the project.
- ref-pish: A reference implementation of the shell. Note that in this version, the history is written to
~/.ref_pish_historyrather than~/.pish_history, to avoid conflict with your own shell program.
struct pish_arg
In pish.h, you will find the definition of struct pish_arg:
#define MAX_ARGC 64

struct pish_arg {
    int argc;
    char *argv[MAX_ARGC];
};
In our starter code, all functions handling a command (after it has been parsed) will be given a struct pish_arg argument.
Running pish
First, run make to compile everything. You should see the pish executable in your assignment directory.
To run pish in interactive mode (accepting keyboard input), type
$ ./pish
Or, to run a script (e.g., script.sh), type
$ ./pish script.sh
The same applies for the reference implementation ref-pish.
What to Hand In
- Submit your code to Gradescope
- We will run your program with
makeand./pishin both interactive and batch mode - There are no design questions
- CREDITS.md is still required
Resources and Policy
Refer to the policies on assignments for working with others or appropriate use of tools like ChatGPT or Github Copilot.
You can use any code from class, lab, or discussion in your work.
PA3 - The Pioneer Shell: Resubmission Due 11/20 at 11:59pm
If you want to resubmit PA3, please read this section carefully. You need to pass all the tests in the original PA3, while also implementing an extra functionality.
Implement pish as originally described. Also update pish to support a new built-in command !! that re-executes the last non-!! command entered by the user.
The !! command should also be recorded in the command history, but should not affect what the "last" command is.
For example, if the user enters the following commands in sequence:
▶ history
1 history
▶ !!
1 history
2 !!
▶ pwd
/home/jpolitz/cse29fa25/pa3/Simple-Shell
▶ ls
Makefile  script.sh  pish  pish.c  pish.h  pish_history.c
pish_history.o  pish.o
▶ !!
Makefile  script.sh  pish  pish.c  pish.h  pish_history.c
pish_history.o  pish.o
▶ !!
Makefile  script.sh  pish  pish.c  pish.h  pish_history.c
pish_history.o  pish.o
▶ history
1 history
2 !!
3 pwd
4 ls
5 !!
6 !!
7 history
Errors
For each of the following errors, call the usage_error() function in the starter code and continue to the next iteration of the loop.
- If the user enters
!!as the very first command (there is no last command to execute). - If the user enters
!! <anything>(if argc != 1).
Coding Style Resubmission
If you got a point off for coding style in the original PA3, you do not have to do the new functionality for that point.
Refer to the Piazza post for more details.
PA4 – Malloc
This assignment is thanks to the staff of CSE29 spring 2024, especially Gerald Soosairaj and Jerry Yu.
- Due Thursday, Nov 20, 11:59pm
- GitHub Classroom: https://classroom.github.com/a/nmnXdILJ
In class, quizzes, and PAs we've used malloc and free to manage memory.
These are functions written in
C! glibc
contains one of the frequently used
implementations.
There are a lot of details that go into these implementations – we don't expect
that anyone could internalize all the details from the documentation above
quickly. However, there are a few key details that are really interesting to
study. In this project, we'll explore how to implement a basic version of
malloc and free that would be sufficient for many of the programs we have
written.
Specifically, we will practice the following concepts in C:
- bitwise operations,
- pointer arithmetic,
- memory management, and of course,
- using the terminal and vim.
Task Specification
You will implement and test two functions. As with all PAs, you can use all your code from PSet 4 for helper functions and to help you understand the task.
vmalloc
void *vmalloc(size_t size);
The size_t size parameter specifies the number of bytes the caller wants.
This has the same meaning as the usual malloc we have been using: the returned
pointer is to the start of size bytes of memory that is now exclusively
available to the caller.
Note the void * return type, which is the same as the usual malloc. void *
is not associated with any concrete data type. It is used as a generic pointer,
and can be implicitly assigned to any other type of pointer.
This is how malloc (and our vmalloc) allow assigning the result to any pointer type:
int *p = malloc(sizeof(int) * 10);
char *c = malloc(sizeof(char) * 64);
If size is not greater than 0, or if the allocator could not find a heap
block that is large enough for the allocation, then vmalloc should return
NULL to indicate no allocation was made.
Your implementation of vmalloc must:
- Use a “best fit” allocation policy
- Always return an address that is a multiple of 16
- Always allocate space on 16-byte boundaries
- Ensure that all blocks, either free or allocated, have correct block headers and footers
Best Fit Allocation Policy
Many allocation policies are possible – choosing the first block that fits, choosing the last block that fits, choosing the most-recently-freed block that fits, and so on. The one you must implement for this PA is the best-fit policy.
That is, once you have determined the size requirement of the desired heap block, you need to traverse the entire heap to find the best-fitting block – the smallest block that is large enough to fit the allocation. If there are multiple candidates of the same size, then you should use the first one you find.
If the best-fitting block you find is larger than what we need, then we need to split that block into two. For example, if we are looking for a 16-byte block for vmalloc(4), and the best fitting candidate is a 64-byte block, then we will split it into a 16-byte block and a 48-byte block. The former is allocated and returned to the caller, the latter remains free. Make sure to create a block header for any new blocks, and update block headers of modified blocks.
Returning the Address
After updating all the relevant metadata, vmalloc should return a pointer to the start of the payload. Do not return the address of the block header!
vmfree
void vmfree(void* ptr)
The vmfree function expects a 16-byte aligned address obtained by a previous call to vmalloc. If the address ptr is NULL, then vmfree does not perform any action and returns directly. If the block appears to be a free block, then vmfree does not perform any action and returns.
For allocated blocks, vmfree updates the block metadata to indicate that it is free, and coalesces with adjacent (previous and next) blocks if they are also free.
Coalescing freed blocks
Just freeing a block is not necessarily enough, since this may leave us with many small free blocks that can't hold a large allocation. When freeing, we also want to check if the next / previous block in the heap are free, and coalesce with them to make one large free block.
If you are coalescing two blocks, remember to update both the header and the footer!
Block footers / Previous Bit
You will need to update both your vmalloc and your vmfree implementation to add code for creating/updating accurate footers, and making sure the "previous block busy" bit is correct.
Design Questions
Heap fragmentation occurs when there are many available blocks that are small-sized and not adjacent (so they cannot be coalesced).
-
Give an example of a program (in C or pseudocode) that sets up a situation where a 20-byte
vmalloccall fails to allocate despite the heap having (in total) over 200 bytes free across many blocks. Assume all the policies and layout of the allocator from the PA are used (best fit, alignment, coalescing rules, and so on) -
Give an example of a program (in C or pseudocode) where all the allocations succeed if using the best fit allocation policy (like in this PA), but some allocations would fail due to fragmentation if the first fit allocation policy was used instead, keeping everything else the same.
Submission
You'll submit on Gradescope as usual. Refer to the policies on collaboration if you need to refresh your memory.
Important: We will compile your program using the provided Makefiles, which you should
not change.
To get started, read through the next few sections about the PA:
Getting Started
The starter code for this assignment is hosted on GitHub Classroom. Use the following link to accept the GitHub Classroom assignment: https://classroom.github.com/a/nmnXdILJ
Just like on previous PAs, clone the repository to ieng6 server.
The Code Base
Unlike previous PAs, this PA comes with starter code that you should read and understand.
The Library
vmlib.h: This header file defines the public interface of our library. Other programs wishing to use our library will include this header file.vm.h: This header file defines the internal data structures, constants, and helper functions for our memory management system. It is not meant to be exposed to users of the library.vminit.c: This file implements functions that set up our “heap”.vmalloc.c: This file implements our own allocation function calledvmalloc.vmfree.c: This file implements our own free function calledvmfree.utils.c: This file implements helper functions and debug functions.
Testing
vmtest.c: This file is not a part of the library. It defines a main function and uses the library functions we created. We can test our library by compiling this file into its own program to run tests. You can write code in themain()function here for testing purposes.tests/: This directory contains small programs and other files which you should use for testing your code. We will explain this in more detail in a later section.
Compiling the Starter Code
To compile, run make in the terminal from the root directory of the repository. You should see the following items show up in your directory:
libvm.so: This is a dynamically linked library, i.e., our own memory allocation system that can be linked to other programs (e.g., vmtest). The interface for this library is defined invmlib.h. TheMakefiles handle compiling with a.sofor you; we set it up this way to match how production systems include libraries likestdlibvmtest: This executable is compiled from vmtest.c with libvm.so linked together. It uses your memory management library to allocate/free memory.- The starter code in
vmtest.cis very simple: it callsvminit()to initialize our simulated “heap”, and calls the vminfo() function to print out the contents of the heap in a neatly readable format. Run the vmtest executable to find out what the heap looks like right after it’s been initialized! (Hint: it’s just one giant free block.)
Reading the Starter Code
For this programming assignment, we want the addresses returned by vmalloc to always be 16-byte aligned (i.e., at an address ending in 0x0). Since the metadata (block header) is 8 bytes in size, block headers will therefore always be placed at addresses ending in 0x8. To maintain this alignment, the first block header (*heapstart) starts at an offset of 8, and all blocks going forward must have sizes that are multiples of 16 bytes.
Block sizes here refer to the size of the block including the header. The smallest possible block is 16 bytes, and would consist of an 8 byte header followed by 8 bytes of allocatable memory. When free, the last 8 bytes of the block would instead contain the block footer, to be used for coalescing free blocks.
Begin by reading through the vm.h file, where we define the internal data structures for the heap. This is where you will find the all-important block headers and block footers. Focus on understanding how struct block_header is used. You will see it in action later.
Next, open vminit.c. This is a very big file containing functions that create and set up the simulated heap for this assignment. Find the init_heap() function, and read through the entire thing to understand how it is setting up the heap. There is pointer arithmetic involved, you will need to do similar things for implementing vmalloc and vmfree, so make sure you have a solid understanding of that. (Why is it necessary to cast pointers to different types?)
Just like production allocators, we create a large chunk of memory as our heap using mmap, and allocations/frees are performed in that memory region.
Once you understand what the init_heap() function is doing, open up utils.c. Here we have implemented the function vminfo(), which will be your ally throughout this PA. This function traverses through the heap blocks and prints out the metadata in each block header. You should find inspiration for how to write your own vmalloc function here. Look at how it manipulates the pointer to jump between blocks!
Testing
For this PA we provide you with some local testing code to help you make sure your program is working; you will need to write more thorough tests than what we've provided! But we give you a big start
Test Programs
In the repository, you will find the tests/ directory, where we have provided some small testing programs that test your library function.
By coding in to the tests/ directory and running make, you can compile all these test programs and run them yourself. These programs are what we will be using in the autograder as well.
For example, here’s the code for the very first test: alloc_basic.c:
#include <assert.h>
#include <stdint.h>
#include <stdlib.h>

#include "vmlib.h"
#include "vm.h"

/*
 * Simplest vmalloc test.
 * Makes one allocation and confirms that it returns a valid pointer,
 * and the allocation takes place at the beginning of the heap.
 */
int main()
{
    vminit(1024);

    void *ptr = vmalloc(8);
    struct block_header *hdr = (struct block_header *)
                               ((char *)ptr - sizeof(struct block_header));

    // check that vmalloc succeeded.
    assert(ptr != NULL);
    // check pointer is aligned.
    assert((uint64_t)ptr % 16 == 0);
    // check position of malloc'd block.
    assert((char *)ptr - (char *)heapstart == sizeof(struct block_header));
    // check block header has the correct contents.
    assert(hdr->size_status == 19);

    vmdestroy();
    return 0;
}
In this test, we simply make one vmalloc() call, and we verify that the allocation returned a valid pointer at the correct location in the heap.
These tests use the assert() statement to check certain test conditions. If your code passes the tests, then nothing will be printed. If one of the assert statements fail, then you will see an error.
Test Images
When you are writing vmalloc, you may wonder how you can test the allocation policy fully when you don’t have the ability to free blocks to create a more realistic allocation scenarios (i.e., a heap with many different allocated/free blocks to search through).
To help you with that, we have created some images in the starter code in the tests/img directory. In your test programs, instead of calling vminit(), you can call the vmload() function instead to load one of these images.
Our alloc_basic2 program uses one such image. If you open tests/alloc_basic2.c, you will see that it creates the simulated heap using the following function call:
vmload("img/many_free.img");
If you load this image and call vminfo(), you can see exactly how this image is laid out:
vmload: heap created at 0x7c2abd1da000 (4096 bytes).
vmload: heap initialization done.
---------------------------------------
 #      stat    offset   size     prev
---------------------------------------
 0      BUSY    8        48       BUSY
 1      BUSY    56       48       BUSY
 2      FREE    104      48       BUSY
 3      BUSY    152      32       FREE
 4      FREE    184      32       BUSY
 5      BUSY    216      48       FREE
 6      FREE    264      128      BUSY
 7      BUSY    392      112      FREE
 8      BUSY    504      32       BUSY
 9      FREE    536      112      BUSY
 10     BUSY    648      352      FREE
 11     BUSY    1000     304      BUSY
 12     BUSY    1304     336      BUSY
 13     FREE    1640     320      BUSY
 14     BUSY    1960     288      FREE
 15     BUSY    2248     448      BUSY
 16     BUSY    2696     256      BUSY
 17     BUSY    2952     96       BUSY
 18     BUSY    3048     368      BUSY
 19     FREE    3416     672      BUSY
 END    N/A     4088     N/A      N/A
---------------------------------------
Total: 4080 bytes, Free: 6, Busy: 14, Total: 20
You can use this image to test allocating in a more realistic heap.
Three images exist in total:
last_free.img: the last block is free,many_free.img: many blocks are free,no_free.img: no block is free (use this to test allocation failure).
PA4 – Malloc: Resubmission Due 12/5 at 11:59pm
If you want to resubmit PA4, please read this section carefully. You need to pass all the tests in the original PA4, while also implementing an extra functionality and answering a new design question described below.
vminfo
In utils.c, we have implemented the function vminfo(), which traverses through the heap blocks and prints out the metadata in each block header. Update the function so that at the end of its output, it prints details about the largest available block as follows:
The largest free block is #x with size y.
where x is the blockid starting from 0, and y is the size (including header) of the largest available block for allocation. If there are multiple candidates for the largest block, x should be the smallest blockid of the candidates. Refer the following updated output of vminfo as an example:
vminit: heap created at 0x707df3026000 (4096 bytes).
vminit: heap initialization done.
---------------------------------------
 #      stat    offset   size     prev
---------------------------------------
 0      BUSY    8        48       BUSY
 1      FREE    56       32       BUSY
 2      BUSY    88       112      FREE
 3      BUSY    200      96       BUSY
 4      FREE    296      208      BUSY
 5      BUSY    504      64       FREE
 6      BUSY    568      320      BUSY
 7      FREE    888      208      BUSY
 8      BUSY    1096     160      FREE
 9      BUSY    1256     368      BUSY
 10     BUSY    1624     272      BUSY
 11     FREE    1896     672      BUSY
 12     BUSY    2568     128      FREE
 13     BUSY    2696     464      BUSY
 14     FREE    3160     672      BUSY
 15     BUSY    3832     160      FREE
 16     FREE    3992     96       BUSY
 END    N/A     4088     N/A      N/A
---------------------------------------
Total: 4080 bytes, Free: 6, Busy: 11, Total: 17
The largest free block is #11 with size 672
Total: 4080 bytes, Free: 6, Busy: 11, Total: 17
The largest free block is #11 with size 672
In this example, there are six FREE blocks with the two largest FREE blocks being 672 bytes in size: the output line shows the index of the 672 sized block that comes first.
Updated DESIGN question for the resubmission
In our implementation, when freeing an allocated block, we coalesce it with the previous and next blocks in the heap if they are free - to make one larger free block.
- Consider an updated implementation where in case of freeing, we only coalesce it with exactly 1 next block in the heap if it is free. That is, we do NOT coalesce backwards. Give an example of a program (in C or pseudocode) where all the allocations succeed in the current design (like in this PA), but some allocations would fail with the updated freeing strategy.
In class, quizzes, and PAs we've used malloc and free to manage memory. These are functions written in C! glibc contains one of the frequently used implementations.
There are a lot of details that go into these implementations – we don't expect that anyone could internalize all the details from the documentation above quickly. However, there are a few key details that are really interesting to study. In this project, we'll explore how to implement a basic version of malloc and free that would be sufficient for many of the programs we have written.
Specifically, we will practice the following concepts in C:
- bitwise operations,
- pointer arithmetic,
- memory management, and of course,
- using the terminal and vim.
PA5 - Web Server
Due Thursday, December 4, 11:59PM
Github Classroom Assignment: https://classroom.github.com/a/0wvJcgvj
Important: there is no resubmission available for PA5. Plan your development and testing accordingly. We will also have no hidden tests for PA5 so that you can get immediate feedback on your code.
There are also no design questions for this PA.
Web Servers and HTTP
HTTP is one of the most common protocols for communicating across computers. At the systems programming level, this means using system calls (usually in C) to tell the operating system to send bytes over a network.
One nice feature of HTTP is that it is a primarily text-based protocol, which makes it more straightforward for humans to read and debug. It is also well-understood by web browsers and programs like curl, making it easy to test and connect to user-facing devices.
It's useful to get experience with the format of HTTP, and with using system calls in C to manipulate HTTP requests.
Task – Chat Server
In this programming assignment, you'll write a C program to implement a chat room (think a plain-text version of Slack or Discord).
It's best to complete the PA on ieng6, because it gives a consistent testing environment for the live server.
Your programs should compile and run with:
make chat-server
./chat-server <optional port number>
The server should start with ./chat-server and print a single message:
$./chat-server
Server started on port PPPPP
If a port number was provided, it should use that port, otherwise it should print an open port that was selected.
It should continue running, listening for requests on that port, until shutdown with Ctrl-c. It can print any other logging messages or other output needed to the terminal.
The requests the chat server listens for are described in this section:
/chats
A request to /chats responds with the plain text rendering of all the chats.
The rendered chat format is
[#N 20XX-MM-DD HH:MM] <username>: <message>
(<rusername>) <reaction>
... [more reactions] ...
... [more chats] ...
Chats must be rendered properly, as in HW5.5. You can put in whatever effort you like into lining things up nicely within these constraints, but these are the requirements.
Example chats rendering might look like:
[#1 2025-11-06 09:01]         joe: hi aaron
[#2 2025-11-06 09:02]       aaron: sup
[#3 2025-11-06 09:04]         joe: working on the example chat for the PA
[#4 2025-11-06 09:06]       aaron: oh cool what should it say
[#5 2025-11-06 09:07]         joe: I dunno we could go pretty meta with it? like a chat about the chat
[#6 2025-11-06 09:10]       aaron: eh kinda lame tbh
[#7 2025-11-06 09:11]         joe: whatever I already wrote it, going with it as-is
[#8 2025-11-06 09:12]       aaron: ok but make sure we don't look like jerks
[#9 2025-11-06 09:12]       aaron: or at least not me
                            (joe)  👍🏻
[#10 2025-11-06 09:12]         joe: good talk
/post
A post request looks like this:
/post?user=<username>&message=<message>
This creates a new chat with the given username and message string with a timestamp given by the time the request is received by the server. It must respond with the list of all chats (including the new one).
Limits and constraints:
- If a parameter (username or message) is missing, respond with some kind of error (HTTP code 400 or 500)
- If username is longer than 15 bytes, respond with some kind of error (HTTP code 400 or 500)
- If message is longer than 255 bytes, respond with some kind of error (HTTP code 400 or 500)
- If a post would make there be more than 100000 (one hundred thousand) chats, the server should respond with an error (HTTP code 404 or 500)
/react
/react?user=<username>&message=<reaction>&id=<id>
Creates a new reaction to a chat by the given username with the given message string, reacting to the post with the given id (the ids are the #N at the beginning of posts). It must respond with the list of all chats (including the new one).
Limits and constraints:
- If the id is not the ID of some existing chat, respond with some kind of error (HTTP code 400 or 500).
- If a parameter (username or message or id) is missing, respond with some kind of error (HTTP code 400 or 500)
- If username is longer than 15 bytes, respond with some kind of error (HTTP code 400 or 500)
- If message is longer than 15 bytes, respond with some kind of error (HTTP code 400 or 500) – reactions are intended to be short!
- If a reaction would make a chat have more than 100 reactions, the server should respond with an error (HTTP code 404 or 500)
Implementation Guide
This page is the entire specification for the assignment; it's what you need to implement. You are free to make whatever choices you like in your code within these constraints. To help you on your way, we have some implementation notes below with suggestions and ideas for how to get started and what to think about. These are not requirements, just suggestions!
First, make sure to do Problem Set 5 first if you haven't already! While completing it you will create helper functions you can use as well as help you develop an understanding of your task.
Then, one way to break down the work the server needs to do is:
- Parsing and interpreting requests (is the request a new post, a reaction, etc)
- Updating the current data (chats and reactions) based on the parameters in the request
- Responding to requests based on the current state of the data (chats and requests)
One way to work incrementally is to separate the data handling and the request handling parts into different functions.
The data handling functions can be tested with by writing a main and using printf or assert, and the request
handling can be tested with curl or a client.
We think the following functions might be useful for you to implement. In your program you might have slightly different signatures or ideas, but these are a useful starting point. Also, our staff is more familiar with this approach, so it will take us less time to help you in office hours!
Data Handling Functions
These functions can be written and tested without starting a server at all. You
could consider having a separate main function in its own file that just tests
these!
add_chat
A function add_chat can add a single chat.
uint8_t add_chat(char* username, char* message)
This function might have several tasks:
- Update the current
id - Get the current timestamp
- Create a new chat and fill in its username and message fields
- As needed, allocate new space, put the new chat in heap memory, store a reference to it in an array, etc. depending on your specific representation of chats
This is testable by setting up initial states of chats and reactions, running
the function, and then using assert or printf on the results.
add_reaction
Similar to add_chat, this adds a single reaction:
uint8_t add_reaction(char* username, char* message, char* id)
This function might have several tasks:
- Use the id to locate the chat that this reaction is for (and maybe return early with an error if the id is invalid/out of range)
- Create a new reaction and fill in its username and message fields
- Add the reaction to the chat struct somehow, maybe with newly allocated space, an added element or reference in an array, etc. depending on your specific representation of chats and reactions
- Update the count of reactions on the referenced chat
This is testable by setting up initial states of chats and reactions, running
the function, and then using assert or printf on the results.
Request and Response Handling Functions
You will definitely need to write a function for handling responses. But the
work of handling individual responses can be broken up. One approach could be to
get the path and query parameter string from the request and check if it's path
is /post, /chats, etc, then pass the string to other functions
respond_with_chats
void respond_with_chats(int client)
This function is reponsible for using write or send to send the response to
the client that made the request. It might include:
- Using
snprintfto format strings with data from the timestamp or ids - Calling
write(client, str, size)on various strings (with the appropirate size) to directly send the data to the client
handle_post
// path is a string like "/post?user=joe&message=hi"
void handle_post(char* path, int client)
This function can have several tasks:
- Use string functions to extract the username and message from the path
- Call
add_chatto do the data update - Call
respond_with_chatsto send the response
handle_reaction
// path is a string like "/react?user=joe&message=hi&id=3"
void handle_reaction(char* path, int client)
This function can have several tasks:
- Use string functions to extract the username, message, and id from the path
- Call
add_reactionto do the data update - Call
respond_with_chatsto send the response
Representing Chats and Reactions
Chats and reactions both have multiple fields, so a natural choice is to represent both chats and reactions as structs.
A chat has several components, which may be good candidates for struct fields:
- The message
- The username
- The timestamp
- The reactions to the message
A reaction has the message content and the user who posted it (no timestamp or reactions-to-reactions), both of which are fixed-size.
You should make structs to hold the Chats and Reactions in your server, and use the constrains above
about the lengths of usernames, messages, and so on to help you decide what data to store.
Other Helpful Functions
This PA explores several features that are straightforward to use, but there are many of them. We might add more to this list as the PA goes on! Here are a few functions you'll probably find useful; try man on them, or follow the links, or do your own searching and research. Don't forget all the functions from class (e.g. malloc and other allocation functions, strstr and other string manipulation functions, and so on). This list is mainly focused on things we haven't tried in class.
-
atoi: convertchar*to integer -
Time functions:
Handin
- Hand in your repository on Gradescope
- Make sure make chat-server builds your server (that's the command we will run), and the server runs on a predictable port with, for example, ./chat-server 8000
- Don't forget CREDITS.txt
- There are no hidden tests for this PA, so you can get immediate feedback on your code.
- There are no design questions for this PA.
- Make sure to keep following good coding practices, including comments and style.