UCSD CSE29 FA24 Syllabus and Logistics
- Aaron Schulman (Instructor)
- Joe Gibbs Politz (Instructor)
Basics - Staff & Resources - Schedule - Course Components - Grading - Policies
CSE 29 introduces you to the broad field of systems programming, including 1) the basics of how programs execute on a computer, 2) programming in C with direct access to memory and system calls, 3) software tools to manage and interact with code and programs. All very cool stuff that makes every programmer better!
Basics
- Lecture (attend the one you're enrolled in):
- Joe/A section: 10am Catalyst Lecture Hall 0125
- Aaron/B section: 12pm (noon) Solis Lecture Hall 104
- Discussions (attend either):
- Wed 8am Warren Lecture Hall 2001
- Fri 4pm Solis Lecture Hall 104
- Labs: Tuesdays (check your schedule!). Either B260 or B270 in the CSE building
- Exams: AP&M B349, flexible scheduling in weeks 3, 5, and 8
- Final exam: AP&M B349, flexible scheduling in week 10
- Professor office hours – Joe and Aaron each have 2 hours. Come to either and
ask anything you need. Overall, the afternoon times are only for CSE29
questions, and the morning times are for general advising and may have non-CSE29
students present as well.
- Aaron:
- Tuesday 10-11am (prioritizes CSE29, CSE lab B250)
- Tuesday 3-4pm (prioritizes general advising, CSE office #3120)
- Joe:
- Tuesday 9-10am (prioritizes general advising, CSE office #3206)
- Tuesday 1-2pm (prioritizes CSE29, CSE lab B250)
- Aaron:
- Office Hours – See the Office Hours Calendar
- Podcasts: podcast.ucsd.edu
- Q&A forum: Piazza
- Gradescope: https://www.gradescope.com
- Textbook/readings: Dive Into Systems, plus additional readings we will assign (all free/online)
- Free: MIT Missing Semester
- Not free but pretty cheap: Julia Evans Zines, especially The Pocket Guide to Debugging
Staff Resources
Office Hours Calendar
Schedule
The schedule below outlines topics, due dates, and links to assignments. We'll typically update the material for the upcoming week before Monday's lecture so you can see what's coming.
Week 10 – File I/O and Goodbye 👋🥲
-
Readings & Resources
-
Lecture Materials
Week 9 – Process Creation and Control 🦃
-
Announcements
- Quiz 9 is available on PrairieLearn, due Tue Dec 3 at 8am.
-
Readings & Resources
-
Lecture Materials
- Wednesday:
- Monday:
- Repository
- Joe's Lecture: Annotated Handout | Recording
- Aaron's Lecture: Slides | Recording
Week 8 – Allocators and Virtual Memory
-
Readings & Resources
-
Lab Quiz
-
Lecture Materials
- Friday:
- Joe's Lecture: jstr.c using my_malloc | Code After | Recording
- Aaron's Lecture: Slides | Recording
- Wednesday:
- Joe's Lecture: Code Before | Code After | Handout | Annotated Handout | Recording
- Aaron's Lecture: Audio Recording
- Monday:
- Repository
- Joe's Lecture: Recording
- Aaron's Lecture: Audio Recording
- Friday:
-
Discussion Materials
- Friday: Repository | Recording
- Wednesday: Repository | Recording
Week 7 – Implementing an Allocator
-
Announcements
- Week 7 Quiz is available on PrairieLearn, due Tue Nov 19 at 8am
-
Readings & Resources
-
Lecture Materials
-
Friday:
-
Wednesday:
- Repository
- Joe's Lecture: Annotated Handout | Recording
- Aaron's Lecture: Slides | Recording
-
Monday: (No lecture)
-
Discussion Materials
-
Week 6 – URLs, Servers, and a Bit of Everything
-
Announcements
- Week 6 Quiz is available on PrairieLearn, due Wed Nov 13 at 8am
- PA3 - Web Server is available and due Monday, November 11 at 10:10 pm
- PA2 Resubmission is available and due Wednesday, November 13 at 10:10 pm
-
Lecture Materials
- Friday:
- Joe's Lecture: Annotated Handout | Recording
- Aaron's Lecture: Slides | Recording
- Wednesday:
- Monday:
- Repository (same as Lab 5)
- Joe's Lecture: Annotated Repository | Recording
- Aaron's Lecture: Recording
- Friday:
-
Discussion Materials
- Friday: Repository | Recording
- Wednesday: Repository | Recording
Week 5 – Managing (Heap) Memory
-
Readings & Resources
-
Lecture Materials
-
Friday:
-
Wednesday:
- Repository
- Joe's Lecture: Recording
- Aaron's Lecture: Recording
-
Monday:
- Repository
- Joe's Lecture: Handout | Annotated Handout | Recording
- Aaron's Lecture: Slides | Recording
-
-
Discussion Materials
- Friday: Repository | Recording
- Wednesday: Repository | Recording
Week 4 – Representations and Memory
-
Announcements
- Week 4 Quiz is available on PrairieLearn
- PA1 Grades have been released; that Piazza post has information about grading process we'll use all quarter.
- PA2 - Hashing and Passwords is due this Friday, October 25, at 10PM
-
Readings & Resources
-
Lecture Materials
- Friday:
- Repository
- Joe's Lecture: Handout | Recording
- Aaron's Lecture: Slides | Recording
- Wednesday:
- Repository
- Joe's Lecture: Handout | Annotated Handout | Recording
- Aaron's Lecture: Slides | Recording
- Monday:
- Repository | Notes PDF
- Videos: Strings/Pointers | Endianness
- Friday:
-
Discussion Materials
- Friday: Repository | Recording
- Wednesday: Repository | Recording
Week 3 – Where (Some) Things are in Memory
-
Announcements
- Make sure to go to your exam slot that you reserved on PrairieTest!
- PA2 is available and is due Friday, October 25 at 10pm!
-
Readings & Resources
-
Lecture Materials
-
Friday:
- Repository
- Joe's Lecture: Slides | Recording
- Aaron's Lecture: Slides | Recording
-
Wednesday:
- Repository
- Joe's Lecture: Slides | Recording
- Aaron's Lecture: Slides | Recording
-
Monday:
- Repository
- Joe's Lecture: Handout | Annotated Handout | Recording
- Aaron's Lecture: Recording
-
-
Discussion Materials
- Friday: Repository | Recording
- Wednesday: Repository | Recording
Week 2 – Number Representations, Sizes, and Signs
-
Announcements
- Quiz 2 is available on PrairieLearn, due Tue Oct 15 at 8am.
- Reminder: PA1 is due this Thursday, Oct 10, at 10:10pm (that's 10/10 at 10:10pm)
- The week 2 lab will use some of your work so far on PA1. You don't need to be done or mostly done, but you will get the most out of lab if you have started.
- Reservations are open for exam slots on PrairieTest, log in with your
@ucsd.eduaccount- This week you can reserve a spot for a practice exam just to get used to finding the lab, signing in, etc. It is not a CSE29-specific practice, just a general tutorial in using the testing center
- This week you must reserve a spot for our first test in the class, which happens next week. The format will be similar to the quizzes; administered through PrairieLearn with a mix of conceptual/mechanical questions and coding questions.
- Reservations are open until the end of the quarter for the remaining tests if you want to reserve your time now.
-
Readings
-
Lecture Materials
- Friday:
- Repository
- Joe's Lecture: Handout | Annotated Handout | Recording
- Aaron's Lecture: Recording
- Wednesday:
- Repository
- Joe's Lecture: Handout | Annotated Handout | Recording
- Aaron's Lecture: Slides | Recording
- Monday:
- Repository
- Joe's Lecture: Handout | Annotated Handout | Recording
- Aaron's Lecture: Slides | Recording
- Friday:
-
Discussion Materials
- Friday: Repository | Recording
- Wednesday: Repository | Recording | GDB Quick Reference Guide
Week 1 – Strings, Memory and Bitwise Representations (in C)
-
Announcements
- PA 1 is available on GitHub, due Thu Oct 10 at 10:10pm.
- Quiz 1 is available on PrairieLearn, due Tue Oct 8 at 8am.
- Lab attendance is required and a lot happens there, make sure to go to lab.
- Submit the welcome survey before lab on Tuesday of week 1.
-
Readings
-
Lecture Materials
- Friday:
- Repository
- Joe's Lecture: Handout | Annotated Handout | Recording
- Aaron's Lecture: Slides | Recording
- Wednesday:
- Repository
- Joe's Lecture: Handout | Annotated Handout | Recording
- Aaron's Lecture: Slides | Recording
- Monday:
- Repository
- Joe's Lecture: Handout | Annotated Handout | Recording
- Aaron's Lecture: Slides | Recording
- Friday:
-
Discussion Materials
- Wednesday: Repository | Recording
Week 0 – Welcome!
-
Announcements
- Lab attendance is required and a lot happens there, make sure to go to lab.
- Submit the welcome survey before lab on Tuesday of week 1.
- Assignments, quizzes, and other things with deadlines will start in week 1.
- No discussion on Friday of week 0 (discussion starts in week 1).
-
Lecture Materials
- Friday:
- Repository
- Joe's Lecture: Annotated Handout
- Aaron's Lecture: Slides
- Friday:
Syllabus
There are several components to the course:
- Lab sessions
- Lecture and discussion sessions
- Weekly quizzes
- Assignments
- Exams
Labs
The course's lab component meets for 2 hours. In each lab you'll switch between working on your own, working in pairs, and participating in group discussions about your approach, lessons learned, programming problems, and so on.
The lab sessions and groups will be led by TAs and tutors, who will note your participation in these discussions for credit. Note that you must participate, not merely attend, for credit.
If you miss lab, you'll still be held accountable for understanding the relevant material via Exams and Assignments. You can miss 2 labs without it impacting your grade (see Grading below). There is no way to make up a lab, even for illness, travel, or emergencies. Our preference would be to require all 10 labs for an A, and have some kind of excused absences. However, tracking excused absences doesn't really scale, so the “two for any reason” policy is how we handle it. You don't need to justify your missed labs. Contact the instructor if you'll miss more than 2 labs for unavoidable reasons.
Lecture and Discussion Sessions
Lecture sessions are on Monday, Wednesday, and Friday, and discussion sections are Wednesday and Friday. We recommend attending every lecture and one of the two discussion sections.
Weekly Quizzes
Each week there will be a (p)review quiz given on Gradescope or PrairieLearn to both review content you've seen and preview upcoming content, due before labs start on Tuesday at 8am.
You can submit these repeatedly with no penalty up to the deadline. The purpose of this quiz is to make sure everyone has checked in on the concepts we will be using in lab. They are open for late submission until the end of the quarter; see Grading below for how late submissions impact grades.
Assignments
The course has 5 assignments that involve programming and writing.
Individual assignments will have detailed information about submission
components; in general you'll submit some code and some written work to
Gradescope. Two files will have special meaning in this class: in CREDITS.txt
you'll put information about who or what helped you with the assignment, and in
DESIGN.txt you'll put answers to open-ended written design questions.
For each assignment, we will give a 0-3 score along with feedback:
- 3 for a complete submission with high code and writing quality with few mistakes, and no significant errors
- 2 for a complete submission with some mistakes or some unclear writing
- 1 for a submission missing key components, or with clear inaccuracies in multiple components
- 0 for no submission or a submission unrecognizable as a partial or complete submission
After each assignment is graded, you'll have a chance to resubmit it based on the feedback you received, which will detail what you need to do to increase your score.
- For an original score of 0 or 1, you can raise your score to 2 (but not to 3)
- For an original score of 2, you can raise your score to 3
This is also the only late policy for assignments. Unsubmitted assignments are initially given a 0, and can get a maximum of 2 points on resubmission.
Exams
This course is participating in a pilot study of a computer-based testing facility on campus (see this paper if you're interested in some background).
Exams will take place in AP&M B349, which is a computer lab. You will schedule your exam at a time that's convenient for you in the given exam week, and you will go to that lab and check in for your exam at the time you picked. The exam will be proctored by staff from the Triton Testing Center (not by the course staff from this course). No study aids or devices are allowed to be used in the testing center. You will need only a photo ID and something to write with (scratch paper is available on request).
The Triton Testing Center has shared a document of rules and tips for using the testing center.
The exams will be administered through PrairieLearn; we will give you practice exams and exercises so you can get used to the format we'll use before you take the first one. The exams will have a mix of questions; they will typically include some that involve programming and interacting with a terminal.
There are three exams during the quarter in weeks 3, 5, and 8. On each you'll get a Full Pass (2 points), Partial Pass (1 point), or Try Again (0 points) as your score.
We don't have a traditionally-scheduled final exam for this course (you can ignore the block provided in Webreg). Instead, in week 10, you'll have the opportunity to retake up to two of the exams from during the quarter to improve your score up to a Full Pass regardless of the score on the first attempt. The retakes may be different than the original exam, but will test the same learning outcomes. This is also the only make-up option for missed exams during the quarter: if you miss an exam for any reason it will be scored as 0, and you can use one of your retake opportunities on that exam.
Grading
Each component of the course has a minimum achievement level to get an A, B, or C in the course. You must reach that achievement level in all of the categories to get an A, B, or C.
- A achievement:
- 8 or more lab participation (out of 10 labs)
- At least 12 total assignment points (e.g. any scores that add up to 12: [3, 3, 2, 2, 2], [3, 3, 3, 2, 1], [3, 3, 3, 3, 0], etc)
- At least 5 total exam points (Full Pass on any 2 of the exams, Partial Pass on the other)
- B achievement:
- 6 or 7 lab participation
- At least 10 total assignment points (e.g. any scores that add up to 10: [2, 2, 2, 2, 2], [3, 3, 3, 1, 0], etc)
- At least 4 total exam points (2 Full Pass and one No Pass, 1 Full Pass and 2 Partial Pass)
- C achievement:
- 4 or 5 lab participation
- At least 8 total assignment points
- At least 3 total exam points
Pluses and minuses will be given around the boundaries of these categories the
based on quiz performance and to-be-determined cutoffs. We don't publish an
exact number for these in advance, but it's consistent across the class. Some
general examples: if you complete all the quizzes completely, correctly, and on
time, you'll get a + modifier. If you meet some of the criteria for the next
higher letter grade but not all, you may get a + modifier (e.g. B+ for 7 lab
participation, 12 assignment points, 5 exam points). If you submit no quizzes on
time or don't get them done completely or correctly, you will get a -
modifier.
Policies
Individual assignments describe policies specific to the assignment. Some general policies for the course are here.
Assignments and Academic Integrity
You can use code that we provide or that your group develops in lab as part of
your assignment. If you use code that you developed with other students (whether
in lab or outside it), got from Piazza, or got from the internet, say which
students you worked with and a sentence or two about what you did together in
CREDITS.txt. All of the writing in assignments (e.g. in DESIGN.txt) must
be your own.
You can use an AI assistant like ChatGPT or Copilot to help you author
assignments in this class. If you do, you are required to include in
CREDITS.txt:
- The prompts you gave to the AI chat, or the context in which you used Copilot autocomplete
- What its output was and how you changed the output after it was produced (if at all)
This helps us all learn how these new, powerful, and little-understood tools work (and don't).
If you don't include a CREDITS.txt and it's clear you included code from
others or from an AI tool, you may lose credit or get a 0 on the assignment, and
repeated or severe violations can be escalated to reports of academic integrity
violations.
Exams and Academic Integrity
Examples for exams will be posted in the week before they happen. You're free to collaborate with others on preparing for the exam, trying things out beforehand, and so on.
You cannot share details of your exam with others until after you receive your grade for it. You cannot communicate with anyone during the exam.
Quizzes and Academic Integrity
You can work on weekly quizzes with other students.
FAQ/AFQ (Anticipated Frequent Questions)
Can I attend a lab section other than the one I'm enrolled in?
No, please do not try to do this. The lab sections have limited seating and are full. We cannot accommodate switching.
How can I switch sections?
You have to drop and re-add (which may involve getting [back on] the waitlist). Sorry.
Can I leave lab early if I'm done or have a conflict?
The labs are designed to not be things you can “finish”. Labs have plenty of extension and exploration activities at the end for you to try out, discuss, and help one another with. Co-located time with other folks learning the same things is precious and what courses are for. Also, if you need an extrinsic motivation, you won't get credit for participation if you don't stay, and participate, the whole time. We can often accommodate one-off exceptions – if you have a particular day where you need to leave early, it's a good idea to be extra-engaged in your participation so your lab leader can give you participation credit before you leave.
Do I have to come to lab?
Yes, see grading above.
What should I do if I'm on the waitlist?
Attend and complete all the work required while waitlisted (this is consistent with CSE policy).
I missed lab, what should I do?
You cannot makeup missed lab credit (but have a few “allowed” misses). Make sure you understand the material from lab because it will be used on exams and assignments; try to do the parts that don't involve discussion on your own, and review your group's lab notes.
I missed a quiz deadline, what should I do?
You can submit it late until the end of the quarter. Generally we allow lots (think like 1/3 to 1/2) of the quizzes to be late without it impacting your grade, but do take them seriously before lab so you're prepared.
I missed an assignment deadline, what should I do?
Some time after each assignment deadline (usually around 2 weeks) there is a late/resubmission deadline. You can resubmit then. See the assignment section above for grading details about resubmissions.
I missed a assignment resubmission deadline, what should I do?
You cannot get an extension on assignment resubmissions; we cannot support multiple late deadlines and still grade all the coursework on time.
I missed my exam time, what should I do?
Stay tuned for announcements about scheduling make-ups in week 10.
Where is the financial aid survey?
We do this for you; as long as you submit a quiz or do a lab participation in the first two weeks, we will mark you as commencing academic activity.
When are the midterms scheduled?
The midterms will be flexibly scheduled during the quarter using a testing center. More details will come; you will need to set aside some outside-of-class time to do them, but there is not a specific class-wide time you have to put on your calendar.
I have a conflict with the final exam time, what can I do?
The final exam will also be flexibly scheduled during week 10 using the testing center.
Week 1 – Command Line and Running C Programs
Lab Logistics
In this class, you are assigned to lab sections, in which you will be in the CSE basement lab rooms to work hands-on on activities related to the tools and techniques that you’ll be using on programming assignments.
Labs are graded by participation, based on your attendance and engagement with the lab activity. Throughout the lab, you will fill in a shared Google Doc with notes and results from what you try and learn. This will be shared with the group of students around you so you have a collective record of your activities (and so we can comment on your progress!)
Your TA/tutor will share the link to the Google Docs with you at the beginning of the lab. When the lab prompts you to write something in the Google doc, be sure to put your name next to your contributions so that we can confirm your participation!
Meet your Group!
We will split into groups of 6-8 students for discussion. For week 1, you may sit wherever you want and choose who you want to work with. Starting week 2, we will have assigned seating and groups. These groups will be somewhat stable throughout the quarter, though some small changes will likely happen. You will have a tutor or TA assigned to your group for help and discussion.
Your discussion leader (the tutor/TA in your lab) will share a Google Doc with your group where you can fill in notes as you work; this document is only for your group. Your discussion leader will not take notes for you.
Write down in notes: In your groups, share, and note in the running notes document (discussion leaders, you answer these as well!):
- How you'd like people to refer to you (pronounce your name/nickname, pronouns like he/her/they, etc)
- Your major
- One of:
- A UCSD student organization you're a member of or interested in
- Your favorite place you've found on campus so far
- A useful campus shortcut or trick you know
- Your answer to the following question. Get to know your fellow group members!
If you could wake up tomorrow and be any (non-human) animal, what animal would you choose to be and why? Would you want to be a pet or be free? Have you had any pets growing up?
Github
Much of our work this quarter will happen through Github, which is a platform for sharing code and collaborating on projects. You should make sure you have a Github account – you're free to use an existing one if you already have one. We will make use of the resources available in the Github Student Developer Pack. This may require signing up with a @ucsd.edu email address, or adding it to your account, in order to verify your student status.
Making an Account
For this lab, you do need to make a Github account right away. You do not need the Student developer pack yet, but you should submit the application in lab if possible so that you'll have the needed resources going forward.
Write down in your Google Doc:
For each student, their @ucsd email and their Github username they will use for this class (this is helpful for the TAs to know who is who!), and a link to their Github profile, which looks something like https://github.com/jpolitz/.
Making a Repository
From your Github profile page, click the + in the upper right to make a new repository (you can call it something like lab1). For lab work, your repositories can be public (for assignments we will show you how to make them be private).
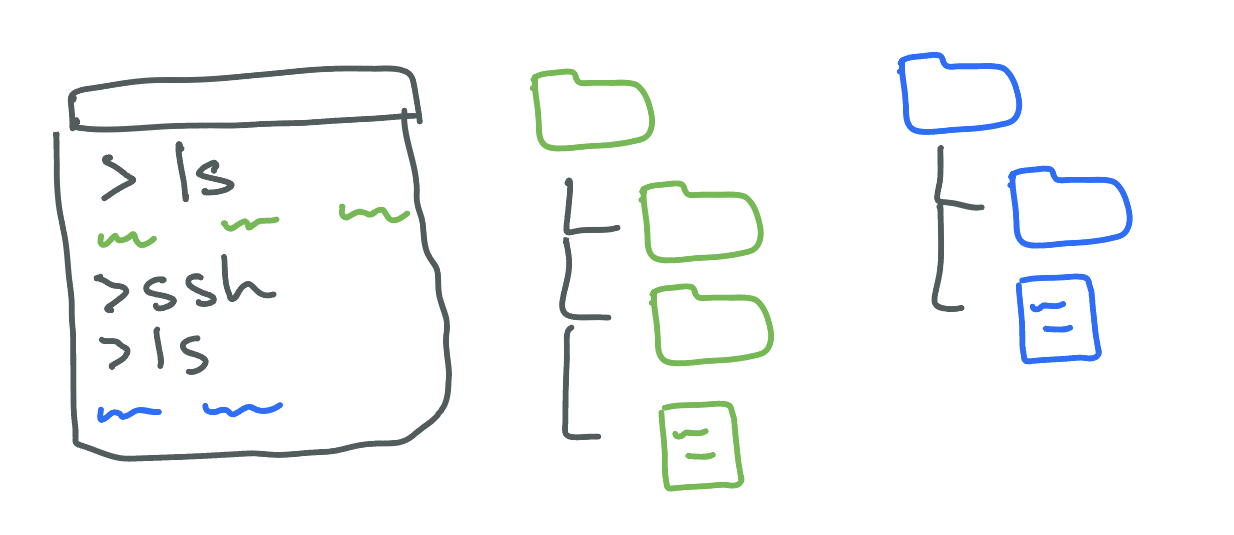
Definition: A repository is a place to store code and other files. It has some similarities to a shared folder in Google Drive: it stores a collection of files and folders, and there are ways to share it with others. The main special thing about repositories is that they store a detailed history of changes to files, which turns out to be really important for programming projects.
There are many ways to interact with a repository; we'll see a few today and many more throughout the quarter. After you create the repository, you'll see a page like this:
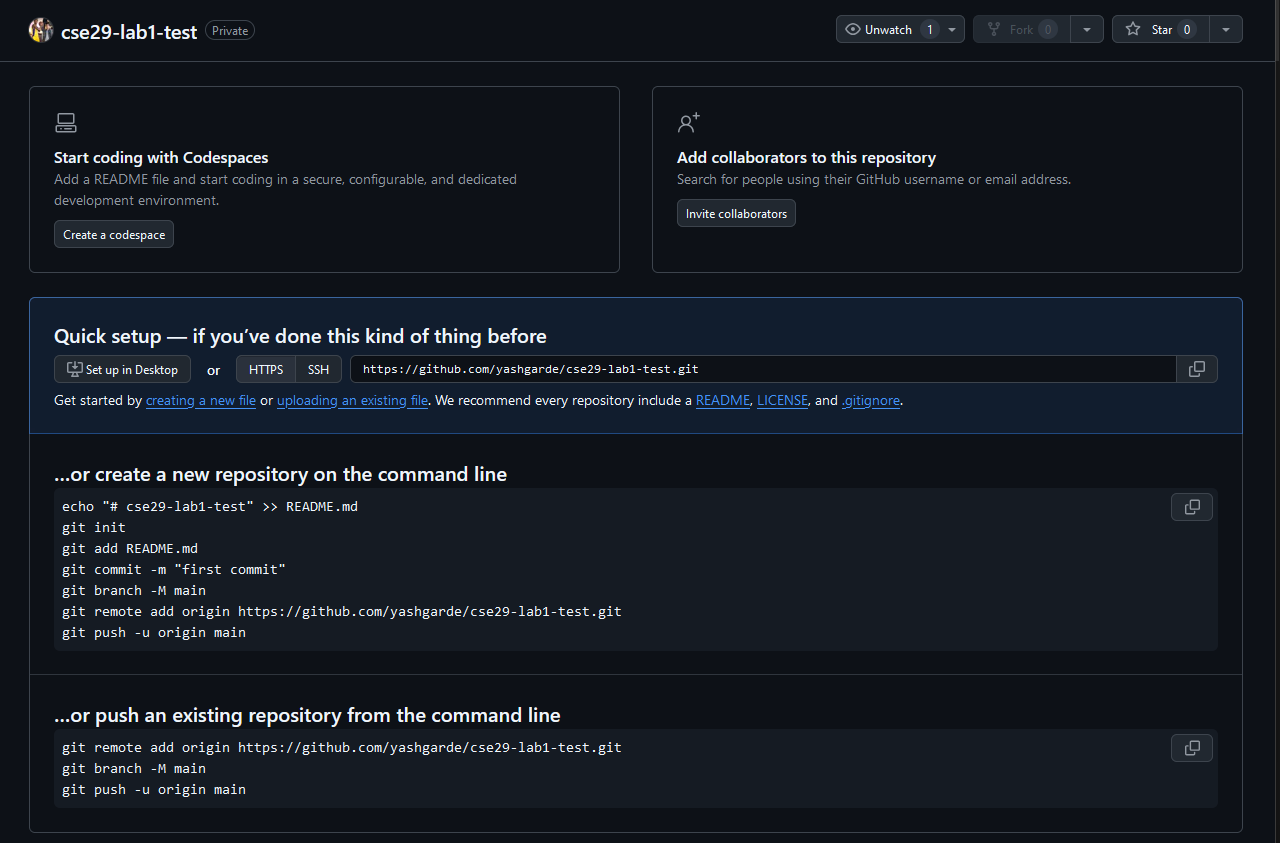
For a first step, you'll make a README file directly on github.com. Click the README link on your empty repository page and you'll be taken to an editor where you can write some text. You can write anything you like for this first section; when you're done, click the Commit changes... button.
Write down in your Google Doc:
For each student, a screenshot of their repository after adding the README file. If anyone ran into errors or issues, describe them!
Github Codespaces
Github has a feature called Codespaces that provide an online environment for the full development process – writing code, running programs, and managing a repository. We'll use this feature throughout the course to have a standardized programming environment for everyone; Codespaces is also similar to many production environments in tech companies and research labs.
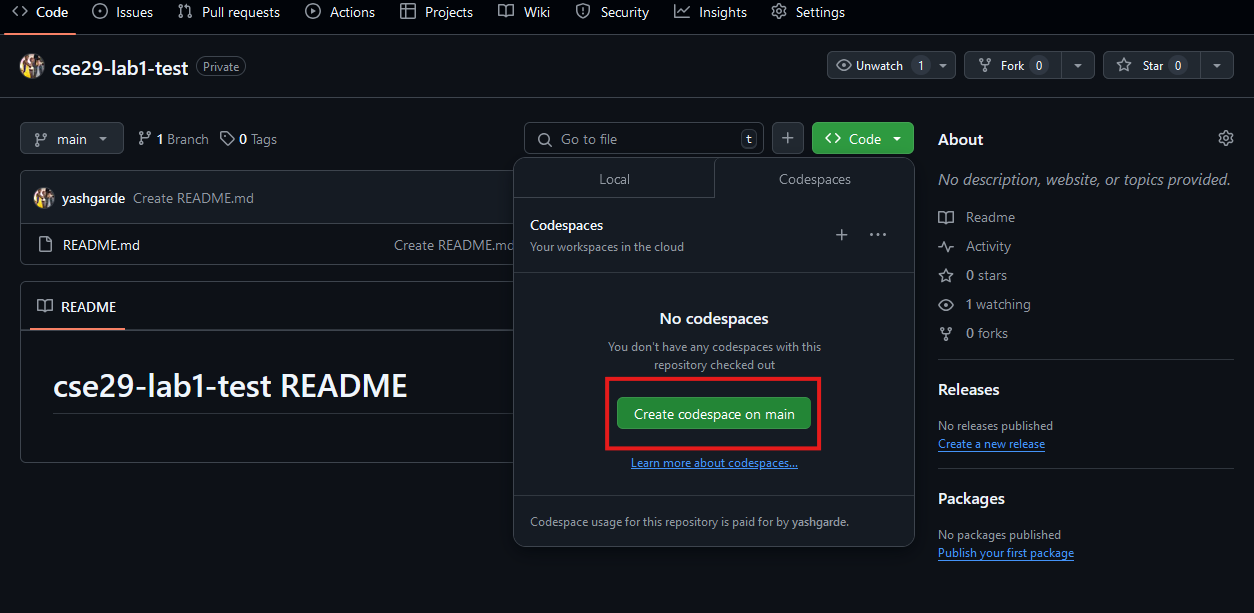
For this lab, we'll create a Codespace to do our work. Click the Code button on your repository page, and then click the Create codespace on main button:
This will open a new Codespace (sometimes it takes a minute to start up), which will look like this:
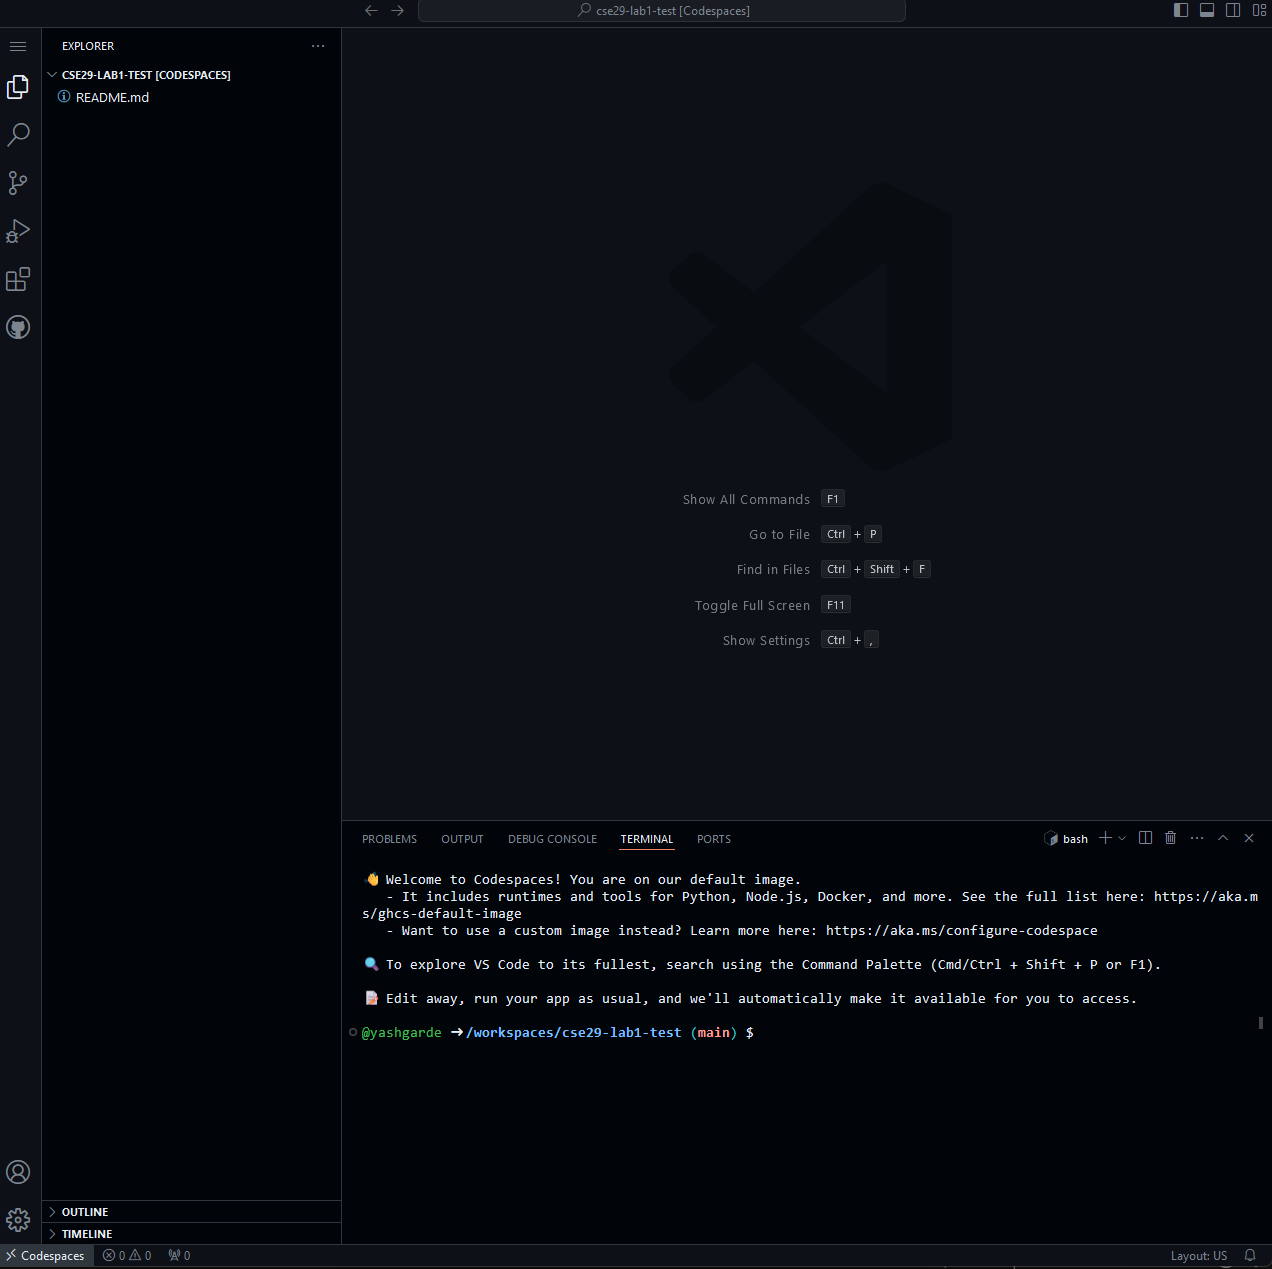
(A cute name will be randomly generated for each new Codespace you make. Check out the URL to see what name you got!)
The README file you made can be seen in the file navigation on the left. You can click on it to open it in a new editor tab (it may have opened by default when the Codespace started, as well). You can type into it to make edits. You may need to double click on the file in the file navigation to open it in the editor.
Do now: Type some edits into the README file. Then, open a new tab and go find the repository again from your Github page. Do you see the edits to the file there?
Write down in your Google Doc: For each student, a screenshot of the edited text in your Codespace, and a screenshot of the repository on Github showing the contents of the README. (NOTE: there will be a difference in these two screenshots!)
To propagate the changes from our Codespace to the repository, we need to commit and push them. We'll talk in detail about these in future labs and lectures; for now we'll just show you how in the Codespace interface and defer explanations to later.
On the left sidebar there is a “Source Control” icon. Click on this, you'll see a M next to your README file listing, which means “modified”. Click on the + next to the M to stage the changes. Then, write a short message in the text box (something simple like “Edited README” suffices). Finally, click the checkmark icon to commit the changes.
Then, click the three dots next to the checkmark and choose “Push”. This will send the changes to the repository on Github.
Write down in your Google Doc: For each student, a screenshot of the repository on Github showing the contents of the README including the edits.
Github Codespaces Summary
In this intro, you've:
- Set up your Github account
- Created a repository on Github
- Created a file through the Github editing interface
- Created a Codespace
- Edited the file in the Codespace
- Committed and pushed the changes to your repository
You'll use all of this setup many times throughout the quarter, and likely the same or similar steps thousands of times throughout your programming career! 🚀
Terminal and ieng6 login
A working systems programmer spends a fair amount of time at the terminal – a text-based interface to a computer. In this course we'll make heavy use of the terminal, both for running programs and for interacting with the system.
In your Codespace, you can open a Terminal by clicking the Terminal menu and choosing New Terminal. This will open a terminal window at the bottom of the screen. A terminal may already be open at the bottom of the screen from when you created the codespace, if not you can also press Ctrl+Shift+` to open a new terminal (hold down the Control key and press backtick, the key to the left of 1 on the keyboard).
Navigation Commands
Try running the following commands in your Codespace terminal. To run a command, type it in and press enter.
pwd
ls
ls .
cat README.md
cat README
cat does-not-exist
mkdir myfirstfolder
cd myfirstfolder
ls
ls .
pwd
touch file1.txt
touch file2.txt
ls
rm file2.txt
ls
ls ..
cd ..
pwd
ls
ls myfirstfolder
Discuss in your group and write down in notes: For each command you just ran, include both a copy-paste of output you see at the terminal and any changes you see in the file navigation as observations of the command's behavior. Then, for the commands ls, cd, pwd, touch, cat, do your best to give a general description of the command. If you're not sure, that's okay! We'll talk more about all of these going forward, and after you are done trying this out, a staff member will add some definitions we have for them to your notes doc to make sure we have agreed-upon summaries.
Downloading a File From the Command Line
Run the following command:
curl https://raw.githubusercontent.com/ucsd-cse29/fa24/refs/heads/main/src/lec/week1/hello.c
You should see the contents of an example from class. Then run this command:
curl -o hello.c https://raw.githubusercontent.com/ucsd-cse29/fa24/refs/heads/main/src/lec/week1/hello.c
You should see the file hello.c from class downloaded and saved into your Codespace. You can observe it in the file navigation, and with ls and cat (try all of them!).
Try opening the link from above in your browser.
curl takes a URL (a link) and downloads the contents. The optional -o somefile command-line option or command-line flag specifies an output file to save the contents to.
Definition: A command-line option or command-line flag is a way to give extra information to a program. Options are usually specified with a dash (-) followed by a letter or word. For example, -o is an option for curl that specifies an output file. The full list of options and flags is usually available by doing a search for the program online, or by using the command man (short for “manual”, nothing to do with dudes). Try running man curl at the terminal (the result may “take over” your terminal, you can use the up and down arrows to scroll and q to get back to the command prompt).
Logging into ieng6
As a student, you are assigned an account on the ieng6 server hosted by UCSD. These are similar to accounts you might get on other systems at other institutions (or a future job). We’ll see how to use your machine to connect to a remote computer over the Internet to do work there.
Your account name is the same account name as the one that’s used for your school Google account, i.e. it is the string that precedes “@ucsd.edu” in your school email address. In case you need to check the status of your student account, refer to the UCSD Student Account Lookup page.
Next run this command (with yourusername replaced by your actual username):
ssh yourusername@ieng6.ucsd.edu
Since this is likely the first time you’ve connected to this server, you will probably get a message like this:
$ ssh yourusername@ieng6.ucsd.edu
The authenticity of host 'ieng6.ucsd.edu (128.54.70.227)' can't be established.
RSA key fingerprint is SHA256:ksruYwhnYH+sySHnHAtLUHngrPEyZTDl/1x99wUQcec.
Are you sure you want to continue connecting (yes/no/[fingerprint])?
Copy and paste the one of the corresponding listed public key fingerprints and press enter.
- If you see the phrase ED25519 key fingerprint answer with: SHA256:8vAtB6KpnYXm5dYczS0M9sotRVhvD55GYz8EjN1DYgs
- If you see the phrase ECDSA key fingerprint answer with: SHA256:/bQ70BSkHU8AEUqommBUhdAg0M4GaFIHLKq0YQyKvmw
- If you see the phrase RSA key fingerprint answer with: SHA256:npmS8Gk0l+zAXD0nNGUxr7hLeYPn7zzhYWVKxlfNaeQ
(Getting the fingerprint from a trusted source is the best thing to do here. You can also just type “yes”, as it's pretty unlikely anything nefarious is going on. If you get this message when you're connecting to a server you connect to often, it could mean someone is trying to listen in on or control the connection. This answer is a decent description of what's going on and how you might calibrate your own risk assessment: Ben Voigt's answer.)
After this, you get a prompt to enter your password. This is the same password you use to log into your student account on other websites, like Canvas and Tritonlink. The terminal itself does not show what you type when you enter your password. This is conventionally done for your own security, so that others looking at your screen don’t see it. Just trust that it gets inputted when you type.
Now your terminal is connected to a computer in the CSE basement, and any commands you run will run on that computer! We call your computer the client and the computer in the basement the server based on how you are connected.
The whole interaction will look something like this:
# On your client
$ ssh yourusername@ieng6.ucsd.edu
The authenticity of host 'ieng6-202.ucsd.edu (128.54.70.227)' can't be established.
RSA key fingerprint is SHA256:ksruYwhnYH+sySHnHAtLUHngrPEyZTDl/1x99wUQcec.
Are you sure you want to continue connecting (yes/no/[fingerprint])?
Password:
# Now on remote server
Last login: Tue Oct 1 14:03:05 2024 from 107-217-10-235.lightspeed.sndgca.sbcglobal.net
quota: No filesystem specified.
Hello user, you are currently logged into ieng6-203.ucsd.edu

You are using 0% CPU on this system

Cluster Status
Hostname     Time    #Users  Load  Averages
ieng6-201   23:25:01   0  0.08,  0.17,  0.11
ieng6-202   23:25:01   1  0.09,  0.15,  0.11
ieng6-203   23:25:01   1  0.08,  0.15,  0.11

To begin work for one of your courses [ cs29fa24 ], type its name
at the command prompt.  (For example, "cs29fa24", without the quotes).

To see all available software packages, type "prep -l" at the command prompt,
or "prep -h" for more options
Then, execute the following commands:
export MODULEPATH=/home/linux/ieng6/cs29fa24/public/modulefiles:/public/modulefiles
module load cs29fa24
You should get the following output:
Tue Oct 01, 2024 11:28pm - Prepping cs29fa24
Now your terminal is connected to a computer in the CSE basement, and any commands you run will run on that computer! We call your computer the client and the computer in the basement the server based on how you are connected.
If, in this process, you run into errors and can't figure out how to proceed, ask! When you ask, take a screenshot of your problem and add it to your group's running notes document, then describe what the fix was. If you don't know how to take a screenshot, ask!
Running Commands, Remotely
Run all the commands from the earlier section again, while logged into ieng6 in the terminal. Include the curl commands as well.
Discuss and write down in notes: For each command, compare its output to what you got in the Codespace. Discuss any differences you see. Which commands work identically? Which seem to have different behavior? Why might that be? What does it mean for a file to be “in” your Codespace vs. “in” your ieng6 account?
Running C Programs
Sometimes we will work in the Codespace, and other times it will be important to do work on ieng6. This mirrors common practice in industry and research labs, where you may do some development locally, while other times you have to configure, edit, or run programs on a specific machine. In this part of the lab we'll see how to build and run a C program (like the one from class) in both places.
At this point you should have hello.c present in your Codespace and in your ieng6 account.
Compiling and Running in Both Places
You can open more than one terminal in your Codespace, and in fact you can see more than one terminal at a time. There is a little icon in the top right of the terminal that looks like a square with a plus sign in it. Clicking that will open a new terminal. You can also drag the tab of a terminal to the side of the screen to create a new panel, and you can see both terminals at the same time. You may want to try that for this activity! New terminals in your Codespace will always open in the context of your Codespace, not logged into ieng6.
Open two terminals, one logged into ieng6 and one in your Codespace.
In both, run the following commands one at a time:
ls
gcc hello.c -o hello
ls
./hello
Write down in notes: What effect did the gcc command have? What did the ./hello command do?
Some definitions:
gccis a compiler for C programs. It takes.cfiles (and other things we'll see later) as inputs, and generates executable files (likehello) as outputs.- An executable file is specially encoded with instructions for a specific (type of) machine. We won't talk in much detail about it in this course, but the way an executable file runs on a computer is one of the the main topics of CSE30. These files can be run without any other tools. When we run
helloby writing./hello, we are directly telling the operating system to run the instructions in that file.
Making an Edit
Next, in your Codespace editor, make an edit to hello.c to change the string message to one of your choice. Save the file, then rerun the commands above in both terminals.
Write down in notes: What was the output in each terminal? What did you observe about the behavior of the program in each place?
When you change the file in your Codespace, the file on ieng6 does not change. You can use cat to verify this; the edit you made is only to the file stored in your Codespace. This is an important concept! Each computer has its own filesystem that stores files and folders. Each terminal is connected to one computer (and to one filesystem) at a time. Knowing which computer you're running commands on is really important for that reason!
It's worth asking how we can get our edits onto ieng6 to run the modified program there. There is a command, related to ssh, called scp, that does just that.
From your terminal connected to your Codespace, run this command (replacing yourusername with your username as before; you will be prompted for your password again):
scp hello.c YOURUSERNAME@ieng6.ucsd.edu:./
Then, in your terminal connected to ieng6, run the following commands:
cat hello.c
gcc hello.c -o hello
./hello
The command scp takes files and copies them to the computer and folder given by the second argument. The : is separating the username and name of the server from the path or folder to copy it into – ./ just means “your home directory”, which is the same folder you see when you log in. scp is a useful command for moving things around between computers. There are many other ways we could accomplish this, but this is one of the most direct.
Write down in notes: For each student, take a screenshot of successfully running the scp command and then using cat to see the new output on ieng6, and put it in the notes.
Summary
- A repository is a place to store code; Github is a service for storing repositories
- A Codespace is a web page that connects to a computer at Github that holds your repository and lets you run commands and edit your code
- A terminal is a text-based interface to a computer.
- We run commands in the terminal, which have options and flags and arguments. We can look up commands' behavior online or with
man - commands are programs that can do all kinds of things, from file management (
ls,cat,cd) to connecting to other computers (curl,ssh) to compiling and running programs (gcc,./hello) - We can connect to
ieng6, which is a collection of computers at UCSD, usingssh. Many times we need to connect to other computers we will usessh - Each computer has its own filesystem, which is a collection of files and folders. We saw the Codespace filesystem and the
ieng6filesystem - We can compile C programs using
gccwhich creates executable files - We can run executable files with
./filename - The
scpcommand can be used to move files between computers (using the same login asssh)
Before you leave - Lab Group Preference Form
Please go ahead and fill out this Google form before you leave, this will help us create the seating chart for next week. Link to Google form
More Practice
These are open-ended exercises for you to try and discuss with your group. These are also great conversation-starters for office hours, deeper understanding with friends outside of class, or conceptual questions on Piazza. Feel free to take your results and write down in notes what you found!
- Commit and push your changes to
hello.cGithub. Can you figure out how to download the code you wrote from Github toieng6usingcurl? (Hint: inspect the URLs we shared for downloading class code) - Try creating a new
.cfile from scratch that prints something different. Compile and run it in both your Codespace and onieng6, using your method of choice to move it toieng6. - Try running the
scpcommand without the./at the end of the path. What happens? - Use
scpto copy a file into a different folder onieng6(like the one you made withmkdir). What does the command look like? - Cause an error in
hello.c(change the name ofmain, or drop a", or otherwise cause an issue), then recompile and re-run. What does thegcccommand output? What does the./hellocommand output? Why? - Try running
gccwithout the-o hellopart. What happens? What is the name of the output file? Can you run it? - Try running
gccwith the-oflag with a different name. What happens? What is the name of the output file? Can you run it? - Run
ls ..after logging intoieng6. What do you see?
Week 2 – Project Management and Testing
Meet your Group!
Meet your more permanent group for labs!
Write down in notes: In your groups, share, and note in the running notes document (discussion leaders, you answer these as well!):
-
How you'd like people to refer to you (pronounce your name/nickname, pronouns like he/her/they, etc)
-
Your github username
-
Your major
-
One of these that you didn't share in week 1:
- A UCSD student organization you're a member of or interested in
- Your favorite place you've found on campus so far
- A useful campus shortcut or trick you know
-
Your answer to the following question. Get to know your fellow group members!
- Pick a song as the soundtrack of your life! Why you did you choose this song? What’s your favorite genre? Who’s your favorite artist?
Testing
The main activity is around writing good tests, with some other activities around managing your code repository.
Some Tests are Always Better Than None
We ask you for a few categories of tests in PA1, which make sure some basic (and not-so-basic) functionality is working. Each of these has a few ways to write it, and you should definitely write more tests than these.
Write down in notes: To get started, everyone in your group should put a
test into the shared doc (there should be an example of what one should look like in the doc already!).
A test for this assignment includes both the input file and the .expect
file. You shouldn't pick the simplest test you wrote; pick one you think is
particularly interesting. If you haven't written any tests yet, write an
interesting test!
Then, add all the tests from your group to your PA's tests and try them on your implementation, and show what happens for each.
If you haven't started yet, this is a great time to get your repository set up, get those tests in, and make sure you know how to run the tests. The program that reads from input from the first quiz, or the programs from discussion, are great starting points.
(NOTE: Google docs will automatically turn typed ASCII quotes (",') into fancy quotes (“,”), so be careful when copying quotes out of a google doc into code / test files. You can turn this off in Tools>Preferences>Use Smart Quotes)
Write down in notes: When your group runs the tests on one another's implementations, what happens? Did your test find a bug in anyone else's implementation? Did someone else's test find a bug in yours? (Does this whole experience just make you extremely motivated to start early next time 😬?)
What Makes Tests Good?
That process, and your own work before today, gave you a few example tests. These aren't thorough enough to test everything that needs to be covered by the program. But what does it mean to “cover all the cases”? In general, there is no theoretical limit to the number of strings we can create, so we can't test all possible inputs (also called exhaustive testing). So we can't say “cover all the cases” means that we write a test for every possible string.
Another way to think of this is in terms of implementations. There are many correct and many incorrect (or incomplete) versions of the UTF analyzer that we can imagine. Some of them are yours! Each test we write would pass or fail on each of these implementations. If it passes on an incorrect implementation, we could say that test doesn't “notice” or “witness” that implementation being wrong. If it fails on an incorrect implementation (while passing on all the correct ones), that's great! It means it is a high-quality test that tells us something about a bug in an that incorrect implementation.
Then, a way of thinking about “covering all the cases” is “how many bad implementations would these tests catch?” Of course, there are infinitely many bad implementations (just like there are infinitely many strings), so in general we can't expect perfection. But most incorrect implementations are close to correct ones (they just have a bug or two), and targeting tests at common mistakes that might be made is a useful way to organize our thinking.
To that end, we've handwritten some bad implementations of the UTF8 analyzer. Your job as a group will be to write a set of tests where some test fails on each of the bad implementations (while still being a correct test).
Your lab leader will share a repository with you that all of you can use for this lab (it will be public and you'll be able to access it later).
Everyone should be able to make their own Codespace from this repository – the
Codespace is just for you, the repository is shared with your whole group. In
the Codespace, spend a few minutes writing some tests and trying them out
against the provided implementations. All of them are mostly right, but have
some specific bugs related to their names. We made one very obviously wrong;
it simply always returns 1 for is_ascii, so any test with a non-ASCII
character will fail.
$ cat tests/crab.txt
🦀
$ ./bin/always_ascii < tests/crab.txt
Enter a UTF-8 encoded string:
Valid ASCII: true
... other output
If you run with the testing script, you'll see the failure:
$ ./test_script bin/always_ascii
Test ./tests/crab.txt failed.
Expected line not found in output:
Valid ASCII: false

Test ./tests/invalid_and_uppercased_ascii_test.txt failed.
Expected line not found in output:
Valid ASCII: false

Test ./tests/is_valid_ascii_test.txt passed.
Your task (as a group) is to write tests to make all of these bad implementations fail using correct tests (e.g. tests that ought to pass on any correct implementation).
Do some work in your individual Codespaces, then commit and sync your tests. Make sure to pick unique names for your test files (consider prefixing with your username) so that the filenames don't conflict.
Can you trigger the bugs in all the bad implementations?
Managing Your Repository
The rest of the lab will have you work on your own repository for PA1 and make progress on the PA. We have some advice about managing your repository that we want you to try.
We recommend making commits, and pushing, to your repository whenever you get to
a useful working checkpoint. That could mean that you got a new test to pass,
for example, or got the first version of one of the functions written, and so
on. We also recommend using .gitignore to manage files that are created by
the compiler (but shouldn't be in version control).
-
Practice creating a small commit in lab – add a test and/or some small amount of code, and make a commit and push. In your notes document: put a screenshot of the commit that you pushed to Github.
- If you've been working this way all along, you can just share a small commit you made earlier.
- If you're just getting started, this can be your first commit of the
mainfunction. - If you're in the middle of working, you can make one commit and push with whatever the current state of your work is, and then another small commit
Notice that you can click on any commit and see the individual files at that point in time! This can help you get back to an earlier state if you're stuck.
-
The file you create with
gcc(probably calledutf8analyzeror similar) changes every time you compile, and could be entirely different when compiled on different computers. It also doesn't have a meaningful “diff” between versions, since it's a binary file. For these reasons, built files are usually not included in a repository. The file.gitignorein the root of a repository can list files that should be completely ignored bygit– it won't include them in the list of files to add or change.- Compile your program and show a screenshot of the status of the binary file that was created (for example, in the source control/Git tab of the codespace)
- Change your
.gitignoreto include the path of this file - Observe that it no longer shows up as a file to add!
It's really useful to keep repositories organized and tidy.
.gitignoreis one way to do that, separating the source code of a project from other “build artifacts” that are temporarily important but shouldn't be tracked and saved in the same way as code.
Working on the PA
Armed with your thorough tests, spend some time working on the PA. You might choose to just include some of the tests you've written in your own code at first as you work on invidual milestones.
Feel free to work together, though keep in mind the academic integrity policies
and CREDITS.md. In this (and in all things learning-based) focus on what's best
for your learning and understanding, not just what's best for finishing the
PA. The conceptual knowledge pays off later in the course, on exams, and in your
career, getting the code complete for a PA without understanding it has little
effect.
Signing Up for An Exam Slot
Next week (week 3) is the first exam. It will have questions in the same platform you've seen in the PrairieLearn quizzes. You need to sign up for an exam slot during week 3, which you can do HERE
This document is the Triton Testing Center's guide: https://tritontesting.ucsd.edu/for-students/scheduling-a-test.html
You should not use lecture or lab time to take the exam; next week will be a normal week of lecture, lab, quiz, and so on with the added exam at some time outside of class.
(You can do this outside of lab time, too, but we wanted to make a point to remind you during lab!)
If you are done early:
- Implement a Zalgo text generator (https://zalgo.org). Do your own research to figure out how that works.
- Implement
reversethat takes an argument buffer to store the reversed string. If they do that, then they should doreverse_in_placethat uses as little extra memory as possible and reverses in place. - Research how to go about implementing
uppercase/lowercasethat includes accented characters. Can you find a library or tool that would help? How do you think that works in software tools like autocorrect that capitalize the first letter of a sentence?
Week 3 – Terminal Usage and Git
Lab Goals
- Set up SSH keys for
ieng6and Github - Learn how to edit files on the terminal using
vim - Do all the steps for working on a PA entirely on a remote computer (
ieng6) - Learn how to manage repositories using
gitCLI
Lab Tasks
Part 1 – Let's get a Terminal Setup
- If you're using Windows, install Git for Windows using all the default/recommended settings as suggested by the installation wizard. Mac users have a pre-installed terminal application.
- Open the Git Bash terminal application (Windows) or Terminal (Mac) and try some commands from Lab 1
-
Try to
lsyourDesktopdirectory. Do those files look familiar? -
Try to
sshintoieng6with your username and password (just like you did in Lab 1) - Help each other if anyone has issues installing or figuring out the terminal.
Discuss and write in notes:
- What was the working directory of the terminal when you launched it?
- What is your home directory on this computer?
- What files and folders are in the home directory?
- Where do you think files that download from your web browser go? Can you list
them with
ls? What's the absolute path to that folder? - Do any commands work differently than you expect on this computer?
- Are you able to use
sshwith your username and password from your local terminal to log intoieng6and enter the course-specific account?
Take a few screenshots of what you found particularly interesting, and discuss how this environment differs from the terminal you used on Codespaces.
Part 2 - Setting up SSH Keys for Easy Access to ieng6
With the setup we've used so far this quarter, each time you log in to your course-specific account, you have to type the password. This can get a bit tedious and luckily there is a cool and interesting way to avoid this while still staying secure using SSH keys.
We've labelled each step with whether it should run on [Y] our computer or [i] eng6. Make sure you follow the instructions carefully!
-
[Y] In your local terminal, run
ssh-keygen. This command will generate a pair of SSH keys for you, one public and one private. -
[Y] Keep pressing
<Enter>until the program shows some text it calls the "randomart image".- Note the path where the public key is saved (underlined below).

-
[Y]/[I] Now, log into your remote course specific account on
ieng6withssh(using your password as usual) DO NOT run thecs29fa24command to prepare your course-specific environment! -
[I] Run
mkdir .sshin the terminal -
[I]/[Y] Log out of your remote account by pressing
Ctrl-Dor typingexit. -
[Y] Now, we want to copy the public SSH key you created on your local machine onto your remote account; specifically inside the
.sshdirectory you just created, into a file calledauthorized_keys. Scroll up in your terminal to where you were creating the SSH key, find the line where it says:Your public key has been saved in: <path to your public SSH key>, copy the path. Make sure you get the public key file, ending in.pub, here, not the private file.
- [Y] Think about a command that will perform the copying of the public key file from your local machine to the
.sshdirectory on your remote account with the appropriate name (HINT: you used this command in Week 1's lab). Work with your group members if you need help!
If you're really stuck, click here to see the answer
From your local computer, runscp PATH_TO_YOUR_PUBLIC_SSH_KEY USER@ieng6.ucsd.edu:~/.ssh/authorized_keys
Make sure to replace USER with your UCSD username and PATH... with the appropriate path
- [Y]/[I] Try to log onto your remote account again, you shouldn’t be prompted for a
password anymore. If you are, ask for help and carefully review the steps above
with your group. To review:
- You should have a directory called
.sshon your computer in your home directory. - That folder should have a key file created by
ssh-keygenand a corresponding.pubversion of the file. - You should have a directory called
.sshonieng6(that you created withmkdir) in your home directory. - The
.pubfile from your computer should be copied to the.ssh/authorized_keysfile onieng6
- You should have a directory called
Add to your notes: A screenshot of you logging into your ieng6 account without a password prompt.
Part 3 - Working in Terminal
So far, we've been primarily using our terminal to compile our C code (with gcc)
and run our programs, but we've just scratched the service of what the terminal can do.
The terminal is the ultimate gateway into communicating with our computer, and today we're going
to dive more into the different ways we can use the terminal to make our lives easier.
3.1 - VIM
vim is a text editor that runs entirely in the terminal. For better or worse, many times developers find themselves with only terminal access to a remote computer, and need to do some programming – that is, editing source code files. A terminal-based editor makes this possible. (As a side effect you can look like hacker from a movie controlling everything
without needing a mouse.)
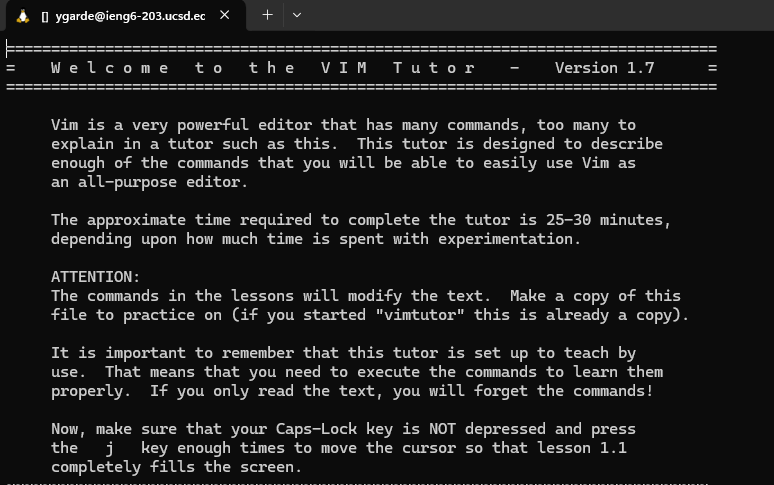
There are a lot of online resources available for vim, but thankfully, the program itself comes with a
interactive tutorial (that's pretty neat!). We can access this tutorial with the vimtutor command from
our terminal
Task: Open the vimtutor tutorial in your terminal and complete Chapters 1 & 2.
Once you have completed the first 2 chapters of vimtutor, you will now be using some of the commands that you learned to correct a bug in a C program that we have written for you.
Task:
- [Y]/[I] If you aren't logged into
ieng6, log in now. (password-free hopefully!) - [I] Download our buggy C program using
curl. The command would look like
curl https://raw.githubusercontent.com/ucsd-cse29/lab3-starter/refs/heads/main/average.c -o average.c
- [I] Compile and run the
average.cfile. - [I] Open the
average.cfile invimand read through the program. - [I] Determine the bug in the program and correct it in
vim. (Try doing it without introducing a new variable!)
Write in your notes: The keys/commands you are pressing/using while navigating vim
- [I] Re-compile and re-run the program to ensure that it now outputs the correct value.
Write in your notes:
- The original output of the program.
- What do you think the program is supposed to do/output?
- What was the bug and how did you fix it?
- The output of the program after the bug has been fixed.
When you are done, discuss with a partner discuss what was comfortable and what was tricky about correcting the file. Compare the commands you used with other members in your group and note the differences.
3.2 - VIM Telephone
Next, we will see how different members of your group approached fixing the bug in the provided C code. You will be running your group members' vim keystrokes to see the differences in how each of you navigated the vim editor.
Task:
- [I] Redownload our C file using a similar
curlto the previous section.curl https://raw.githubusercontent.com/ucsd-cse29/lab3-starter/refs/heads/main/average.c -o average2.c. - [I] Now, run the commands that another member of your group used to correct the
average.cfile. You should find the commands in your shared Google Doc. - Write in your notes: What were some of the key differences you noticed between your keystrokes and your group members?
Part 4 - Github with ieng6
With the bug fixed, we now want to push our changes to our Github repository. Before we can do that though, we need to be able to perform actions against our Github repository from ieng6. This is where SSH keys come in handy once again!
4.1 - Setting up SSH Keys for Github
- [Y]/[I] Login to
ieng6as usual (hopefully, without typing a password now!) - [I] Run the command
ssh-keygen, and again press<Enter>until the command completes and shows the "randomart image". Just like before, this will put a key file and a.pubversion of it into the.sshdirectory – this time onieng6!
Next, we want to add the public key to your Github account. This is like the step of copying the public key to authorized_keys on ieng6, but instead we're copying to Github.
-
[I] Display the SSH public key generated above using
cat <path of your ssh key .pub file>and copy it to your clipboard; you can copy it by highlighting and right-clicking -
Open your Github account on the browser.
-
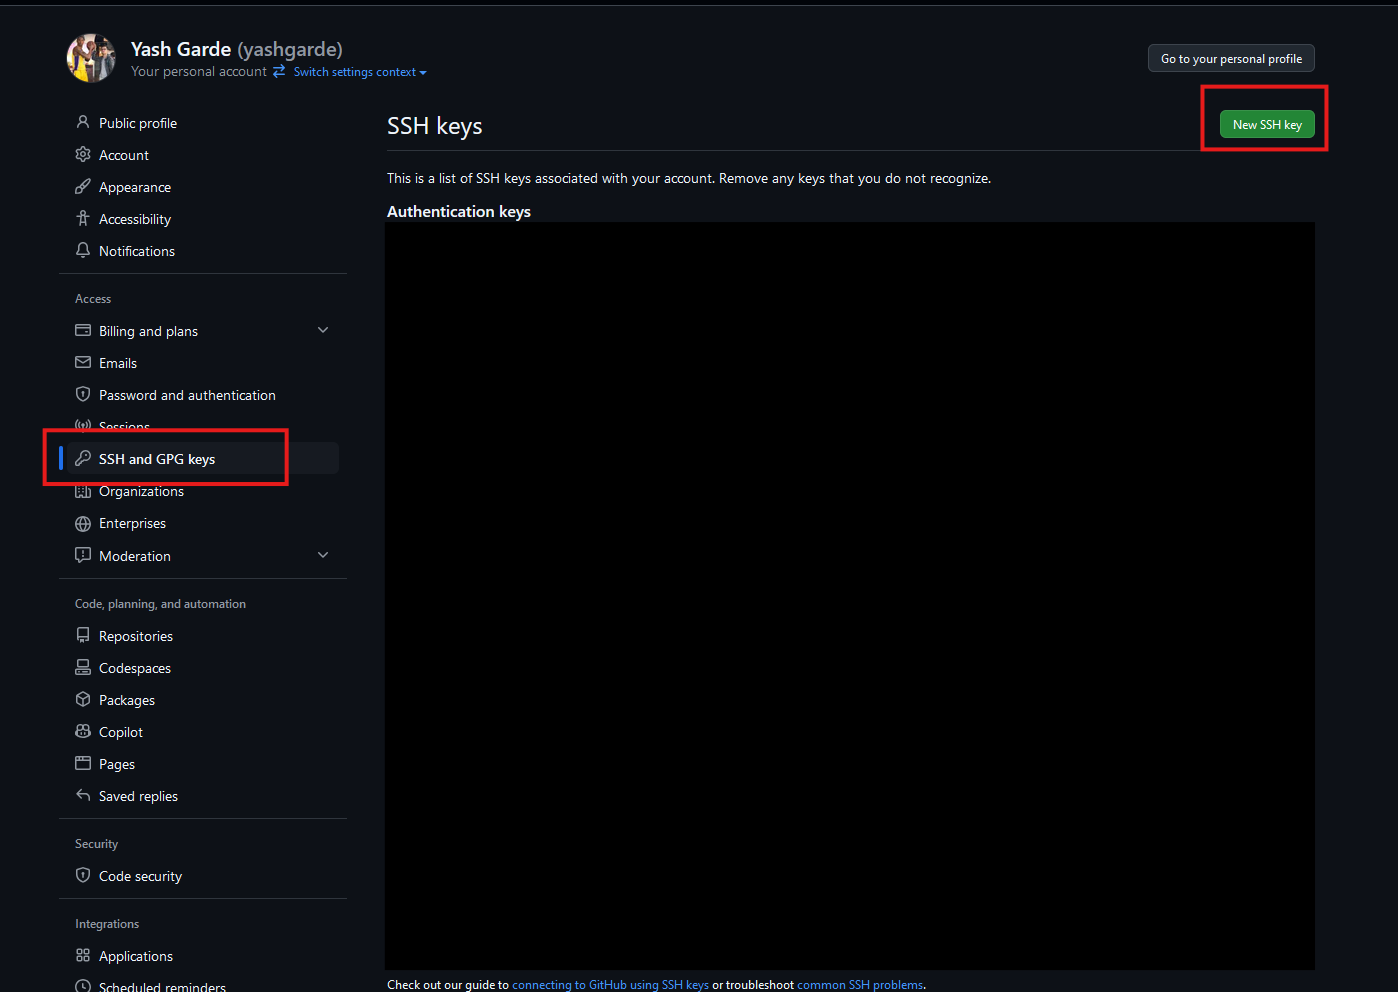
In the upper right corner, click on your profile photo, then click Settings.

-
In the “Access” section of the sidebar, click SSH and GPG keys.
-
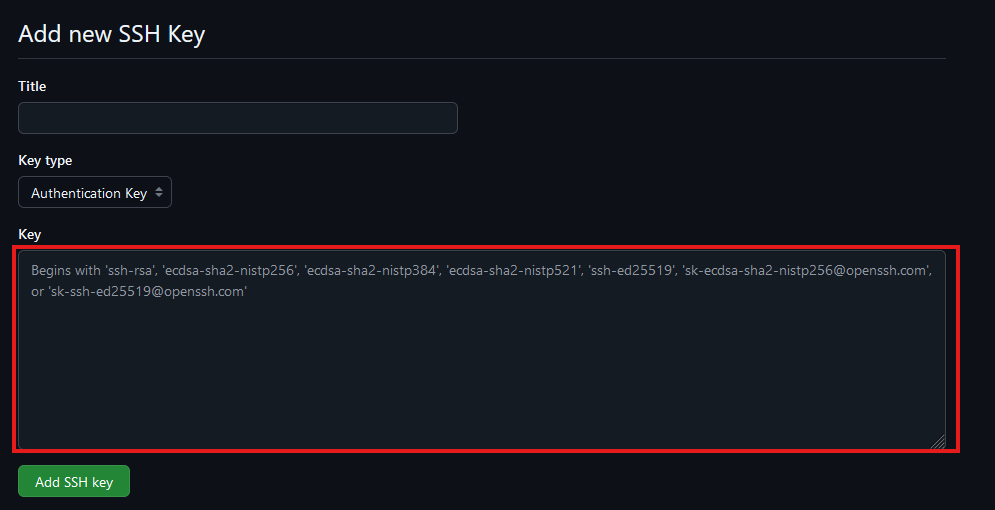
Click New SSH key or Add SSH key under the “SSH keys” section.
-
Add a “Title” to your key (ex: Aaron's ieng6 machine).
-
Select the “Key Type” to be an Authentication Key
-
Copy your public key from the output of the cat command and paste it into the “Key” field
-
Click Add SSH key.
-
If prompted, confirm access to your account on Github.
Go back to the ieng6 terminal and:
- [I] Run the following command to add github.com as a recognized host (this avoids the scary yes/no prompt about accepting new connections the first time you connect)
ssh-keyscan -t rsa github.com >> ~/.ssh/known_hosts>>means "append stdout of the command to file"
- [I] Check your connection by running the following command:
ssh -T git@github.com- It will say something like "Hi supercoolstudent1234! You've successfully authenticated, but GitHub does not provide shell access."
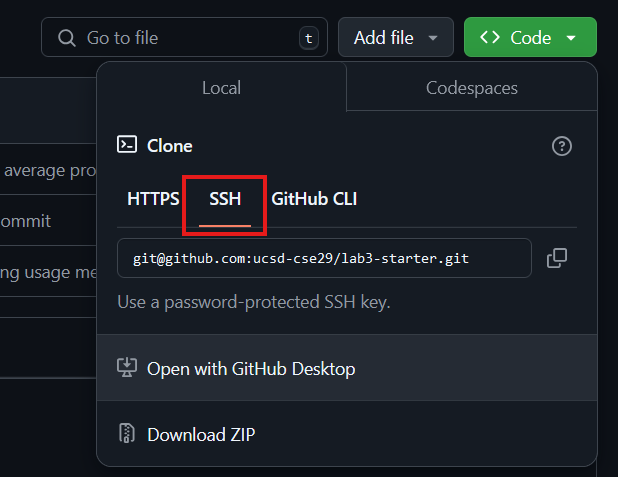
Now we have an SSH key which can be used to authenticate to GitHub! In addition to using https clone URLs, we can now use SSH clone URLs that look like this:
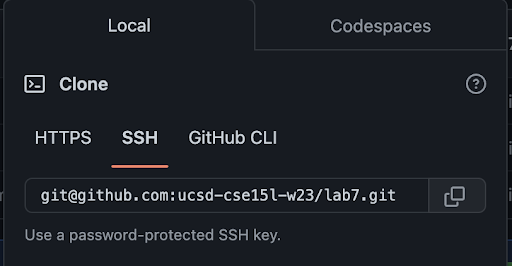
Crucially, these will allow both cloning and pushing to the repository (as long as your account has access) from ieng6!
4.2 - git CLI commands
So far you have been using the "Source Control" tab in your Github codespaces to commit and push your changes. Since we only have our terminal today, we will be learning how to use the git CLI to do the same thing.
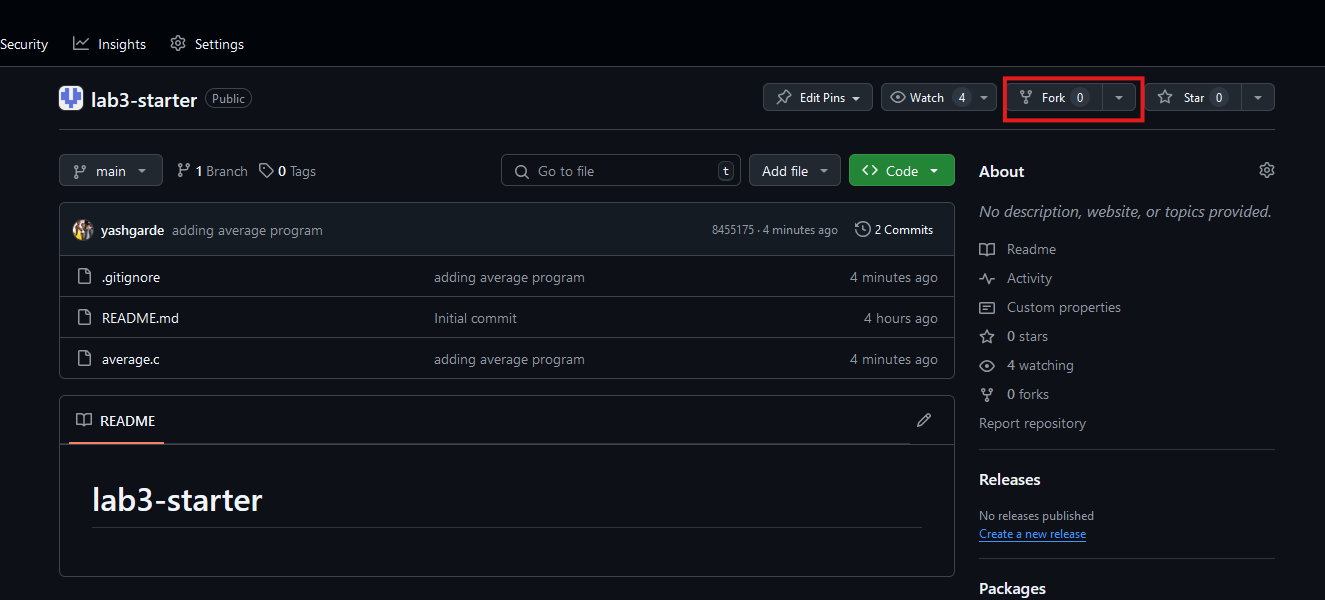
- Forking a repository
A fork of a repository is a personal copy of the repository that you can make changes to without affecting the original repository. To fork a repository, click the "Fork" button in the top right corner of the repository page.
Task: Create a fork of the Lab 3 starter repository here.
- Cloning with
git clone
To retrieve a local copy of our git repository, we use the git clone command. clone takes a link from github (usually beginning with https://github.com or git@github.com).
Task: Use the SSH clone URL to clone your forked repository to your ieng6 account into another new directory. Fix the bug that you fixed earlier in the average.c file again and then proceed!
After we are done making changes to our local branch it's now time to push our changes to our remote branch (in this case github)
- Getting the status with
git status
Let's first run git status, to see the status of our repository. status returns which files are untracked (new) modified (changed) and deleted.
Task: After correcting the buggy C code, add the output of running the git status command in your terminal to your notes.
- Staging file with
git add
When we are done making changes to a file, we "stage" it to mark it as ready to be commited. Using the git add command with the path of the changed file(s) will stage each to be included in the next commit. Using git add . will stage all changed and/or new files in the current directory.
Task: Use git add to stage our corrected C file. Compare the output of git status to the output written in your notes.
- Committing with
git commit
A commit is a package of associated changes. Running the git commit command will take all of our staged files, and package them into a single commit. With the -m flag, we can specify a message detailing the changes of the commit. Without -m, git opens a vim window to write the commit message.
Task: Use git commit to commit our staged changes. Use vim to write your commit message.
- Pushing to the remote repository with
git push
With our commit now made, we can use the git push command to upload our changes to our remote branch (github). If this is the first time you are using git push, git may ask you to set the name and email you want associated with your commits.
- Viewing the log with
git log
Git also keeps a log of all the changes. The git log command prints this log into our terminal. From this log we can see the date, author, and message associated with each commit. The HEAD -> marker points to the latest commit locally, while the origin/ marker points to the latest commit on the remote. After running git push, both of these markers should be on the same line.
Task: After pushing your changes, add the output of git log to your notes.
Week 4 – Compiling and “Building”
Welcome to Week 4!
Take a moment to ensure you have your group's Google Doc pulled up and answer the following question as a group while also filling it out in the Google Doc!
Q: What is your favorite place that you’ve been to? If it’s a travel destination, who did you go there with, and when?
Lab Goals
- Set up SSH keys for connecting
ieng6to Github From Week 3 Lab - Practice pushing PA2 code to Github from the command line
- Tools for solving Memory errors in C programs
- Testing with
assert+ Makefiles
Pushing PA2 Code to Github from ieng6
Make sure your ieng6 account has Github access.
-
Run the corresponding prep command for your class (
cs29fa24for Joe's,cs29fa24bfor Aaron's) after you are logged in. If you have already started working on your PA2 and had cloned the repository without running this command, you will need to reclone after running this command and continue working. This command sets up your working directory for CSE29 which is where you want to be working! -
Get your PA2 code onto ieng6; if you've already done a step, skip it
-
Follow the Github Classroom Link to create your PA2 repository. See the PA2 Assignment for the actual functions to write and instructions for this PA.
-
Log into ieng6 and clone the repository you just made using the Github Classroom Link with
git clone [your-repository-link]. Remember to use the SSH clone link!
-
IMPORTANT NOTE: Make sure to clone the
SSHURL and not theHTTPSURL! The Github link should start withgit@github.com -
Change into the directory with your PA2 repository. In the example above, that would be
cd pa2-hashing-and-passwords-<your-github-username>
-
-
Check status by running
git status. This will tell you (from the command-line) what's going in the copy of your code you have checked out in the current working directory. If you haven't done any work yet, you'll see something like:On branch main Your branch is up to date with 'origin/main'. nothing to commit, working tree cleanYou can also use
lsto see what's going on. In a brand-new repository, that will show these files:$ ls CREDITS.md DESIGN.md README.mdThis means you haven't edited or created any files since you cloned the code. If you've done some work, you might see all kinds of things here, most likely
pwcrack.c, which you may have created.IMPORTANT NOTE: If you have already done some work and your file name is not
pwcrack.c, use the commandmv <your_file_name>.c pwcrack.cto rename it (mvis also used to move files from one place to another in a filesystem). This will be important for future sections of the lab! -
Create or edit
pwcrack.c. If you already createdpwcrack.cand thegit statuscommand shows that it is new or modified, there's nothing to do here. If you created it, but it has no modifications, open it and make a small edit (even just adding a comment like/* edit in lab */) If you haven't created it yet, you can create it usingvim:$ vim pwcrack.cThen into the file type:
#include <stdio.h>

int main() {
    printf("did not find a matching password\n");
}
Then save and quit with
:wq. Nowgit statusshould show it as a new untracked file:$ git status On branch main Your branch is up to date with 'origin/main'. Untracked files: (use "git add <file>..." to include in what will be committed) pwcrack.c nothing added to commit but untracked files present (use "git add" to track) -
Add the change you made to “stage” it with
git add pwcrack.c. After you do this,git statuswill show it as ready to commit.$ git add pwcrack.c $ git status On branch main Your branch is up to date with 'origin/main'. Changes to be committed: (use "git restore --staged <file>..." to unstage) new file: pwcrack.c -
Commit the file by using
git commit -m "your message here", where your message might just be about adding or editing this file.$ git commit -m "created first version of pwcrack.c" [main 91d2f60] created first version of pwcrack.c 1 file changed, 5 insertions(+) create mode 100644 pwcrack.c $ git status On branch main Your branch is ahead of 'origin/main' by 1 commit. (use "git push" to publish your local commits) nothing to commit, working tree clean -
Push your work to Github by using
git push origin main. Then you should be able to visit your repository on Github and see the change!$ git push origin main Enumerating objects: 4, done. Counting objects: 100% (4/4), done. Delta compression using up to 8 threads Compressing objects: 100% (3/3), done. Writing objects: 100% (3/3), 383 bytes | 191.00 KiB/s, done. Total 3 (delta 1), reused 0 (delta 0), pack-reused 0 remote: Resolving deltas: 100% (1/1), completed with 1 local object. To github.com:ucsd-cse29-fa24/pa2-hashing-and-passwords-jpolitz.git 0787d50..91d2f60 main -> main $ git status On branch main Your branch is up to date with 'origin/main'. nothing to commit, working tree clean
Write in your notes: A screenshot of the commit(s) you pushed to Github from your terminal and also a screenshot of the commit(s) on the Github website.
Check with the person sitting next to you to see if they got a similar result. Did you run into any errors? Try understanding and fixing them: maybe you made a typo in a command, or maybe something isn't set up correctly about your connection to Github. Make sure you can create and edit files, add and commit the changes, and push them to Github before moving on.
New Debugging Tools
For this section, you'll be working with the following program:
#include <stdio.h>

// edits string, then returns how many changed
int X_to_Y(char str[]) {
    int num_xes = 0;
    for (int i=0; str[i] != '\0'; i++) {
        if (str[i] = 'X') {
            str[i] = 'Y';
            num_xes += 1;
        }
    }
}

int main(int argc, char *argv[]) {
    for (int i=1; i<=argc; i++) {
        int num_xes = X_to_Y(argv[i]);
        printf("\"%s\": %d 'X'es changed\n", argv[i], num_xes);
    }
}
- Read through this program without running it.
- In your notes, write down what you think it would output if ran as
./buggy helloX XOXO - Discuss your thoughts with your group, and see if you notice any bugs in it. In your notes: Write down any bugs you think you've fonud.
Getting set up on ieng6
- On
ieng6, use the following command to curl the above program into a file calledbuggy.c:
curl -o buggy.c https://raw.githubusercontent.com/ucsd-cse29/fa24/refs/heads/main/src/week4/buggy.c
- Then run the following command to compile the program:
gcc -std=c11 buggy.c -o buggy
Notice the new command-line flag introduced here! We use the -std=c11 flag to tell gcc what version of C we want to compile with. This is necessary since the default version on ieng6 would fail to compile this program due to us declaring i within the for loop.
- Now, try running the program with some string arguments:
./buggy helloX XOXO
Oh no! You should see it outputting far too many Y-s and zeroes, and then crashing (Segmentation Fault). Let's see if we can use -Wall to get to the bottom of this.
The -Wall
Many common errors can be caught by the compiler, but a lot of these checks aren't enabled by default. We can ask the compiler to warn us about them with the -Wall flag ("- W(arn) all")
- Run the following command to recompile the program with warnings enabled:
gcc -Wall -std=c11 buggy.c -o buggy
- This time, gcc should have given you two warnings, read through them. Would they have helped you catch those two bugs?
- In your notes: Write down the warnings you got (
[-Wxxxxxx])
In general, It's almost always a good idea to have -Wall enabled by default because it will helpfully warn you about many common C errors.
NOTE: One unfortunate side effect of -Wall is that if you ever declare a variable but don't use it, the compiler will warn you about it. This can be helpful to find bugs sometimes, but often ends up being more
annoying than helpful. You can disable this by with the -Wno-unused-variable flag:
gcc -Wall -Wno-unused-variable -std=c11 buggy.c -o buggy
Segfaults
Now, we've found two bugs, but why is the program still crashing? If we provide a single argument (argc = 2), ourfor loop iterates until i <= argc, which means it will try to access argv[argc], which is out of bounds.
Unfortunately, when we try to read this as a memory address (char*) , it ends up being an invalid memory address (it happens to be 0, though other values may give similar errors), so the program ended with a segmentation fault, which is a fancy term for “the program tried to access memory it shouldn't and was stopped by the operating system”.
This is pretty different from an error like ArrayIndexOutOfBounds in a language like Java, which gives information like a stack trace and the value of the incorrect index. Because of C's focus on doing only what is necessary and giving low-level access to memory, this kind of mistake is permitted, for better or worse. Aside from causing numerous security vulnerabilities, these memory errors are difficult to debug, since you can't even tell which line of code caused the crash.
Thankfully, there are a few tools that help debug invalid memory accesses.
AddressSanitizer
Let's use the AddressSanitizer to figure out which line of code we crashed on. AddressSanitizer (or ASan) is a tool, built into gcc and other C compilers these days, that turns invalid memory accesses (the kind that give segfaults) into descriptive errors.
- Run the following commands (these are needed if you don't run
cs29fa24on login, to work around an old version of gcc)
export ASAN_OPTIONS=symbolize=1:print_legend=0
export ASAN_SYMBOLIZER_PATH=/usr/bin/llvm-symbolizer
- Compile the program again with the following option to enable the sanitizer:
gcc -std=c11 -g -fsanitize=address buggy.c -o buggy.asan
The -fsanitize=address part does extra work in the compiler to put special checks in to look for memory errors. The -g option we saw in lecture turns on some debugging information like line numbers in stack traces.
- After compiling, rerun the program like before. You should see it output a stacktrace that start something like this, which shows the function calls that led to the error:
$ ./buggy.asan helloX
"YYYYYY": 0 'X'es changed
AddressSanitizer:DEADLYSIGNAL
=================================================================
==303858==ERROR: AddressSanitizer: SEGV on unknown address 0x000000000000 (pc 0x55f690eb0320 bp 0x7fff2e028b50 sp 0x7fff2e028b30 T0)
==303858==The signal is caused by a READ memory access.
... (several lines omitted)
- Read through the stack trace and identify the functions that were called. In your notes: Write down the last function called, and what line of buggy.c the error was on.
Now, we can see exactly the path the code took before crashing, making our lives much easier! So, why isn't ASan the default? Mainly because it makes programs run slower. It's great for debugging, or for programs where speed isn't an issue, but if you're trying to hash as many passwords as you can in 10 seconds, it's best to not turn it on! For this reason, it's good to have the option to compile two separate executables, which we called buggy and buggy.asan above.
GDB
Now that we've identified where the crash happens, let's use gdb to help us debug it further.
gdb (which you've already seen a bit of in lecture / discussion) is a command-line debugger that allows us to step through our program line by line and inspect the values of variables at each step. It can also give us backtraces through our program to show us where the error may have occurred.
For more GDB resources, see the Week 3 Reading on GDB Debugging, as well as the GDB Quick Reference Guide and GDB Tips and Tricks linked under the Week 3 Readings & Resources :-)
- After compiling with the -g flag, load our program into gdb
$ gdb buggy.asan
- To see our source code while in gdb, run the command:
(gdb) layout src
- Before running the program, set a breakpoint in the code before the program reaches its error. Here, the error is on line 6, so type in your gdb terminal:
(gdb) break buggy.c:6
- After setting the breakpoint, run the program from inside gdb with an argument (everything after
rungets passed as command line args to your program)
(gdb) run helloX
If done correctly, gdb should print out the for(int i=0... line in the program. The breakpoint paused the execution before this line was executed.
-
Try the following commands
info args: tells us what arguments were passed into this function,info locals: tells the values of the local variables at this point of the execution.p s[3]: this lets your print out the values of expressions, not just variables. Try some others!- Can also specify the format you want, e.g.
p/x var1prints the value ofvar1in hex,p/tprints in binary).
- Can also specify the format you want, e.g.
btshould print out a stacktrace similar to what ASan did.
-
Now, use the
ccommand to continue executing until it hits the breakpoint a second time -
Use the commands you learned to print the variable that
buggy.cis attempting to access (and crashing on). -
In your notes: Write the command you used, and what
gdbprinted out- NOTE: If your program runs too far ahead, you can always ask gdb to restart it by using
run ARG1 ARG2 ...again
- NOTE: If your program runs too far ahead, you can always ask gdb to restart it by using
Testing with assert and Makefiles
In this section, we will be working on one of the functions that is part of PA2 and provide a cool way to incorporate unit testing into your main() functions without needing to change/comment lots of lines of code!
Finally, we will introduce a convenient way to compile our programs using Makefiles and the make utility!
Testing with assert
Task: While on your ieng6 account within your PA2 repo directory perform the following steps:
-
Open your
pwcrack.cfile that we created/renamed in the previous portion of the lab. We are providing an incomplete implementation of thehex_to_bytefunction. Add the following function to your C file and complete it by determining what the function should return. To see the function's intended behavior, refer to the PA2 spec found here.NOTE: If you have already implemented your own
hex_to_bytefunction, you can skip this step.#include <stdlib.h> #include <stdio.h> #include <stdint.h> uint8_t hex_to_byte(unsigned char h1, unsigned char h2) { uint8_t x = 0; uint8_t y = 0; // Convert h1 to a decimal value if (h1 >= '0' && h1 <= '9') { x += h1 - '0'; } else if (h1 >= 'a' && h1 <= 'f') { x += h1 - 'a' + 10; } // Convert h2 to a decimal value if (h2 >= '0' && h2 <= '9') { y += h2 - '0'; } else if (h2 >= 'a' && h2 <= 'f') { y += h2 - 'a' + 10; } // TODO: Determine what the function should return }
-
Now we will need to add a
main()function to this file to give the program an entrypoint. Copy the following main function into yourpwcrack.cfile.NOTE: If you already have a
main()function from working on the PA, you can keep it as is and focus on the unit testing portion of the code given below.int main(int argc, char **argv) { // UNIT TESTING SECTION int test = 0; // Set this variable to 1 to run unit tests instead of the entire program if (test) { assert(hex_to_byte('a', '2') == 162); // ADD MORE TESTS HERE. MAKE SURE TO ADD TESTS THAT FAIL AS WELL TO SEE WHAT HAPPENS! printf("ALL TESTS PASSED!\n"); return 0; } // MAIN PROGRAM SECTION if (argc < 2) { printf("Error: not enough arguments provided!\n"); printf("Usage: %s <byte 1 in hex> <byte 2 in hex> ...\n", argv[0]); printf("Example: %s a2 b7 99\n", argv[0]); return 1; } int i = 1; for (; i < argc; i++) { printf("Value of hex byte %s is %d\n", argv[i], hex_to_byte(argv[i][0], argv[i][1])); } }You will note that this
main()function serves two purposes:- It parses your command-line arguments to your program and runs your password cracker. In this lab, we will be demonstrating the use of command-line arguments to only test the
hex_to_bytefunction but you will extend this to work for your complete password cracker implementation. - The
ifstatement at the beginning of themain()function is a way to unit test specific functions as you work on your PA. Setting the value of thetestvariable to1will run the code within theifstatement that should have severalassert()statements to test your individual functions (we have provided an example test forhex_to_byte). If all your tests pass, the program will printALL TESTS PASSED!and exit successfully. If not, you will receive an error when you run your program withint test = 1;.
- It parses your command-line arguments to your program and runs your password cracker. In this lab, we will be demonstrating the use of command-line arguments to only test the
- Commit and push your changes to Github. Make sure to include the new files you created in your commit.
In your notes: Briefly explain what you had the hex_to_byte function return and why?
Makefiles
Thus far, we have been typing out the various gcc commands needed to compile our C programs. We have also learned some command-line flags that can be useful when compiling our programs like -g for debugging information, -std=c11 to use the correct C version when compiling on ieng6 and -fsanitize for memory errors. Wouldn't it be nice if we could just type one command and have all the necessary files compiled with the correct flags? This is where make comes in.
make is a utility for building C programs. A Makefile is a file that contains a set of rules that tell the make utility what commands it should run for that rule. We will be creating a Makefile with rules to compile our C programs with the correct flags and dependencies.
Task: Perform the following steps to create a Makefile for your PA2 project:
-
In your PA2 repository, create a new file named
Makefileand add the following content to it:all: pwcrack pwcrack: pwcrack.c gcc -std=c11 -Wall -Wno-unused-variable -fsanitize=address -g pwcrack.c -o pwcrack clean: rm -f pwcrackIMPORTANT NOTE: The indentation in the
Makefileis done with aTABcharacter, not spaces. Make sure to use aTABcharacter when indenting the commands in theMakefile.NOTE: If your file names are different than what is given above at this point, change the rules to match the file names you are using.
-
Now, in your terminal, run
make all. This will perform the same operation as runninggcc -std=c11 -fsanitize=address -g pwcrack.c -o pwcrack.outwithout needing to type or remember that command! You should see thepwcrackfile in your directory. However, if you runmake allagain, you will see that it doesn't recompile the files because they have not changed since the last time they were compiled. This is one of the benefits of usingmaketo compile your programs. -
Now run
make clean. This should delete the executable file. -
Next, run just
makewith no arguments.
In your notes: What happened when you ran make without any arguments? Why do you think this is the case?
We now have a clean and simple way to compile our C programs with the correct flags and dependencies using make. This will be very useful as we continue to work on our PA2 project and need to compile our programs multiple times.
If you are done early
- Work on PA2! Use the remaining time in lab to make progress on PA2 along with your group members and your tutor!
- Try adding a separate rule that would build pwcrack without address sanitizer enabled. Rename the rules so that one generates
pwcrack.asan, and the other generatespwcrack. You may need to adjustallandcleanas well to work correctly with this. - If you are done with PA2 here is a fun extension you could work on: Extend your password cracker such that when given a hash, it will attempt to go through all possible passwords of length 6 until the password is found.
Week 5 – Building a Simple Server
Welcome to Week 5!
Take a moment to ensure you have your group's Google Doc pulled up and answer the following question as a group while also filling it out in the Google Doc!
Q: If you could pick up a new skill in an instant what would it be and why?
Lab Goals
Part 1: Let's Have a Chat
Entering lab, you may have noticed something interesting running on the projector. We've started up a demonstration of the next PA to play around with. For the next PA, you'll be creating your own chatroom server, where users can send and react to other's messages.
We've included a client on the ieng6 machines that you can use to communicate in our chatroom.
We can run our chat-client with: (where MACHINE is ieng6-201 for Joe's lab, or ieng6-202 for Aaron's lab)
/home/linux/ieng6/cs29fa24/public/chat-client USERNAME MACHINE 8000
Task:
- Choose a username and send a message to your lab room's chat server.
- Try reacting to a member of your lab group's message. Try reacting with an emoji 😁
- In your notes: Add a screenshot of your message and reaction.
The client is cool, but there are many other ways we can also interact with the chat server:
In the past we've been using curl primarily to download single files from the internet. We can also use curl to send messages!
To see all the messages of the chat server we can curl the url:
curl 'MACHINE.ucsd.edu:8000/chats'
To send a message to the chat server, we can curl the url:
curl 'MACHINE.ucsd.edu:8000/post?user=USERNAME&message=MESSAGE'
Task:
- Try sending a message to the chatroom server using
curl
To react to another user's message, we can curl the url:
curl 'MACHINE.ucsd.edu:8000/react?user=USERNAME&message=REACTION&id=ID'
REACTION can be any 16 byte message and ID is the id of the message you wish to react to.
Task:
- Try reacting to your group member's message from your web browser (Chrome, Safari, Firefox, etc.)
- In your notes: Add a screenshot from your web browser of
MACHINE.ucsd.edu:8000/chats.
Part 2: Headers and Servers
In parts 2 and 3, you'll be writing your own simple webserver that keeps track of and lets you modify the value of a number (which should be a bit easier than writing a whole chat server).
2.0 Getting started
Task
- If you haven't done so already, log onto
ieng6, then run the corresponding prep command for your class (cs29fa24for Joe's,cs29fa24bfor Aaron's). - Fork the lab5 starter repo, then clone it. (If you're unsure how, you can refer back to how we did this in Lab 3 and Lab 4)
Header files
Looking into the lab5 repository, you'll find two source files (number-server.c, http-server.c), and one header file (http-server.h).
In the previous labs and PAs for the class, our code has consisted of a single .c file, containing a main() and all associated functions.
As programs get more complex, it becomes increasingly important to organize the code by seperating it into multiple files.
http-server.h should look like this:
#ifndef HTTP_SERVER_H
#define HTTP_SERVER_H

#include <stdlib.h>
// ... more #includes

void start_server(void(*handler)(char*, int), int port);
#define BUFFER_SIZE 2048

#endif
This header file contains the declaration of start_server, which includes all info needed for C to call a function, which are its arguments and return type. However the definition of the function
(i.e. the actual code that it runs) are in http-server.c.
To call this function, number-server.c needs the declaration, which it gets by including http-server.h.
EXTRA INFO 📝:
It's not necessary to fully understand the implementation of
start_server, but the idea behind the function is available in the pa3 writeup.Every function in a C file should have its visibility defined in one of two ways:
- Public functions (meant to be called from other source files) need to be declared in a header file.
- Private functions (typically helpers or utilities) should always be declared as
static(e.g,static int foo() {...}) to specify that they shouldn't be visible to other.cfiles.The
ifndef/define/endifat the start and end of a header are an include guard
2.1 Compiling with multiple files
When compiling a program with multiple source files, all source (.c) files must be included as arguments to gcc. NOTE: you don't need to specify the header files to gcc; they are automatically
pulled in by #include statements.
Task
- Try compiling the
number_serverusing gcc. (Note: you may need to pass in the-std=c11flag) - In your notes: Write down what happens when you don't include the
http-server.cfile ingcc. What happens when you ONLY include thehttp-server.cfile ingcc? - Once you're successfully able to compile this program, create a
Makefileso that you can compilenumber_serverjust by typingmake.- (Note: You can refer to how we did this in the last lab)
- You may find it useful to also include the debugging flags from last lab:
-Wall -Wno-unused-variable -fsanitize=address -g
- Run the
number-serveryou just compiled; it should say something like "Server started on port PPPPP". - Open your browser and go to
MACHINE.ucsd.edu:PPPPPwhereMACHINEis theieng6server you are on likeieng6-201,ieng6-202, orieng6-203;PPPPPis the port number from your server like8000. Your browser will show an error page, but you should see some output fromnumber-serverin your terminal - In your notes: Add a screenshot of the terminal output from
number-server
Congrats, you've got a working server running!
2.2 String Hunt
For the purposes of this lab, we'll also need a few more functions from the C <string> library in order to build our backend.
In your notes: For each of the following functions, add its signature and write a brief description of what the function does.
You can look it up in the manpages by typing (man XXX) in the terminal, where XXX is a function name.
For example, typing man strstr in the terminal would give you the manual for the strstr function.
-
strstr -
sscanf -
snprintf
2.3 HTTP 404 Response
Currently our number server isn't responding to requests at all. In part 3 of the lab, you'll make your server handle three kinds of requests, but for now lets start by responding with a '404 Page Not Found'.
HTTP Requests
When we request a given url e.g. ieng6-201.ucsd.edu:8000/post?user=joe&message=hi, our web-client (a browser, curl, or our fancy-client) does some work on our behalf.
The start of the url gives us the address (ieng6-201.ucsd.edu) and port (8000) of the server our client connects to. Once connected, it sends an HTTP request, which looks something like this:
GET /post?user=joe&message=hi HTTP/1.1
User-Agent: curl/7.29.0
... many other headers
The string after GET is the path of the request, and that's the part that will change depending on the type of request. In part 3, you'll be examining this path to determine how to respond.
HTTP Responses
Once we've decided what to do with a request, we can send a response back .
The second argument to handle_response is an int that is a file descriptor (called the "client socket") for us to write a response to. To send data back to the client, we can use the write function:
write(client_sock, message, message_size);
//    int          char[]   size_t
An HTTP response for an unknown path should return a "404: Not Found" response that looks like the following:
HTTP/1.1 404 Not Found
Content-Type: text/plain

... 404 message to display to user ...
Note: A nuance of this is that the newlines in HTTP responses are not just \n; they are required to be \r\n (which, interestingly, is how line endings work on Windows). Some software will work with just a \n for line breaks, but the correct thing to do is use \r\n, so in a string literal the HTTP header above would look like
"HTTP/1.1 404 Not Found\r\nContent-Type: text/plain\r\n\r\n"
Task
-
Use
curlto accessMACHINE.ucsd.edu:PPPPPwith the numeric server running. How doescurlrespond? -
In your notes: Add a screenshot of your browser accessing
MACHINE.ucsd.edu:PPPPPwith the numeric-server still running. How is this different than if the server was not running? -
In
number-server.c, modifyhandle_404to send an HTTP response back to the client. You'll need to callwritetwice, once to write the response header, and once to write out the body of the response.IMPORTANT NOTE: To see the response header being printed, you will need to add the
-vflag to thecurlcommand, i.e.curl -v MACHINE.ucsd.edu:PPPPP -
Once you've done this, connect to your server from a browser and make sure you can see the error message, including the path of the url you tried to connect to.
-
In your notes: Add a screenshot of the 'Not Found' page in your browser. How is this different from the previous error page?
-
Try connecting to different paths on your server. Does you notice anything interesting if you put in add special characters to the path? Spaces? Emoji?
Part 3: Implementing the Number Server
Now that we've completed our walkthrough of the basics of the http-server library. It's time to use the library to create our own server.
The number-server needs handle 3 different routes:
-
/shownumThis function responds to the client socket with the current value of
num. -
/incrementThis function increments the value of
numby one and responds to the client with the new value ofnum. -
/add?value=NNNThis function increments the value of
numby the value encoded inNNN(a decimal integer) and responds to the client with the new value ofnum
We'll walk you through the first one, then you can try the others on your own.
3.1 Getting started
Successful Responses
However, now that we're adding support for /shownum and friends, we need to be able to send back a successful response,
not just a "page not found". The HTTP status code for success is 200, so a successful response would look something like this:
HTTP/1.1 200 OK
Content-Type: text/plain

... body of response ...
As a string literal, the response header would look like this:
"HTTP/1.1 200 OK\r\nContent-Type: text/plain\r\n\r\n"
Path parsing:
We also need to ensure that our /shownum, /increment, and /add responses only trigger when the correct path is requested, a path like /badpath should still result in a 404 response.
Using a function like strcmp or strstr can be useful to check if the path matches a given string.
Maintaining state
In the lab5 starter, num is a global int variable, so functions can read/write its value.
After completing the /shownum route, curl the route with:
curl localhost:<port>/shownum
You should see something like:
Your number is 0
Congrats! You officially got a web server running! Now, you have all the tools to implement the other functions of number-server.
3.2 Query parameters:
This section might be useful once you start working on the /add endpoint.
When sending a GET request in HTTP, any data accompanying the request needs to be sent as part of the path. This data is encoded as query parameters which follow a ? in the path and usually take the form of
?keyA=foo&keyB=bar&...
For the case of the /add endpoint, we need to encode the amount to add as part of the query string. A valid request to /add looks like
/add?value=<number>
Parsing query parameters correctly can be tricky, but in this case we only have one parameter to worry about, which makes it easier.
Task:
- What string function could we use to scan through our path and extract the number?
- Try using this function to print out the number after
value=from the url path - Implement the
/addendpoint for your number-server - In your notes: Put a screenshot of your number-server working with the endpoints you implemented.
- In your notes: Think of a request you could make that would cause your numeric-server to crash.
Week 6 – Work on PA3 (Chat Server)
Work on your PA3! Your tutors are here to help.
You are welcome to work with your classmates, share ideas, and so on.
In your notes doc, you should be able to show by the end of the lab:
- You loading a URL via curl or browser a request on one of your classmates' chat servers that shows adding at least one chat, or part of a chat.
- One of your classmates loading a URL via curl or browser on your chat server that shows adding at least one chat, or part of a chat.
If you think you're all the way done with PA3, here are some suggestions:
- Implement threads in your chat server.
- Right now the chat server allows anyone to post with any username. Brainstorm ways to have a user who uses a username first “claim” it somehow, so others can't. HINT: add a path for “registering” a username and share a secret between the server and the user to recognize them in the future.
Week 7 - More GDB + Valgrind
Welcome to Week 7
The goal of this weeks' lab is to have you perform various interesting tasks involving using GDB and Valgrind!
To get started, login to ieng6 and clone this repository which contains the activities for today's lab and cd into the lab7-starter directory.
If you see the following upon running ls, you're ready to get started!
[ygarde@ieng6-203]:lab7-starter:505$ ls
README.md  ctf  gradebook  valgrind
Lab Goals
Crack the Password
The relevant files for this part of the lab are found within the password-crack directory in the lab7-starter repository you cloned earlier.
You are provided with an executable binary that performs a similar task to your password cracker from PA2. It randomly selects a word as the password (this word is unique to your student ID) and displays the hash of this word and then prompts you to guess the password. You are also given the main.c file that calls the function that generates the secret word and hashes it. However, you do not have the source code for the word generator itself.
Your goal is to crack the password given only the hash and the main.c file.
./ctf
Generating and hashing secret word...
the hash is 229478424054275
What is the password?:
yash
Password not found, Try again
hello
Password not found, Try again
return
Password not found, Try again
.
.
.
TASK:
- Using tools you have learned about in CSE 29, determine what your random secret word is and crack the password!
In your notes: Describe the tool(s)/process you used and provide a screenshot of you cracking the password!
Change your Grade with Buffer Overflows
The relevant file for this part of the lab is found within the gradebook directory in the lab7-starter repository you cloned at the start of lab.
In this directory you will find an executable file called gradebook. Running this program will display your (fictional) assignment grade for Assignment 1 and ask whether you would like to leave a comment for a regrade:
./gradebook
Welcome to your gradebook!
=========== ASSIGNMENT 1 SUBMISSION ===========
Due Date : 10/24
Grade    : D (65/100)
===============================================

If you'd like to leave a comment on your submission, please enter it here (or Ctrl + D to end):
>
After entering a comment, you will see an updated assignment entry printed out with your comment and the option to edit the comment:
If you'd like to leave a comment on your submission, please enter it here (or Ctrl + D to end):
> please regrade my submission
=========== UPDATED ASSIGNMENT 1 SUBMISSION ===========
Due Date : 10/24
Grade    : D (65/100)
Comment  : please regrade my submission
=======================================================

If you'd like to edit your comment, please type your new comment here (or Ctrl + D to end):
>
A confidential source has informed you of a vulnerability in this gradebook that allows you to change your grade for the assignment if you provide an appropriate comment. This source has also given you the following screenshot of the source code to help you:
gradebook.c Source Code:
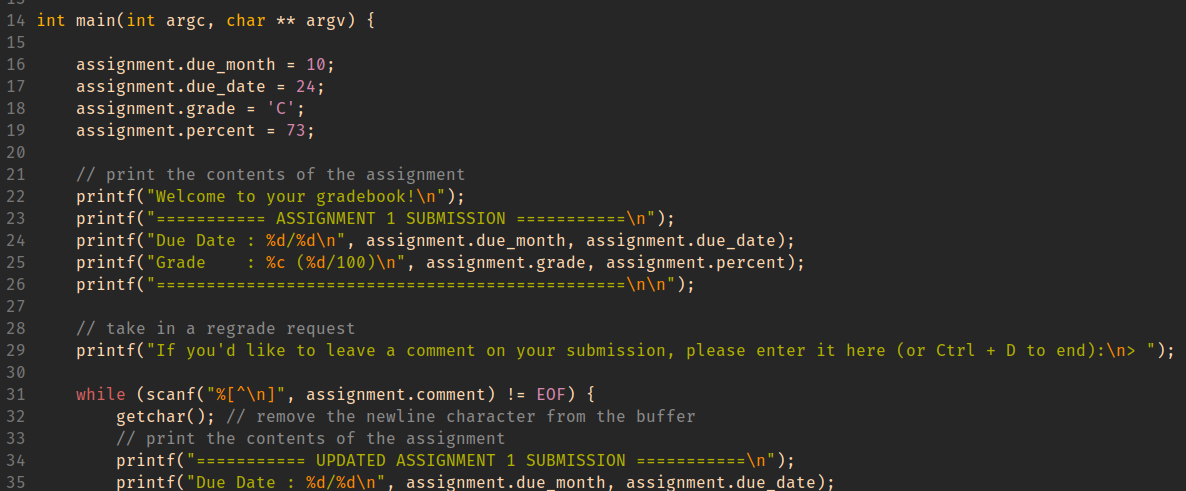
TASK:
- Using the information above and tools you have learned about in CSE 29, determine how you would change your grade in Assignment 1 to an A.
- Once you have successfully changed your grade to an A, change your percent to reflect your new grade as well, a 95% sounds about right!
In your notes: Describe how you changed your letter grade and percentage for the assignment. What properties of the program did you exploit for this? Compare your approach to that of your group members and discuss any differences in your approaches.
Addressing your Memory Errors
The relevant files for this part of the lab are found within the valgrind directory in the lab7-starter repository you cloned earlier.
In this directory, you will find a Makefile, jstr.c and arraylist.c which contain the implementations of the String and List structs you have seen in lecture. In addition to these files, there are 6 additional C files labeled q1-q6.
Each of these q files implements function(s) on the String and List structs but with one or more memory related errors in them. Your task is to use valgrind to determine these errors and fix them. The files are numbered in increasing order of difficulty, so it is recommended to start with q1_expand_list.c and work your way up.
TASKS:
-
Open
jstr.candarraylist.cand familiarize yourself with the implementations of theStringandListstructs. -
Run the
makecommand to compile all the buggy C files. You should now have 6 executables in your directory. (Check this by usingls). -
For each program (starting with
q1), run it both with and withoutvalgrindto see what happens. Use the program output (whether it crashed or not) andvalgrindto determine where the error may be and edit the C file to fix it. Remember to use--leak-check=fullto get more detailed information about memory leaks.NOTE: The names of the files as well as the function names within the files are hints for where the error may be.
NOTE: All the changes should be in the
buggy_functions found in each file. Themainfunction should not need to be modified. -
Once you have fixed the error(s) in a file, run the program with
valgrindagain to ensure that there are no memory leaks or other memory-related errors. Yourvalgrindoutput should look like: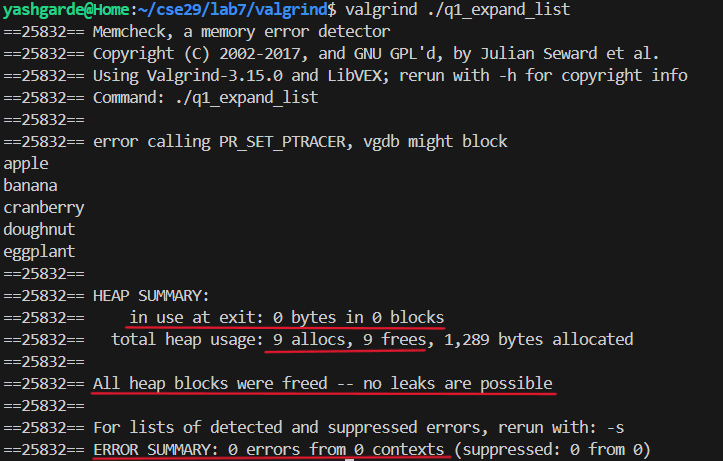 All heap memory should be freed and there should be no errors reported in the
 ERROR SUMMARY. -
When you determine the bug in each of the files, describe the error you found and how you fixed it in your notes. Provide a screenshot of the
valgrindoutput for the fixed program.
Week 8 – Work on PA4 (Malloc)
Work on your PA4! Your tutors are here to help.
You are welcome to work with your classmates, share ideas, and so on.
In your notes doc, by the end of lab please include a screenshot of you using the various functions provided to you in the starter code:
vminit()to initialize the heap to a certain sizevmload()to load one of the images as the heapvminfo()to print the heap layout
along with your understanding of these functions.
Week 9 - More UNIX Commands
Welcome to Week 9
The goal of this week's lab is to introduce you to various new and interesting UNIX commands and features to help you get more comfortable with working on a terminal environment!
To get started, login to ieng6 and fork and clone this repository which contains the various files needed for the lab and cd into the lab9-starter directory.
If you see the following upon running ls, you're ready to get started!
~/cse29/lab9-starter$ ls
Makefile  README.md  message.txt  pokemon  problem.c
Lab Goals
Viewing and Redirecting Program Output
In the starter code, you are given a problem.c source code file. This program creates a large 2-D array, fills it with numbers, and prints them out. Fortunately, whoever wrote this was thoughtful enough to write code to check for an out-of-bounds error. Unfortunately, whoever wrote this was not thoughtful enough to debug the program. We’re going to use this program as an example of how the following UNIX commands can be used to parse a lot of program output easily.
Compile and run problem to see exactly what “a lot of program output” means.
$ make problem
$ ./problem
You will notice that the program occassionally prints out an error amidst all the other output of the program. For programs with more errors and more output, you could imagine how we wouldn’t want to keep scrolling up the terminal to read. There are multiple ways in which we can filter out everything but the error messages.
Say less
During the quarter, you have used input redirection (<) and output redirection (>) operators to read from and write to files. Let’s first save the output of the program to a text file:
$ ./problem > problem.txt
Note: output redirection (
>) will replace the contents of the specified file. If you'd rather append to it instead, use>>.
To view larger files like this, we can use the less command to be able to scroll through and/or search their contents.
$ less problem.txt
TASK:
- Redirect the output of
./problemto a fileproblem.txt - Use
lessto view the contents ofproblem.txt; try usingj/kto scroll around. - Hit
hwhile inlessto show the help screen, and skim through some of the commands (note:^refers to the Ctrl key) - Use the help screen to find how to search for a pattern, and how to repeat that search.
- IN YOUR NOTES: Provide a screenshot of the output of
lesswith the search results forerror(it should be highlighted) .
grep
The grep command searches files for lines that match a pattern. grep takes in two arguments: the string to match and a file to read from.
$ grep error problem.txt
We can also run grep with only one argument, e.g. grep error, in which case grep will read input from stdin instead of from a file. This means we can also write an equivalent command using input redirection, like so:
$ grep error < problem.txt
This grep command looks similar to the first, but here "problem.txt" is not passed as an argument to grep; we'll see how this can be useful in part 2 of this lab.
TASK:
- We have provided an additional file named
message.txtfile with more program output, but some lines were written way out of bounds at column index 42. - Use
lessto skim through the contents ofmessage.txt - Use
grepto search for all the lines that contain the string42inmessage.txt. - IN YOUR NOTES: Provide a screenshot of your search results and the message that was hidden in the out of bounds entries.
Output Streams
In the examples above, we use redirection to manipulate the standard output (stdout) of a program. By default, printf() outputs to this stdout stream, which we illustrate above. What these diagrams do not show is that there actually exists another output stream called standard error (stderr).
To use stderr, we use an alternative to printf(), fprintf(), and specify that it should output to the stderr stream. In problem.c, this line is given to you and commented out. Uncomment this line, and comment the line above (the original print statement). Recompile the program.
TASK: Write your observations for each step in your notes and compare!
- Edit problem.c to print out errors to
stderrinstead ofstdoutand recompile. - Run the program (
$ ./problem) and observe the output. Do you notice anything different? - Run the program with output redirection to a file (
$ ./problem > problem.txt) and observe the output. What do you notice? What is the difference between what's in the file and what's on the terminal? - Run the program with output redirection to a file (
$ ./problem 2> errors.txt) and observe the output. What do you notice?
UNIX uses 1> implicitly as the default redirection operator when we just use >. We can read this as “redirect to the stream with file descriptor 1”, where the stream with file descriptor 1 is stdout. Similarly, 2> redirects to the stream with file descriptor 2, which is stderr.
We can also use two redirections in conjuction with each other to redirect different streams to different files in one command.
$ ./problem > problem.txt 2> errors.txt
Or we can redirect both streams to the same file.
$ ./problem > output.txt 2>&1
where this syntax is read as “redirect the stream with file descriptor 2 to the same place as the stream with file descriptor 1”.
Flow like Water with Pipes
Before starting, revert the fprintf() line in problem.c back to the printf() that you commented out!
The searching and filtering methods we have seen thus far require that the output of a program be saved to a file before we can manipulate it. However, there are times when we want to filter the output of a program without saving it to a file. This is where pipes come in!
Within UNIX, the pipe operator (|) is used to directly feed output from one program as input into another program. We can pipe directly from the problem program into either less or grep to accomplish the same result as running these commands on the problem.txt file:
$ ./problem | less
$ ./problem | grep error
We can compound indirection, redirection, and pipe operators to create helpful commands. Understanding how these operators work in conjunction with each other can be understood as an analogy to actual pipes, rendered below in immaculate ASCII art.
-
By default, print statements in programs output directly to the terminal interface. So this command:
$ ./problemlooks like this:
+-----------+ | |== | ./problem | ~ ~ ~ ~ ~> terminal | |== +-----------+ -
By using the redirection operator, we install an elbow pipe to redirect the flow of output into a file. The output no longer flows into the terminal.
$ ./problem > problem.txt+-----------+ redirect | |==------+ | ./problem | ~ ~ ~ | terminal | |==--+ $ + +-----------+ | $ | | v | problem.txt -
By using the pipe operator, we install a coupling between the output and input of two programs. Without any other pipes at the end, the output of the second program flow into the terminal.
$ ./problem | grep error+-----------+ pipe +-----------+ | |==-------==| |== | ./problem | ~ ~ ~ ~ ~>| grep | ~ ~ ~ ~ ~> terminal | |==-------==| |== +-----------+ +-----------+ -
By using both piping and redirection, we can chain multiple commands and file writing actions. In this command, we run the problem program, filter its output with
grep, and output the filtered lines into a file. This file now contains the error messages from problem, and can serve as an error log. IN YOUR NOTES: Does this output to the terminal as well?$ ./problem | grep error > errors.txt+-----------+ pipe +-----------+ redirect | |==-------==| |==------+ | ./problem | ~ ~ ~ ~ ~>| grep | ~ ~ ~ | terminal | |==-------==| |==--+ $ + +-----------+ +-----------+ | $ | | v | errors.txt
Having your tee and Drinking it too
Redirection lets us write to a file. Not having redirection lets us directly see the output in the terminal. Why don’t we have both?
By using the tee command, we can simultaneously write output to a file and and continue flowing data rightward, usually to the terminal. tee is a command, not an operator like redirection and piping, so we must pipe into tee first. tee takes a filename as an argument, which it outputs to.
$ ./problem | tee problem.txt
+-----------+   pipe    +-----------+
|           |==-------==|           |==
| ./problem | ~ ~ ~ ~ ~>|   tee     | ~ ~ ~ ~ ~> terminal
|           |==-------==|           |==
+-----------+           +-----------+
                            | $ |
                            | v |
                         problem.txt
We can continue to construct longer pipe systems to feed output through multiple commands. This command runs problem, filters its output with grep, then outputs to both a file and the terminal.
$ ./problem | grep error | tee errors.txt
+-----------+   pipe    +-----------+   pipe    +-----------+
|           |==-------==|           |==-------==|           |==
| ./problem | ~ ~ ~ ~ ~>|   grep    | ~ ~ ~ ~ ~>|   tee     | ~ ~ ~ ~ ~> terminal
|           |==-------==|           |==-------==|           |==
+-----------+           +-----------+           +-----------+
                                                    | $ |
                                                    | v |
                                                  errors.txt
Pokemon Mailtime!
The mail command, unlike other commands we’ve taught you in this lab and previous ones, is especially unique: literally no one uses this! As such, this section is not relevant to any course material. But the idea of sending each other mail via the terminal, all 1970s-core, is too appealing to pass up on.
Using the mail Shell
Throughout this section, we’ll use myname and friendname to refer to your and your partner’s UCSD username, respectively. This is the username you use for your UCSD email, and the one you use to log into ieng6.
In order for mail to work, you and whoever you are mailing to must be on the same cluster on ieng6. If each line of your command prompt starts with this:
[myname@ieng6-203]:~:500$
then ieng6-203 is the cluster you are logged into. In order to SSH into a specific cluster, exit out of your current SSH session, and in your local machine terminal, type:
$ ssh myname@ieng6-203.ucsd.edu
You can choose between clusters 201, 202, and 203, as long as you make sure you and your partner are in the same cluster.
Once you and your partner are in the same cluster, try using the mail command to begin composing an e-mail:
$ mail friendname@ieng6-203.ucsd.edu
This will prompt you with Subject: so you can type your email’s subject. The subject is only one line of text, so when you press Enter you are now typing the contents of your mail. When done writing your message, press Ctrl + D to finish and send.
Now, your partner can use the mail command by itself to see that they have received mail! It will have a number next to it as it enumerates messages every time you open the mail shell. Type this number and press Enter to see the message!
While in the mail shell, you can type ? to see a list of commands you can use to navigate your mail.
You will likely not need to use all of these commands but at least a few are worth noting:
type <message list>can be used to print out the contents of selected messages. For example,type 3 4prints out the contents of messages 3 and 4.headerswill print out the list of enumerated messages along with their senders, subjects, and statuses.- You can respond to a message with
Reply <message list>, which will open a response to the message to type in a reply. Again, you can finish and send withCtrl + D. For example,Reply 5opens a response to message 5.
Sending Mail from outside the mail Shell
There also exists another method to send mail from outside the mail shell, using the pipe operator (|) we learned earlier.
This command also makes use of the echo command, which outputs its argument to stdout (echo "hello" will print hello to your terminal!). Sounds redundant, but it’s intended to be used in this way to input strings into other commands, or to be used as print statements in bash scripts.
$ echo “email body here” | mail -s “subject here” friendname@ieng6-203.ucsd.edu
Trading Pokemon
For this section, you will be using the files within the pokemon directory of the starter code. This directory contains a pokeget.sh file which will generate a Pokemon when given its Pokedex number (don't worry if you don't know what that is, it's just a unique number for each Pokemon). The format to use the script is as follows:
$ ./pokeget.sh <Pokedex number> > <filename>.pk
Sender Tasks
- Use the
pokeget.shscript to generate a Pokemon of your choice and save it to a file. You can do this by running the script with the Pokedex number of the Pokemon you want to generate. For example, to generate Pikachu, you would run./pokeget.sh 25 > pikachu.pk. - Once you have generated your
.pkfile, use the following command to send your it to your partner, using the-aoption. Replacepikachu.pkwith the name of your Pokemon file if it is different.
$ echo "email body here" | mail -s "subject here" -a pikachu.pk friendname@ieng6-203.ucsd.edu
Receiver Tasks
- Open your
mailshell from within thepokemondirectory and check for new mail. You should see the email with the Pokemon file attached. - Save the email to a file in the
pokemondirectory by typingsave <message number> pikachu.email. For example, if the message number is 3, you would typesave 3 pikachu.email. - Extract the attachment to retrieve the Pokemon that you were sent using the provided script:
$ ./extract_pokemon.sh pikachu.email > pikachu.pk
$ cat pikachu.pk
NOTE: the filenames here aren't official or necessary, we just picked them to make it easier to keep track of what kinds files things are
If everything went well, you should see get the Pokemon your partner sent you! Have a bit of fun with this and send each other some cool Pokemon.
PA3 Resubmission - Web Server
- Resubmission Due 10:10pm Wednesday, December 4, 2024
- Github Classroom Assignment: https://classroom.github.com/a/hlq9KJbK
Resubmission instructions
If you want to resubmit PA3, please read this section carefully. You need to pass all the tests in the original PA3, while also implementing an extra functionality and answering a new design question described below.
In addition to /chats, /post, /react, /reset requests, the chat server also listens for the following request:
/edit
/edit?id=<id>&message=<message>
Edits the message in the post with the given id (the ids are the #N at the
beginning of posts) by replacing it with the new message. It must
respond with the list of all chats (including the chat with the replaced message).
Limits and constraints:
- If the id is not the ID of some existing chat, respond with some kind of error (HTTP code 400 or 500)
- If a parameter (
idormessage) is missing, respond with some kind of error (HTTP code 400 or 500) - If message is longer than 255 bytes, respond with some kind of error (HTTP code 400 or 500)
Updated DESIGN questions for the resubmission
We recommended representing chats and reactions as structs. Another option would be to just represent every chat as the string of text that gets printed (including the id number, timestamp, username, message, any reactions, etc). This representation would be a single char* per chat. Then, the list of all chats would be a char**. Adding a reaction would append a new reaction to the string for that chat.
- What is one good and one bad thing about this alternate design? For this part, consider only the original implementation without
/edit. - How would this
char**design make it harder to add the/editfeature in your code?
Web Servers and HTTP
HTTP is one of the most common protocols for communicating across computers. At the systems programming level, this means using system calls (usually in C) to tell the operating system to send bytes over a network.
One nice feature of HTTP is that it is a primarily text-based protocol, which
makes it more straightforward for humans to read and debug. It is also well-understood by web
browsers and programs like curl, making it easy to test and connect to
user-facing devices.
It's useful to get experience with the format of HTTP, and with using system calls in C to manipulate HTTP requests.
Task – Chat Server
In this programming assignment, you'll write a C program to implement a chat room (think a plain-text version of Slack or Discord).
It's best to complete the PA on ieng6, because it gives a consistent testing
environment for the live server.
You can also use the client from Lab 5 to try out your server.
Your programs should compile and run with:
$ make chat-server
$ ./chat-server <optional port number>
The server should start with ./chat-server and print a single message:
$./chat-server
Server started on port PPPPP
If a port number was provided, it should use that port, otherwise it should print an open port that was selected.
It should continue running, listening for requests on that port, until shutdown with Ctrl-c. It can print any other logging messages or other output needed to the terminal.
The requests the chat server listens for are described in this section
/chats
A request to /chats responds with the plain text rendering of all the chats.
The rendered chat format is
[#N 20XX-MM-DD HH:MM]   <username>: <message>
                    (<rusername>)  <reaction>
                        ... [more reactions] ...
... [more chats] ...
Where:
#Nis#followed by a number like#5or#33, where the integer is the id of the chat (ids start at 1 and count up).YYYY-mm-dd HH:MMis the timestamp of the chat (when it was sent).YYYYis the year, like2024mmis the two-digit month, like10for Octoberddis the two-digit day, like31HHis the two-digit hour in 24-hour format, like14for 2pmMMis the two-digit minute, like55
<username>is the username of the user who sent the chat<message>is the text of the message the user entered<rusername>is the name of a user who reacted to the message<reaction>is a reaction to a message
In terms of alignment and spacing:
- There should be at least one space between the number and the timestamp
- There should be at least one space between the closing
]and the username - There should be no space right after the username in a chat, it should be immediately followed by a colon
- There should be a single space after the colon before the message
- There should be some space before the
(in a reaction, no space between the()and the username, and some space after the)before the reaction message
You can put in whatever effort you like into lining things up nicely within these constraints, but these are the requirements.
So an example chats rendering might look like:
[#1 2024-10-06 09:01]         joe: hi aaron
[#2 2024-10-06 09:02]       aaron: sup
[#3 2024-10-06 09:04]         joe: working on the example chat for the PA
[#4 2024-10-06 09:06]       aaron: oh cool what should it say
[#5 2024-10-06 09:07]         joe: I dunno we could go pretty meta with it? I pushed an example go check it out. like a chat about the chat
[#6 2024-10-06 09:10]       aaron: eh kinda lame tbh
[#7 2024-10-06 09:11]         joe: whatever I already wrote it, going with it as-is
[#8 2024-10-06 09:12]       aaron: ok but make sure we don't look like jerks
[#9 2024-10-06 09:12]       aaron: or at least not me
                            (joe)  👍🏻
[#10 2024-10-06 09:12]         joe: good talk
Here's another:
[#1 2024-10-24 13:01]        yash: hi all! react with 👍🏻 if you think the lab is good to go, or 😬 if you think it needs more testing
                          (aaron)  👍🏻
                          (elena)  😬
                         (arunan)  😬
                          (janet)  😬
                         (travis)  😬
                            (joe)  🐿️
[#2 2024-10-24 13:02]        yash: OK we'll go with what joe said
/post
A post request looks like this:
/post?user=<username>&message=<message>
This creates a new chat with the given username and message string with a timestamp given by the time the request is received by the server. It must respond with the list of all chats (including the new one).
Limits and constraints:
- If a parameter (
usernameormessage) is missing, respond with some kind of error (HTTP code 400 or 500) - If username is longer than 15 bytes, respond with some kind of error (HTTP code 400 or 500)
- If message is longer than 255 bytes, respond with some kind of error (HTTP code 400 or 500)
- If a post would make there be more than 100000 (one hundred thousand) chats, the server should respond with an error (HTTP code 404 or 500)
/react
/react?user=<username>&message=<reaction>&id=<id>
Creates a new reaction to a chat by the given username with the given message
string, reacting to the post with the given id (the ids are the #N at the
beginning of posts). It must
respond with the list of all chats (including the new one).
Limits and constraints:
- If the id is not the ID of some existing chat, respond with some kind of error (HTTP code 400 or 500).
- If a parameter (
usernameormessageorid) is missing, respond with some kind of error (HTTP code 400 or 500) - If username is longer than 15 bytes, respond with some kind of error (HTTP code 400 or 500)
- If message is longer than 15 bytes, respond with some kind of error (HTTP code 400 or 500) – reactions are intended to be short!
- If a reaction would make a chat have more than 100 reactions, the server should respond with an error (HTTP code 404 or 500)
/reset
A /reset request resets the chat server to have no chats or reactions,
starting from the empty initial state. Should respond with a successful HTTP response with an empty body.
It should be possible to /reset the room many times, and after resetting the
memory usage of the program should be the same as in the empty initial state.
After a reset, it should be possible to immediately shut down the program and
have valgrind report no memory leaks.
Design Questions (You do not need to answer these for the resubmission)
-
How much working memory do 10 chats take in your program, in between processing requests (assume no one has reacted to them)? How about 100? 1000? We can call this part of the memory your program uses the chat storage. How much additional working memory is used when handling the
/chatsrequest in your code for 10, 100, and 1000 chats? Speculate on ways to lower either the chat storage or the memory used to process a request, or explain why your approach minimizes them. -
The PA writeup specifies many limits and constraints on the input (usernames, messages, ids, and so on). Choose one of these limits or constraints, and imagine removing it. What's something that would now work and might make a user happy because the limit is removed? What's a problem that could result from removing that limit? What impact would it have on your implementation to remove it (any new possibilities of errors, new cases to handle, etc)?
Implementation Guide
This page is the entire specification for the assignment; it's what you need to implement. You are free to make whatever choices you like in your code within these constraints. To help you on your way, we have an implementation guide:
- A lot of the background you need is in Lab 5 Part 2 and Part 3. Make sure you're comfortable with and have completed those ideas.
- Discussion sections this week will cover examples related to parsing query parameters in requests
- HTTP
- Function-by-function Breakdown
- Representing Chats and Reactions
- Other Useful Functions
Handin
- Hand in your repository on Gradescope
- Make sure
make chat-serverbuilds your server (that's the command we will run), and the server runs on a predictable port with, for example,./chat-server 8000 - Don't forget
DESIGN.mdandCREDITS.md
Implementation Guide: The http-server Library
We've provided you with http-server.c and http-server.h. This is code for
you to treat as a library, you shouldn't change it at all (though you may
learn from reading it!).
It provides one function for you to use:
void start_server(void(*handler)(char*, int), int port);
This function takes two arguments: a handler that takes HTTP requests and
writes responses, and a port for telling the server what address to use. The
port can be 0 to ask the operating system to choose one for us.
The type for handler is the type of a function pointer, which is the address
of a function. To use start_server, we define a function (it can have any
name) with the appropriate signature and pass it into start_server as an
argument. The handler function takes two arguments:
void(*handler)(char*, int)
- The first, the
char*, is a string containing the request from the internet. It will be an HTTP request. - The second, the
int, is a file descriptor that our program can use to write a response using thewritesystem call
Here's a straightforward example that just responds to the user with a constant string:
#include "http-server.h" // http-server includes a lot of other useful things
char const* HTTP_200_OK = "HTTP/1.1 200 OK\r\nContent-Type: text/plain\r\n\r\n";
void handle_response(char *request, int client_socket) {
    printf("The user sent a request with: %s\n", request);
    write(client_socket, HTTP_200_OK, strlen(HTTP_200_OK));
    write(client_socket, "Hello!", 6);
}
int main() {
    start_server(&handle_response, 0);
}
$ gcc -o print-request print-request.c http-server.c
$ ./print-request
Server started on port PPPPP (will be a specific number for you)
# the lines below print *when the request is received*
The user sent a request with: GET /post?user=joe&message=hi HTTP/1.1
Host: localhost:36611
User-Agent: curl/7.68.0
Accept: */*
The user sent a request with: GET /post?user=aaron&message=sup HTTP/1.1
Host: localhost:36611
User-Agent: curl/7.68.0
Accept: */*
(in another terminal)
$ curl "http://localhost:PPPPP/post?user=joe&message=hi"
Hello!
$ curl "http://localhost:PPPPP/post?user=aaron&message=sup"
Hello!
Then, every time the server gets a request, it will call the handle_request
function, which will print the contents of the request, and then use the write system call to send a response back to the client (in this case with a constant string). This is the entry point to our program, and it's a good starting point for you to build up from!
One other tip for using start_server:
- If
portis 0, the library will pick an open port provided by the operating system. This is convenient for getting started - However, when you restart a program it's annoying to have to change the port number in any requests you have in your bash history, etc. So you can also provide the port number as an argument, which could be hardcoded or taken from a command-line argument. You can do that to re-run the program with the same port it used last time to keep your examples consistent
HTTP Requests
The first argument to handler is a char* with a a reference to the HTTP
request. For our chat-server, all requests will be GET requests and will
look something like
GET /post?user=joe&message=hi HTTP/1.1
Host: localhost:36611 User-Agent:
curl/7.68.0 Accept: */ *
The string after GET is the path of the request, and that's the part that will
change depending on the type of request we get. Part of the job of the
chat-server will be to extract the relevant information from the path, like
which action to take (post, react, etc.) and the parameters of the action (user,
message, etc.) in order to work with them.
It probably makes sense to use some C string library functions to do this. In
particular strtok will allow you to “split up” a string by replacing
delimiters like , &, and = with null terminators. You may also find
strcspn, strstr, or strpbrk useful; it's up to you to come up with a plan
to put these together to extract the information out of each request.
HTTP Responses
The second argument to handler is an int that is a file descriptor for the
response. The http-server library has set things up so writing to the socket
sends bytes directly back to whatever client made the request.
The format of a HTTP response for a successful response is
HTTP/1.1 200 OK
Content-Type: text/plain

... response body ...
Note: A nuance of this is that the newlines in HTTP responses are not just
\n; they are required to be
\r\n (which, interestingly,
is how line endings
work on Windows). Some software will work with just a \n for line breaks, but
the correct thing to do is use \r\n, so in a string literal the HTTP header above
would look like
"HTTP/1.1 200 OK\r\nContent-Type: text/plain\r\n\r\n...response body...
There are many other Content-Types in the world other than text/plain! But
we will focus on just plain text reponses for this assignment.
Working Incrementally: Data vs. Requests
One way to break down the work the server needs to do is:
- Parsing and interpreting requests (is the request a new post, a reaction, etc)
- Updating the current data (chats and reactions) based on the parameters in the request
- Responding to requests based on the current state of the data (chats and requests)
One way to work incrementally is to separate the data handling and the request handling parts into different functions.
The data handling functions can be tested with asserts, and the request
handling can be tested with curl or a client.
We think the following functions might be useful for you to implement. In your program you might have slightly different signatures or ideas, but these are a useful starting point. Also, our staff is more familiar with this approach, so it will take us less time to help you in office hours!
Data Handling Functions
These functions can be written and tested without starting a server at all. You
could consider having a separate main function in its own file that just tests
these!
add_chat
A function add_chat can add a single chat.
uint8_t add_chat(char* username, char* message)
This function might have several tasks:
- Update the current
id - Get the current timestamp
- Create a new chat and fill in its username and message fields
- As needed, allocate new space, put the new chat in heap memory, store a reference to it in an array, etc. depending on your specific representation of chats
This is testable by setting up initial states of chats and reactions, running
the function, and then using assert or printf on the results.
add_reaction
Similar to add_chat, this adds a single reaction:
uint8_t add_reaction(char* username, char* message, char* id)
This function might have several tasks:
- Use the id to locate the chat that this reaction is for (and maybe return early with an error if the id is invalid/out of range)
- Create a new reaction and fill in its username and message fields
- Add the reaction to the chat struct somehow, maybe with newly allocated space, an added element or reference in an array, etc. depending on your specific representation of chats and reactions
- Update the count of reactions on the referenced chat
This is testable by setting up initial states of chats and reactions, running
the function, and then using assert or printf on the results.
reset
This function can use free as necessary to clear dynamically-allocated heap
memory and reset logical values (like a counter of the number of chats) back to
0.
This is testable by setting up initial states of chats and reactions, running
the function, and then using assert or printf on the results. You can also
set up a main function in a fresh file just for checking that after using a
sequence of add_chat and add_reaction followed by reset, there are no memory
leaks when run with valgrind.
Request and Response Handling Functions
You will definitely need to write a function for handling responses. But the
work of handling individual responses can be broken up. One approach could be to
get the path and query parameter string from the request and check if it's path
is /post, /chats, etc, then pass the string to other functions
respond_with_chats
void respond_with_chats(int client)
This function is reponsible for using write or send to send the response to
the client that made the request. It might include:
- Using
snprintfto format strings with data from the timestamp or ids - Calling
write(client, str, size)on various strings (with the appropirate size) to directly send the data to the client
handle_post
// path is a string like "/post?user=joe&message=hi"
void handle_post(char* path, int client)
This function can have several tasks:
- Use string functions to extract the username and message from the path
- Call
add_chatto do the data update - Call
respond_with_chatsto send the response
handle_reaction
// path is a string like "/react?user=joe&message=hi&id=3"
void handle_reaction(char* path, int client)
This function can have several tasks:
- Use string functions to extract the username, message, and id from the path
- Call
add_reactionto do the data update - Call
respond_with_chatsto send the response
Parsing Functions
One crucial task is getting information out of requests. That is, given a string like this:
"GET /post?user=joe&message=hi HTTP/1.1\r\n"
How do we extract the parts that say "joe" and "hi"?
There are a few substeps you might consider, whether as helper functions or just parts of an overall approach:
- Isolate the path part (the part starting with
/and up until the space beforeHTTP) - Search for known strings and delimiters like
user=and& - Copy parts of the string into new character arrays, paying careful attention to the necessary lengths (some of the limits on requests may be helpful here!). Alternatively, create interior pointers into the path at the appropriate places for the username and message
Remember that Week 4 Monday had a video specifically about strings and interior pointers, and Week 5 Discussions are specifically about parsing requests!
Representing Chats
Chats and reactions both have multiple fields, so a natural choice is to represent both chats and reactions as structs.
A chat has several components, which may be good candidates for struct fields:
- The message
- The username
- The timestamp
- The reactions to the message
A reaction has the message content and the user who posted it (no timestamp or reactions-to-reactions), both of which are fixed-size.
You could consider structures like these; what are some tradeoffs? (We've assumed that the program defines some useful constants to avoid repeating specific numbers).
struct Reaction {
    char user[USERNAME_SIZE];
    char message[REACTION_SIZE];
}
struct Chat {
    uint32_t id;
    char user[USERNAME_SIZE];
    char message[MESSAGE_SIZE];
    char timestamp[TIMESTAMP_SIZE];
    uint32_t num_reactions;
    Reaction reactions[MAX_REACTIONS];
}
struct Reaction {
    char *user;
    char *message;
}
struct Chat {
    uint32_t id;
    char *user;
    char *message;
    char *timestamp;
    uint32_t num_reactions;
    Reaction *reactions;
}
These are ideas – some combination of them might work, and they are not necessarily perfect or complete. Some things to think about:
- Which fields are fixed-size?
- Which fields can grow?
- Which fields can change?
- What are limits for them described in the specification?
Other Helpful Functions
This PA explores several features that are straightforward to use, but there are
many of them. We might add more to this list as the PA goes on! Here are a few
functions you'll probably find useful; try man on them, or follow the links,
or do your own searching and research. Don't forget all the functions from class
(e.g. malloc and other allocation functions, strstr and other string
manipulation functions, and so on). This list is mainly focused on things we
haven't tried in class.
-
atoi: convertchar*to integerFor example:
#include <stdio.h> #include <stdlib.h> int main() { char numeric[] = "123"; int asnum = atoi(numeric); printf("%d\n", asnum * 2); } -
Time functions:
-
time: get the current time -
localtime: convert the time to the current local time zone -
strftime: print the time in a given formatFor example:
#include <time.h>
#include <stdio.h>

int main() {
    char buffer[100];
    time_t now = time(NULL);
    struct tm *tm_info = localtime(&now);
    strftime(buffer, sizeof(buffer), "%Y-%m-%d %H:%M:%S", tm_info);
    printf("%s", buffer);
}
-
PA4 Resubmission – Malloc
This assignment is thanks to the staff of CSE29 spring 2024, especially Gerald Soosairaj and Jerry Yu.
- Resubmission Due Tuesday, Dec 10, 10:10pm
- GitHub Classroom: https://classroom.github.com/a/ngxgHFB3
Resubmission instructions
If you want to resubmit PA4, please read this section carefully. You need to pass all the tests in the original PA4, while also implementing an extra functionality and answering a new design question described below.
vminfo
In utils.c, we have implemented the function vminfo(), which traverses through the heap blocks and prints out the metadata in each block header.
Update the function so that at the end of its output, it prints details about the largest available block as follows:
The largest free block is #x with size y.
where x is the blockid starting from 0, and y is the size (including header) of the largest available block for allocation.
If there are multiple candidates for the largest block, x should be the smallest blockid of the candidates.
Refer the following updated output of vminfo as an example:
vminit: heap created at 0x707df3026000 (4096 bytes).
vminit: heap initialization done.
---------------------------------------
 #      stat    offset   size     prev
---------------------------------------
 0      BUSY    8        48       BUSY
 1      FREE    56       32       BUSY
 2      BUSY    88       112      FREE
 3      BUSY    200      96       BUSY
 4      FREE    296      208      BUSY
 5      BUSY    504      64       FREE
 6      BUSY    568      320      BUSY
 7      FREE    888      208      BUSY
 8      BUSY    1096     160      FREE
 9      BUSY    1256     368      BUSY
 10     BUSY    1624     272      BUSY
 11     FREE    1896     672      BUSY
 12     BUSY    2568     128      FREE
 13     BUSY    2696     464      BUSY
 14     FREE    3160     672      BUSY
 15     BUSY    3832     160      FREE
 16     FREE    3992     96       BUSY
 END    N/A     4088     N/A      N/A
---------------------------------------
Total: 4080 bytes, Free: 6, Busy: 11, Total: 17
The largest free block is #11 with size 672
In this example, there are six FREE blocks with the two largest FREE blocks being 672 bytes in size: the output line shows the index of the 672 sized block that comes first.
Updated DESIGN question for the resubmission
In our implementation, when freeing an allocated block, we coalesce it with the previous and next blocks in the heap if they are free - to make one larger free block.
- Consider an updated implementation where in case of freeing, we only coalesce it with exactly 1 next block in the heap if it is free. Give an example of a program (in C or pseudocode) where all the allocations succeed in the current design (like in this PA), but some allocations would fail with the updated freeing strategy.
In class, quizzes, and PAs we've _used_ `malloc` and `free` to manage memory. These are functions [written in C](https://sourceware.org/git/?p=glibc.git;a=blob;f=malloc/malloc.c)! `glibc` contains one of the [frequently used implementations](https://sourceware.org/glibc/wiki/MallocInternals).
There are a lot of details that go into these implementations – we don't expect
that anyone could internalize all the details from the documentation above
quickly. However, there are a few key details that are really interesting to
study. In this project, we'll explore how to implement a basic version of
malloc and free that would be sufficient for many of the programs we have
written.
Specfically, we will practice the following concepts in C:
- bitwise operations,
- pointer arithmetic,
- memory management, and of course,
- using the terminal and vim.
Task Specification
You will implement and test two functions.
vmalloc
void *vmalloc(size_t size);
The size_t size parameter specifies the number of bytes the caller wants.
This has the same meaning as the usual malloc we have been using: the returned
pointer is to the start of size bytes of memory that is now exclusively
available to the caller.
Note the void * return type, whic is the same as the usual malloc. void *
is not associatd with any concrete data type. It is used as a generic pointer,
and can be implicitly assigned to any other type of pointer.
This is how malloc (and our vmalloc) allow assigning the result to any pointer type:
int *p = malloc(sizeof(int) * 10);
char *c = malloc(sizeof(char) * 64);
If size is not greater than 0, or if the allocator could not find a heap
block that is large enough for the allocation, then vmalloc should return
NULL to indicate no allocation was made.
Your implementation of vmalloc must:
- Use a “best fit” allocation policy
- Always return an address that is a multiple of 16
- Always allocate space on 16-byte boundaries
More details are in the implementation guide.
vmfree
void vmfree(void* ptr)
The vmfree function expects a 16-byte aligned address obtained by a previous
call to vmalloc. If the address ptr is NULL, then vmfree does not perform any
action and returns directly. If the block appears to be a free block, then
vmfree does not perform any action and returns.
For allocated blocks, vmfree updates the block metadata to indicate that it is
free, and coalesces with adjacent (previous and next) blocks if they are also
free.
More details are in the implementation guide.
Design Questions (You do not need to answer these for the resubmission)
Heap fragmentation occurs when there are many available blocks that are small-sized and not adjacent (so they cannot be coalesced).
-
Give an example of a program (in C or pseudocode) that sets up a situation where a 20-byte
vmalloccall fails to allocate despite the heap having (in total) over 200 bytes free across many blocks. Assume all the policies and layout of the allocator from the PA are used (best fit, alignment, coalescing rules, and so on) -
Give an example of a program (in C or pseudocode) where all the allocations succeed if using the best fit allocation policy (like in this PA), but some allocations would fail due to fragmentation if the first fit allocation policy was used instead, keeping everything else the same.
Submission
You'll submit on Gradescope as usual. Refer to the policies on collaboration if you need to refresh your memory.
We will compile your program using the provided Makefiles, which you should
not change.
To get started read through the next few sections about the PA:
Getting Started
The starter code for this assignment is hosted on GitHub Classroom. Use the following link to accept the GitHub Classroom assignment: https://classroom.github.com/a/ngxgHFB3
Just like on PA2/3, clone the repository to ieng6 server.
The Code Base
Unlike previous PAs, this PA comes with starter code that you should read and understand.
The Library
vmlib.h: This header file defines the public interface of our library. Other programs wishing to use our library will include this header file.vm.h: This header file defines the internal data structures, constants, and helper functions for our memory management system. It is not meant to be exposed to users of the library.vminit.c: This file implements functions that set up our “heap”.vmalloc.c: This file implements our own allocation function calledvmalloc.vmfree.c: This file implements our own free function calledvmfree.utils.c: This file implements helper functions and debug functions.
Testing
vmtest.c: This file is not a part of the library. It defines a main function and uses the library functions we created. We can test our library by compiling this file into its own program to run tests. You can write code in themain()function here for testing purposes.tests/: This directory contains small programs and other files which you should use for testing your code. We will explain this in more detail in a later section.
Compiling the Starter Code
To compile, run make in the terminal from the root directory of the repository. You should see the following items show up in your directory:
libvm.so: This is a dynamically linked library, i.e., our own memory allocation system that can be linked to other programs (e.g., vmtest). The interface for this library is defined invmlib.h. TheMakefiles handle compiling with a.sofor you; we set it up this way to match how production systems include libraries likestdlibvmtest: This executable is compiled from vmtest.c with libvm.so linked together. It uses your memory management library to allocate/free memory.- The starter code in
vmtest.cis very simple: it callsvminit()to initialize our simulated “heap”, and calls the vminfo() function to print out the contents of the heap in a neatly readable format. Run the vmtest executable to find out what the heap looks like right after it’s been initialized! (Hint: it’s just one giant free block.)
Reading the Starter Code
For this programming assignment, we want the addresses returned by vmalloc to always be 16-byte aligned (i.e., at an address ending in 0x0). Since the metadata (block header) is 8 bytes in size, block headers will therefore always be placed at addresses ending in 0x8. To maintain this alignment, the first block header (*heapstart) starts at an offset of 8, and all blocks going forward must have sizes that are multiples of 16 bytes.
Block sizes here refer to the size of the block including the header. The smallest possible block is 16 bytes, and would consist of an 8 byte header followed by 8 bytes of allocatable memory. When free, the last 8 bytes of the block would instead contain the block footer, to be used for coalescing free blocks.
The size_t data type, which you will see frequently throughout this PA, is a 64-bit (8-byte) unsigned integer type.
Begin by reading through the vm.h file, where we define the internal data structures for the heap. This is where you will find the all-important block headers and block footers. Focus on understanding how struct block_header is used. You will see it in action later.
Next, open vminit.c. This is a very big file containing functions that create and set up the simulated heap for this assignment. Find the init_heap() function, and read through the entire thing to understand how it is setting up the heap. There is pointer arithmetic involved, you will need to do similar things for implementing vmalloc and vmfree, so make sure you have a solid understanding of that. (Why is it necessary to cast pointers to different types?)
Just like production allocators, we create a large chunk of memory as our heap using mmap, and allocations/frees are performed in that memory region.
Once you understand what the init_heap() function is doing, open up utils.c. Here we have implemented the function vminfo(), which will be your ally throughout this PA. This function traverses through the heap blocks and prints out the metadata in each block header. You should find inspiration for how to write your own vmalloc function here. Look at how it manipulates the pointer to jump between blocks!
Implementation Guide
This provides detailed implementation information and a suggested workflow.
Incremental Development Tips
- Run the starter code and understand the output. Always figure out how to run your program first! You can’t do any testing if you don’t know how to run your program.
- Understand the
init_heap()function. - Understand the
vminfo()function. - Begin writing the
vmalloc()function:- write and test the size calculation code.
- write and test the best-fit policy. (A helper function would be great here.) See later section for testing images.
- write and test splitting free blocks.
- Begin writing the vmfree() function:
- write and test a basic
vmfree()implementation that only frees one block. - write and test coalescing with the next block if it is also free.
- write and test a basic
- Add block footers / coalescing backwards
- update and test
vmfree()andvmalloc()to write block footers into free blocks. - update and test
vmfree()to coalesce with the previous block if it is free.
- update and test
- Test everything!
Consider some helper functions along the way:
- A function to get the size of a block in bytes given a pointer to the beginning of it
- A function to get the size of a block in 8-byte words given a pointer to the beginning of it
- A function for getting a pointer to the next block given a pointer to the beginning of a block
Implementing vmalloc
Allocation Size Calculation
We need to do some calculations based on the requested size to get the actual block size that we need to look for in our heap.
- Add 8 bytes for the block header to the requested size;
- Round up the new size to the nearest multiple of 16.
For example, if the user calls vmalloc(10), we first add 8 bytes for the header to get 18, and then round up to the nearest multiple of 16, which gets us 32. So to allocate 10 bytes, we need to look for a heap block that is at least 32 bytes in size.
Allocation Policy
Many allocation policies are possible – choosing the first block that fits, choosing the last block that fits, choosing the most-recently-freed block that fits, and so on. The one you must implement for this PA is the best-fit policy.
That is, once you have determined the size requirement of the desired heap block, you need to traverse the entire heap to find the best-fitting block – the smallest block that is large enough to fit the allocation. If there are multiple candidates of the same size, then you should use the first one you find.
Splitting Large Blocks
If the best-fitting block you find is larger than what we need, then we need to split that block into two. For example, if we are looking for a 16-byte block for vmalloc(4), and the best fitting candidate is a 64-byte block, then we will split it into a 16-byte block and a 48-byte block. The former is allocated and returned to the caller, the latter remains free.
Updating Block Header(s)
If a new block was created as a result of a split, you need to create a new header for it, and
- set the correct size.
- set the status bit to 0.
- set the previous bit to 1.
And for the block that was allocated, you need to
- update the size (if splitting happened).
- set the status bit to 1.
- go to the next block header (if it’s not the end mark) and set its previous bit to 1.
Returning the Address
After updating all the relevant metadata, vmalloc should return a pointer to the start of the payload. Do not return the address of the block header!
Implementing vmfree
The simplest version of vmfree just finds the header for the given block and resets the block status bit to 0.
Coalescing freed blocks
Just freeing a block is not necessarily enough, since this may leave us with many small free blocks that can't hold a large allocation. When freeing, we also want to check if the next / previous block in the heap are free, and coalesce with them to make one large free block.
If you are coalescing two blocks, remember to update both the header and the footer!
Block footers / Previous Bit
Since a block's header contains its size, we know how far forward to move to get to the next block's header. However, when coalescing backwards, we need to know the size of the previous block to get to its header. To be able to do this without walking the entire list of blocks from the beginning, we write the block size to a footer in the last 8 bytes of the block.
Since footers are only needed during coalescing, we only need to add footers to free blocks; this means that footers don't take up extra space in allocated blocks, and free blocks weren't using that space anyway. However, we then need to make sure we update the "previous block busy" bit correctly so that we don't confuse user data in an allocated block with footer data in a free block.
You will need to update both your vmalloc and your vmfree implementation to add code for creating/updating accurate footers, and making sure the "previous block busy" bit is correct.
Testing
For this PA we provide you with some local testing code to help you make sure your program is working; you will need to write more thorough tests than what we've provided! But we give you a big start
Test Programs
In the repository, you will find the tests/ directory, where we have provided some small testing programs that test your library function.
By coding in to the tests/ directory and running make, you can compile all these test programs and run them yourself. These programs are what we will be using in the autograder as well.
For example, here’s the code for the very first test: alloc_basic.c:
#include <assert.h>
#include <stdint.h>
#include <stdlib.h>

#include "vmlib.h"
#include "vm.h"

/*
 * Simplest vmalloc test.
 * Makes one allocation and confirms that it returns a valid pointer,
 * and the allocation takes place at the beginning of the heap.
 */
int main()
{
    vminit(1024);

    void *ptr = vmalloc(8);
    struct block_header *hdr = (struct block_header *)
                               ((char *)ptr - sizeof(struct block_header));

    // check that vmalloc succeeded.
    assert(ptr != NULL);
    // check pointer is aligned.
    assert((uint64_t)ptr % 16 == 0);
    // check position of malloc'd block.
    assert((char *)ptr - (char *)heapstart == sizeof(struct block_header));
    // check block header has the correct contents.
    assert(hdr->size_status == 19);

    vmdestroy();
    return 0;
}
In this test, we simply make one vmalloc() call, and we verify that the allocation returned a valid pointer at the correct location in the heap.
These tests use the assert() statement to check certain test conditions. If your code passes the tests, then nothing will be printed. If one of the assert statements fail, then you will see an error.
Test Images
When you are writing vmalloc, you may wonder how you can test the allocation policy fully when you don’t have the ability to free blocks to create a more realistic allocation scenarios (i.e., a heap with many different allocated/free blocks to search through).
To help you with that, we have created some images in the starter code in the tests/img directory. In your test programs, instead of calling vminit(), you can call the vmload() function instead to load one of these images.
Our alloc_basic2 program uses one such image. If you open tests/alloc_basic2.c, you will see that it creates the simulated heap using the following function call:
vmload("img/many_free.img");
If you load this image and call vminfo(), you can see exactly how this image is laid out:
vmload: heap created at 0x7c2abd1da000 (4096 bytes).
vmload: heap initialization done.
---------------------------------------
 #      stat    offset   size     prev
---------------------------------------
 0      BUSY    8        48       BUSY
 1      BUSY    56       48       BUSY
 2      FREE    104      48       BUSY
 3      BUSY    152      32       FREE
 4      FREE    184      32       BUSY
 5      BUSY    216      48       FREE
 6      FREE    264      128      BUSY
 7      BUSY    392      112      FREE
 8      BUSY    504      32       BUSY
 9      FREE    536      112      BUSY
 10     BUSY    648      352      FREE
 11     BUSY    1000     304      BUSY
 12     BUSY    1304     336      BUSY
 13     FREE    1640     320      BUSY
 14     BUSY    1960     288      FREE
 15     BUSY    2248     448      BUSY
 16     BUSY    2696     256      BUSY
 17     BUSY    2952     96       BUSY
 18     BUSY    3048     368      BUSY
 19     FREE    3416     672      BUSY
 END    N/A     4088     N/A      N/A
---------------------------------------
Total: 4080 bytes, Free: 6, Busy: 14, Total: 20
You can use this image to test allocating in a more realistic heap.
Three images exist in total:
last_free.img: the last block is free,many_free.img: many blocks are free,no_free.img: no block is free (use this to test allocation failure).
Project 5: The Pioneer Shell
Due Friday, December 6, 10:00PM
This assignment is from CSE29 SP24, which has its own list of acknowledgments!
Learning Goals
This assignment calls upon many of the concepts that you have practiced in previous PAs. Specfically, we will practice the following concepts in C:
- string manipulation using library functions,
- command line arguments,
- process management using fork(), exec(), and wait(), and of course,
- using the terminal and vim.
We'll also get practice with a new set of library functions for opening, reading from, and writing to files.
Introduction
Throughout this quarter, you have been interacting with the ieng6 server via the
terminal – you’ve used vim to write code, used gcc and make to compile,
used git to commit and push your changes, etc. At the heart of all this lies
the shell, which acts as the user interface for the operating system.
At its core, the shell is a program that reads and parses user input, and runs
built-in commands (such as cd) or executable programs (such as ls, gcc, make, or
vim).
As a way to wrap up this quarter, you will now create your own shell (a massively simplified one of course). We shall call it–
The Pioneer Shell
The PIoneer SHell, or as we endearingly call it, pish (a name with such elegance
as other popular programs in the UNIX world, e.g., git).
Interactive Mode
Your basic shell simply runs on an infinite loop; it repeatedly–
- prints out a prompt,
- reads keyboard input from the user
- parses the input into a command and argument list
- if the input is a built-in shell command, then executes the command directly
- otherwise, creates a child process to run the program specified in the input command, and waits for that process to finish
This mode of operation is called the interactive mode. The other mode you will need to implement is–
Batch Mode
Shell programs (like bash, which is what you have been using on ieng6) also
support a batch execution mode, i.e., scripts. In this mode, instead of printing
out a prompt and waiting for user input, the shell reads from a script file and
executes the commands from that file one line at a time.
In both modes, once the shell hits the end-of-file marker (EOF), it should call
exit(EXIT_SUCCESS) to exit gracefully. In the interactive mode, this can be done
by pressing Ctrl-D.
Parsing Input
Every time the shell reads a line of input (be it from stdin or from a file),
it breaks it down into our familiar argv array.
For instance, if the user enters "ls -a -l\n" (notice the newline character),
the shell should break it down into argv[0] = "ls", argv[1] = "-a", and argv[2] = "-l". In the starter code, we provide a struct to hold the parsed command.
Handling Whitespaces
You should make sure your code is robust enough to handle various sorts of
whitespace characters. In this PA, we expect your shell to handle any arbitrary
number of spaces ( ) and tabs (\t) between arguments.
For example, your shell should be able to handle the following input: " \tls\t\t-a -l ", and still run the ls program with the correct argv array.
Splitting the arguments is very much like what you did in PA3 parsing URLs. We give a specific suggestion of a function for this PA:
The strtok() function
char *strtok(char *str, const char *delim);
The strtok() function breaks a string into a sequence of zero or more nonempty
tokens. On the first call to strtok(), the string to be parsed should be
specified in str. In each subsequent call that should parse the same string, str
must be NULL. Read that last bit again - strtok is not like other
functions we've used!
The delim argument specifies a set of characters that delimit the tokens in the
parsed string.
Each call to strtok() returns a pointer to a null-terminated string containing
the next token. If no more tokens are found, strtok() returns NULL.
The above paragraphs are taken directly from the Linux manual (except for "read that last bit again". Joe added that). Now let’s see this function in action:
Suppose we have the following string:
char str[32] = "A|BC|D E |FGH \n"
And we would like to break it down by any of '|', ' ', or '\n', which would
leave us "A", "BC", "D", "E", and "FGH". We can write the following code:
#include <stdio.h>
#include <string.h>

int main()
{
    char str[32] = "  A|BC|D E   |FGH   \n";
    // break down the string at '|', ' ', and '\n' delimiters.
    char *tok = strtok(str, " |\n");
    while (tok) {
        printf("\'%s\'\n", tok);
        tok = strtok(NULL, " |\n");
    }
    return 0;
}
And running this program gives us:
'A'
'BC'
'D'
'E'
'FGH'
Note again that we try to break down (tokenize) the string using three possible
delimiter characters: '|', ' ', or '\n', the delim string we pass to strtok()
has these three characters: " |\n".
We think you will find strtok() very useful for your implementation!
Built-In Commands
Whenver your shell executes a command, it should check whether the command is a
built-in command or not. Specifically, the first whitespace-separated value in
the user input string is the command. For example, if the user enters ls -a -l tests/,
we break it down into argv[0] = "ls", argv[1] = "-a", argv[2] = "-l", and argv[3] = "tests/", and the command we are checking for is argv[0], which is
"ls".
If the command is one of the following built-in commands, your shell should invoke your implmementation of that built-in command.
There are three built-in commands to implement for this project: exit, cd,
and history.
Built-in Command: exit
When the user types exit, your shell should call the exit system call with
EXIT_SUCCESS (macro for 0). This command does not take arguments. If any is
provided, the shell raises a usage error.
Built-in Command: cd
cd should be run with precisely 1 argument, which is the path to change to.
You should use the chdir() system call with the argument supplied by the user.
If chdir() fails (refer to man page to see how to detect failure), you should
use call perror("cd") to print an error message. We will explain the
perror() function in a later section.
Built-in Command: history
When the user enters the history command, the shell should print out the list of
commands a user has ever entered in interactive mode.
(If you are on ieng6, open the ~/.bash_history file to take a look at all the
commands you have executed. How far you’ve come this quarter!)
To do this, we will need to write the execution history to a file for persistent
storage. Just like bash, we designate a hidden file in the user’s home directory
to store the command history.
Our history file will be stored at ~/.pish_history. (You will find a function in
the starter code that help you get this file path.)
When adding a command to history, If the user enters an empty command (0 length or whitespace-only), it should not be added to the history.
When the user types in the history command to our shell, it should print out
all the contents of our history file, adding a counter to each line:
▶  history
1 history
▶  pwd
/home/jpolitz/cse29fa24/pa5/Simple-Shell
▶  ls
Makefile  script.sh  pish  pish.c  pish.h	pish_history.c  pish_history.o  pish.o
▶  history
1 history
2 pwd
3 ls
4 history
Note that the number before each line is added by history. The contents of
.pish_history should not contain the leading numbers.
Running Programs
If, instead, the command is not one of the aforementioned built-in commands, the
shell treats it as a program, and spawns a child process to run and manage the
program using the fork() and exec() family of system calls, along with
wait().
Refer to the material from Week 9 for information on these system calls.
Excluded Features
Now because our shells are quite simple, there are a lot of things that you may be accustomed to using that will not be present in our shell. (Just so you are aware how much work the authors of the bash shell put into their product!)
You will not be able to
-use the arrow keys to navigate your command history,
-use
Don’t be concerned when these things don’t work in your shell implementation!
If this were an upper-division C course, we would also ask you to implement redirection and piping, but it's [checks notes] week 10 already!
Handling Errors
Because the shell is quite a complex program, we expect you to handle many different errors and print appropriate error messages. To make this simple, we now introduce–
Usage Errors
This only applies to built-in commands. When the user invokes one of the shell’s built-in commands, we need to check if they are doing it correctly.
- For
cd, we expectargc == 2, - For
historyandexit, we expectargc == 1.
If the users enters an incorrect command, e.g. exit 1 or cd without a path,
then you should call the usage_error() function in the starter code, and
continue to the next iteration of the loop.
The perror() function
void perror(const char *s);
The perror() function produces a message on stderr describing the last error
encountered during a library function/system call.
When printing the error message, perror() first prints whatever string s we
give it, followed by a colon and a blank, followed by the error message.
Consider an example where we try to open a nonexistent file using fopen(), the
call should fail and not return a valid FILE pointer, in which case, we call
perror() to report the problem:
FILE *fp = fopen("noexist.txt", "r");
if (fp == NULL) {
    perror("open");
    return EXIT_FAILURE;
}
If we run this program, we would get the following output:
open: No such file or directory
Errors to handle
You need to handle errors from the following system calls/library functions
using perror(). Please pay attention to the string we give to perror() in each
case and reproduce it in your code exactly.
fopen()failure:perror("open"),chdir()failure:perror("cd"),execvp()failure:perror("pish"),fork()failure:perror("fork")
Getting Started
The starter code for this assignment is hosted on GitHub classroom. Use the following link to accept the GitHub Classroom assignment:
Github Classroom: https://classroom.github.com/a/ZT3W6c0Z
The Code Base
You are given the following files:
pish.h: Defines struct pish_arg for handling command parsing; declares functions handling the history feature.pish.c: Implements the shell, including parsing, some built-in commands, and running programs.pish_history.c: Implements the history feature.Makefile: Builds the project.ref-pish: A reference implementation of the shell. Note that in this version, the history is written to~/.ref_pish_historyrather than~/.pish_history, to avoid conflict with your own shell program.
(Note: The reference implementation contains a few inconsistencies with the write-up. For instance, the reference program does not report an error when cding into a nonexistent directory. If such an inconsistency occur, please stick to the writeup!)
Running pish
First, run make to compile everything. You should see the pish executable in
your assignment directory.
To run pish in interactive mode (accepting keyboard input), type
$ ./pish
Or, to run a script (e.g., script.sh), type
$ ./pish script.sh
The same applies for the reference implementation ref-pish.
struct pish_arg
In pish.h, you will find the definition of struct pish_arg:
#define MAX_ARGC 64

struct pish_arg {
  int argc;
  char *argv[MAX_ARGC];
};
In our starter code, all functions handling a command (after it has been parsed)
will be given a struct pish_arg argument.
Hints
This project once more requires you to think carefully about incremental development. There are many things to, how should you go about everything? In what order? Here’s one possibile plan:
- Start from simple commands without any arguments, e.g.,
"ls". - After that, start implementing running programs with
forkandexec. - Implementing input parsing using
strtok(). Think about how to break down the line and put it intostruct pish_arg. - Once command parsing is working, go on to implement the two simple built-in commands:
exitandcd. Make sure to take care of error handling. - Next, make sure you can parse commands with arguments, e.g.,
"ls -a". - Next, make sure you can handle arbitrary whitespaces.
- Make sure reading from a script file works just as well as from
stdin. - Once that’s working, you can finish implementing the
historycommand. - The list above is just a suggestion. You are of course encouraged to come up with your own implementation plan. But the most important thing is that you should have a plan!
Start early, start often!
Valgrind
You have a lot of freedom for how to implement this PA. You do not necessarily need to use malloc, but if you use dynamic memory allocation at any point, make sure you free everything properly. We will include a valgrind test when grading your assignment. So make sure there are no memory issues! (Memory leaks, invalid read/writes, using uninitialized variables, etc.)
Submission
- Submit your code to Gradescope
- We will run your program with
makeand./pishin both interactive and batch mode - There are no design questions
- CREDITS.md is still required