Week 1 – Command Line and Running C Programs
Lab Logistics
In this class, you are assigned to lab sections, in which you will be in the CSE basement lab rooms to work hands-on on activities related to the tools and techniques that you’ll be using on programming assignments.
Labs are graded by participation, based on your attendance and engagement with the lab activity. Throughout the lab, you will fill in a shared Google Doc with notes and results from what you try and learn. This will be shared with the group of students around you so you have a collective record of your activities (and so we can comment on your progress!)
Your TA/tutor will share the link to the Google Docs with you at the beginning of the lab. When the lab prompts you to write something in the Google doc, be sure to put your name next to your contributions so that we can confirm your participation!
Meet your Group!
We will split into groups of 6-8 students for discussion. For week 1, you may sit wherever you want and choose who you want to work with. Starting week 2, we will have assigned seating and groups. These groups will be somewhat stable throughout the quarter, though some small changes will likely happen. You will have a tutor or TA assigned to your group for help and discussion.
Your discussion leader (the tutor/TA in your lab) will share a Google Doc with your group where you can fill in notes as you work; this document is only for your group. Your discussion leader will not take notes for you.
Write down in notes: In your groups, share, and note in the running notes document (discussion leaders, you answer these as well!):
- How you'd like people to refer to you (pronounce your name/nickname, pronouns like he/her/they, etc)
- Your major
- One of:
- A UCSD student organization you're a member of or interested in
- Your favorite place you've found on campus so far
- A useful campus shortcut or trick you know
- Your answer to the following question. Get to know your fellow group members!
If you could wake up tomorrow and be any (non-human) animal, what animal would you choose to be and why? Would you want to be a pet or be free? Have you had any pets growing up?
Github
Much of our work this quarter will happen through Github, which is a platform for sharing code and collaborating on projects. You should make sure you have a Github account – you're free to use an existing one if you already have one. We will make use of the resources available in the Github Student Developer Pack. This may require signing up with a @ucsd.edu email address, or adding it to your account, in order to verify your student status.
Making an Account
For this lab, you do need to make a Github account right away. You do not need the Student developer pack yet, but you should submit the application in lab if possible so that you'll have the needed resources going forward.
Write down in your Google Doc:
For each student, their @ucsd email and their Github username they will use for this class (this is helpful for the TAs to know who is who!), and a link to their Github profile, which looks something like https://github.com/jpolitz/.
Making a Repository
From your Github profile page, click the + in the upper right to make a new repository (you can call it something like lab1). For lab work, your repositories can be public (for assignments we will show you how to make them be private).
Definition: A repository is a place to store code and other files. It has some similarities to a shared folder in Google Drive: it stores a collection of files and folders, and there are ways to share it with others. The main special thing about repositories is that they store a detailed history of changes to files, which turns out to be really important for programming projects.
There are many ways to interact with a repository; we'll see a few today and many more throughout the quarter. After you create the repository, you'll see a page like this:
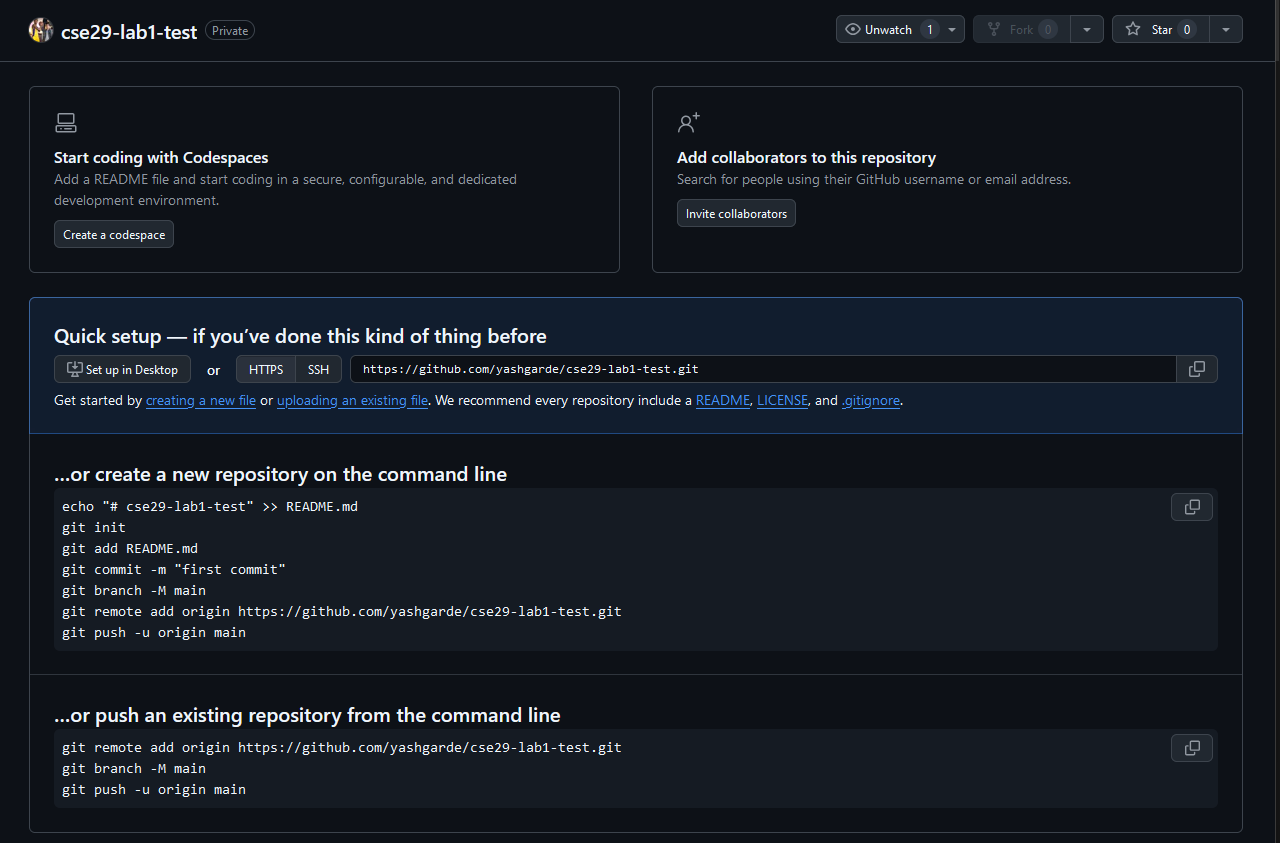
For a first step, you'll make a README file directly on github.com. Click the README link on your empty repository page and you'll be taken to an editor where you can write some text. You can write anything you like for this first section; when you're done, click the Commit changes... button.
Write down in your Google Doc:
For each student, a screenshot of their repository after adding the README file. If anyone ran into errors or issues, describe them!
Github Codespaces
Github has a feature called Codespaces that provide an online environment for the full development process – writing code, running programs, and managing a repository. We'll use this feature throughout the course to have a standardized programming environment for everyone; Codespaces is also similar to many production environments in tech companies and research labs.
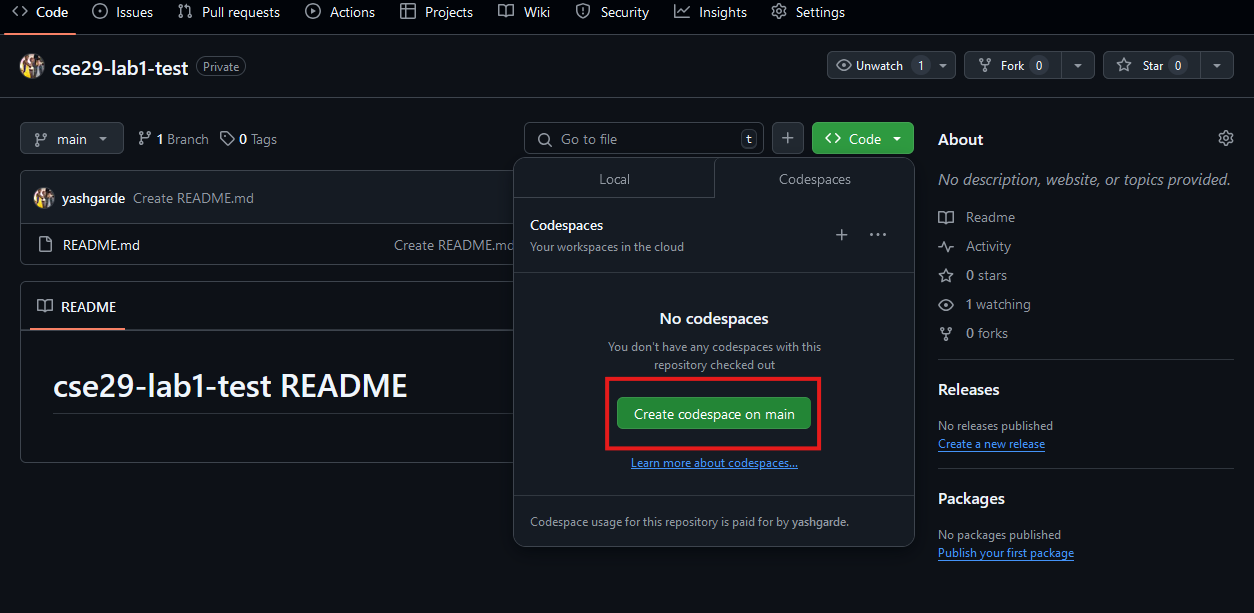
For this lab, we'll create a Codespace to do our work. Click the Code button on your repository page, and then click the Create codespace on main button:
This will open a new Codespace (sometimes it takes a minute to start up), which will look like this:
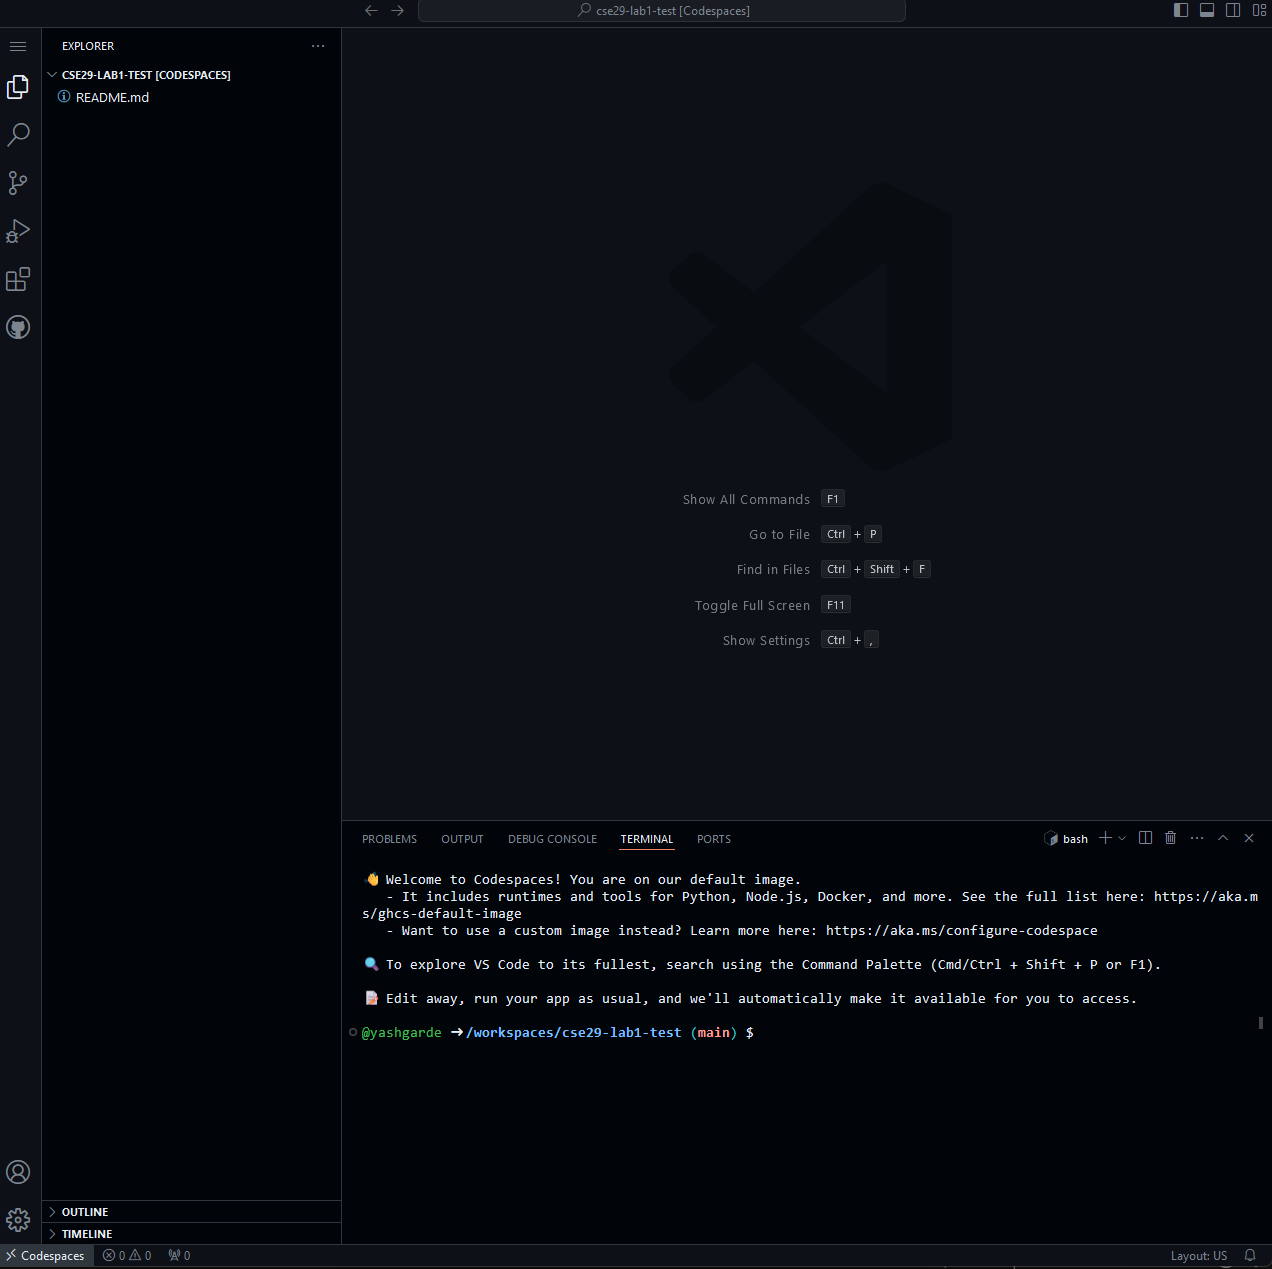
(A cute name will be randomly generated for each new Codespace you make. Check out the URL to see what name you got!)
The README file you made can be seen in the file navigation on the left. You can click on it to open it in a new editor tab (it may have opened by default when the Codespace started, as well). You can type into it to make edits. You may need to double click on the file in the file navigation to open it in the editor.
Do now: Type some edits into the README file. Then, open a new tab and go find the repository again from your Github page. Do you see the edits to the file there?
Write down in your Google Doc: For each student, a screenshot of the edited text in your Codespace, and a screenshot of the repository on Github showing the contents of the README. (NOTE: there will be a difference in these two screenshots!)
To propagate the changes from our Codespace to the repository, we need to commit and push them. We'll talk in detail about these in future labs and lectures; for now we'll just show you how in the Codespace interface and defer explanations to later.
On the left sidebar there is a “Source Control” icon. Click on this, you'll see a M next to your README file listing, which means “modified”. Click on the + next to the M to stage the changes. Then, write a short message in the text box (something simple like “Edited README” suffices). Finally, click the checkmark icon to commit the changes.
Then, click the three dots next to the checkmark and choose “Push”. This will send the changes to the repository on Github.
Write down in your Google Doc: For each student, a screenshot of the repository on Github showing the contents of the README including the edits.
Github Codespaces Summary
In this intro, you've:
- Set up your Github account
- Created a repository on Github
- Created a file through the Github editing interface
- Created a Codespace
- Edited the file in the Codespace
- Committed and pushed the changes to your repository
You'll use all of this setup many times throughout the quarter, and likely the same or similar steps thousands of times throughout your programming career! 🚀
Terminal and ieng6 login
A working systems programmer spends a fair amount of time at the terminal – a text-based interface to a computer. In this course we'll make heavy use of the terminal, both for running programs and for interacting with the system.
In your Codespace, you can open a Terminal by clicking the Terminal menu and choosing New Terminal. This will open a terminal window at the bottom of the screen. A terminal may already be open at the bottom of the screen from when you created the codespace, if not you can also press Ctrl+Shift+` to open a new terminal (hold down the Control key and press backtick, the key to the left of 1 on the keyboard).
Navigation Commands
Try running the following commands in your Codespace terminal. To run a command, type it in and press enter.
pwd
ls
ls .
cat README.md
cat README
cat does-not-exist
mkdir myfirstfolder
cd myfirstfolder
ls
ls .
pwd
touch file1.txt
touch file2.txt
ls
rm file2.txt
ls
ls ..
cd ..
pwd
ls
ls myfirstfolder
Discuss in your group and write down in notes: For each command you just ran, include both a copy-paste of output you see at the terminal and any changes you see in the file navigation as observations of the command's behavior. Then, for the commands ls, cd, pwd, touch, cat, do your best to give a general description of the command. If you're not sure, that's okay! We'll talk more about all of these going forward, and after you are done trying this out, a staff member will add some definitions we have for them to your notes doc to make sure we have agreed-upon summaries.
Downloading a File From the Command Line
Run the following command:
curl https://raw.githubusercontent.com/ucsd-cse29/fa24/refs/heads/main/src/lec/week1/hello.c
You should see the contents of an example from class. Then run this command:
curl -o hello.c https://raw.githubusercontent.com/ucsd-cse29/fa24/refs/heads/main/src/lec/week1/hello.c
You should see the file hello.c from class downloaded and saved into your Codespace. You can observe it in the file navigation, and with ls and cat (try all of them!).
Try opening the link from above in your browser.
curl takes a URL (a link) and downloads the contents. The optional -o somefile command-line option or command-line flag specifies an output file to save the contents to.
Definition: A command-line option or command-line flag is a way to give extra information to a program. Options are usually specified with a dash (-) followed by a letter or word. For example, -o is an option for curl that specifies an output file. The full list of options and flags is usually available by doing a search for the program online, or by using the command man (short for “manual”, nothing to do with dudes). Try running man curl at the terminal (the result may “take over” your terminal, you can use the up and down arrows to scroll and q to get back to the command prompt).
Logging into ieng6
As a student, you are assigned an account on the ieng6 server hosted by UCSD. These are similar to accounts you might get on other systems at other institutions (or a future job). We’ll see how to use your machine to connect to a remote computer over the Internet to do work there.
Your account name is the same account name as the one that’s used for your school Google account, i.e. it is the string that precedes “@ucsd.edu” in your school email address. In case you need to check the status of your student account, refer to the UCSD Student Account Lookup page.
Next run this command (with yourusername replaced by your actual username):
ssh yourusername@ieng6.ucsd.edu
Since this is likely the first time you’ve connected to this server, you will probably get a message like this:
$ ssh yourusername@ieng6.ucsd.edu
The authenticity of host 'ieng6.ucsd.edu (128.54.70.227)' can't be established.
RSA key fingerprint is SHA256:ksruYwhnYH+sySHnHAtLUHngrPEyZTDl/1x99wUQcec.
Are you sure you want to continue connecting (yes/no/[fingerprint])?
Copy and paste the one of the corresponding listed public key fingerprints and press enter.
- If you see the phrase ED25519 key fingerprint answer with: SHA256:8vAtB6KpnYXm5dYczS0M9sotRVhvD55GYz8EjN1DYgs
- If you see the phrase ECDSA key fingerprint answer with: SHA256:/bQ70BSkHU8AEUqommBUhdAg0M4GaFIHLKq0YQyKvmw
- If you see the phrase RSA key fingerprint answer with: SHA256:npmS8Gk0l+zAXD0nNGUxr7hLeYPn7zzhYWVKxlfNaeQ
(Getting the fingerprint from a trusted source is the best thing to do here. You can also just type “yes”, as it's pretty unlikely anything nefarious is going on. If you get this message when you're connecting to a server you connect to often, it could mean someone is trying to listen in on or control the connection. This answer is a decent description of what's going on and how you might calibrate your own risk assessment: Ben Voigt's answer.)
After this, you get a prompt to enter your password. This is the same password you use to log into your student account on other websites, like Canvas and Tritonlink. The terminal itself does not show what you type when you enter your password. This is conventionally done for your own security, so that others looking at your screen don’t see it. Just trust that it gets inputted when you type.
Now your terminal is connected to a computer in the CSE basement, and any commands you run will run on that computer! We call your computer the client and the computer in the basement the server based on how you are connected.
The whole interaction will look something like this:
# On your client
$ ssh yourusername@ieng6.ucsd.edu
The authenticity of host 'ieng6-202.ucsd.edu (128.54.70.227)' can't be established.
RSA key fingerprint is SHA256:ksruYwhnYH+sySHnHAtLUHngrPEyZTDl/1x99wUQcec.
Are you sure you want to continue connecting (yes/no/[fingerprint])?
Password:
# Now on remote server
Last login: Tue Oct 1 14:03:05 2024 from 107-217-10-235.lightspeed.sndgca.sbcglobal.net
quota: No filesystem specified.
Hello user, you are currently logged into ieng6-203.ucsd.edu

You are using 0% CPU on this system

Cluster Status
Hostname     Time    #Users  Load  Averages
ieng6-201   23:25:01   0  0.08,  0.17,  0.11
ieng6-202   23:25:01   1  0.09,  0.15,  0.11
ieng6-203   23:25:01   1  0.08,  0.15,  0.11

To begin work for one of your courses [ cs29fa24 ], type its name
at the command prompt.  (For example, "cs29fa24", without the quotes).

To see all available software packages, type "prep -l" at the command prompt,
or "prep -h" for more options
Then, execute the following commands:
export MODULEPATH=/home/linux/ieng6/cs29fa24/public/modulefiles:/public/modulefiles
module load cs29fa24
You should get the following output:
Tue Oct 01, 2024 11:28pm - Prepping cs29fa24
Now your terminal is connected to a computer in the CSE basement, and any commands you run will run on that computer! We call your computer the client and the computer in the basement the server based on how you are connected.
If, in this process, you run into errors and can't figure out how to proceed, ask! When you ask, take a screenshot of your problem and add it to your group's running notes document, then describe what the fix was. If you don't know how to take a screenshot, ask!
Running Commands, Remotely
Run all the commands from the earlier section again, while logged into ieng6 in the terminal. Include the curl commands as well.
Discuss and write down in notes: For each command, compare its output to what you got in the Codespace. Discuss any differences you see. Which commands work identically? Which seem to have different behavior? Why might that be? What does it mean for a file to be “in” your Codespace vs. “in” your ieng6 account?
Running C Programs
Sometimes we will work in the Codespace, and other times it will be important to do work on ieng6. This mirrors common practice in industry and research labs, where you may do some development locally, while other times you have to configure, edit, or run programs on a specific machine. In this part of the lab we'll see how to build and run a C program (like the one from class) in both places.
At this point you should have hello.c present in your Codespace and in your ieng6 account.
Compiling and Running in Both Places
You can open more than one terminal in your Codespace, and in fact you can see more than one terminal at a time. There is a little icon in the top right of the terminal that looks like a square with a plus sign in it. Clicking that will open a new terminal. You can also drag the tab of a terminal to the side of the screen to create a new panel, and you can see both terminals at the same time. You may want to try that for this activity! New terminals in your Codespace will always open in the context of your Codespace, not logged into ieng6.
Open two terminals, one logged into ieng6 and one in your Codespace.
In both, run the following commands one at a time:
ls
gcc hello.c -o hello
ls
./hello
Write down in notes: What effect did the gcc command have? What did the ./hello command do?
Some definitions:
gccis a compiler for C programs. It takes.cfiles (and other things we'll see later) as inputs, and generates executable files (likehello) as outputs.- An executable file is specially encoded with instructions for a specific (type of) machine. We won't talk in much detail about it in this course, but the way an executable file runs on a computer is one of the the main topics of CSE30. These files can be run without any other tools. When we run
helloby writing./hello, we are directly telling the operating system to run the instructions in that file.
Making an Edit
Next, in your Codespace editor, make an edit to hello.c to change the string message to one of your choice. Save the file, then rerun the commands above in both terminals.
Write down in notes: What was the output in each terminal? What did you observe about the behavior of the program in each place?
When you change the file in your Codespace, the file on ieng6 does not change. You can use cat to verify this; the edit you made is only to the file stored in your Codespace. This is an important concept! Each computer has its own filesystem that stores files and folders. Each terminal is connected to one computer (and to one filesystem) at a time. Knowing which computer you're running commands on is really important for that reason!
It's worth asking how we can get our edits onto ieng6 to run the modified program there. There is a command, related to ssh, called scp, that does just that.
From your terminal connected to your Codespace, run this command (replacing yourusername with your username as before; you will be prompted for your password again):
scp hello.c YOURUSERNAME@ieng6.ucsd.edu:./
Then, in your terminal connected to ieng6, run the following commands:
cat hello.c
gcc hello.c -o hello
./hello
The command scp takes files and copies them to the computer and folder given by the second argument. The : is separating the username and name of the server from the path or folder to copy it into – ./ just means “your home directory”, which is the same folder you see when you log in. scp is a useful command for moving things around between computers. There are many other ways we could accomplish this, but this is one of the most direct.
Write down in notes: For each student, take a screenshot of successfully running the scp command and then using cat to see the new output on ieng6, and put it in the notes.
Summary
- A repository is a place to store code; Github is a service for storing repositories
- A Codespace is a web page that connects to a computer at Github that holds your repository and lets you run commands and edit your code
- A terminal is a text-based interface to a computer.
- We run commands in the terminal, which have options and flags and arguments. We can look up commands' behavior online or with
man - commands are programs that can do all kinds of things, from file management (
ls,cat,cd) to connecting to other computers (curl,ssh) to compiling and running programs (gcc,./hello) - We can connect to
ieng6, which is a collection of computers at UCSD, usingssh. Many times we need to connect to other computers we will usessh - Each computer has its own filesystem, which is a collection of files and folders. We saw the Codespace filesystem and the
ieng6filesystem - We can compile C programs using
gccwhich creates executable files - We can run executable files with
./filename - The
scpcommand can be used to move files between computers (using the same login asssh)
Before you leave - Lab Group Preference Form
Please go ahead and fill out this Google form before you leave, this will help us create the seating chart for next week. Link to Google form
More Practice
These are open-ended exercises for you to try and discuss with your group. These are also great conversation-starters for office hours, deeper understanding with friends outside of class, or conceptual questions on Piazza. Feel free to take your results and write down in notes what you found!
- Commit and push your changes to
hello.cGithub. Can you figure out how to download the code you wrote from Github toieng6usingcurl? (Hint: inspect the URLs we shared for downloading class code) - Try creating a new
.cfile from scratch that prints something different. Compile and run it in both your Codespace and onieng6, using your method of choice to move it toieng6. - Try running the
scpcommand without the./at the end of the path. What happens? - Use
scpto copy a file into a different folder onieng6(like the one you made withmkdir). What does the command look like? - Cause an error in
hello.c(change the name ofmain, or drop a", or otherwise cause an issue), then recompile and re-run. What does thegcccommand output? What does the./hellocommand output? Why? - Try running
gccwithout the-o hellopart. What happens? What is the name of the output file? Can you run it? - Try running
gccwith the-oflag with a different name. What happens? What is the name of the output file? Can you run it? - Run
ls ..after logging intoieng6. What do you see?