Week 3 – Terminal Usage and Git
Lab Goals
- Set up SSH keys for
ieng6and Github - Learn how to edit files on the terminal using
vim - Do all the steps for working on a PA entirely on a remote computer (
ieng6) - Learn how to manage repositories using
gitCLI
Lab Tasks
Part 1 – Let's get a Terminal Setup
- If you're using Windows, install Git for Windows using all the default/recommended settings as suggested by the installation wizard. Mac users have a pre-installed terminal application.
- Open the Git Bash terminal application (Windows) or Terminal (Mac) and try some commands from Lab 1
-
Try to
lsyourDesktopdirectory. Do those files look familiar? -
Try to
sshintoieng6with your username and password (just like you did in Lab 1) - Help each other if anyone has issues installing or figuring out the terminal.
Discuss and write in notes:
- What was the working directory of the terminal when you launched it?
- What is your home directory on this computer?
- What files and folders are in the home directory?
- Where do you think files that download from your web browser go? Can you list
them with
ls? What's the absolute path to that folder? - Do any commands work differently than you expect on this computer?
- Are you able to use
sshwith your username and password from your local terminal to log intoieng6and enter the course-specific account?
Take a few screenshots of what you found particularly interesting, and discuss how this environment differs from the terminal you used on Codespaces.
Part 2 - Setting up SSH Keys for Easy Access to ieng6
With the setup we've used so far this quarter, each time you log in to your course-specific account, you have to type the password. This can get a bit tedious and luckily there is a cool and interesting way to avoid this while still staying secure using SSH keys.
We've labelled each step with whether it should run on [Y] our computer or [i] eng6. Make sure you follow the instructions carefully!
-
[Y] In your local terminal, run
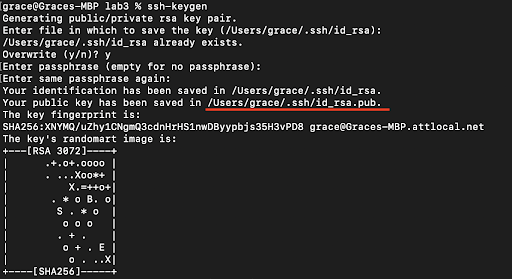
ssh-keygen. This command will generate a pair of SSH keys for you, one public and one private. -
[Y] Keep pressing
<Enter>until the program shows some text it calls the "randomart image".- Note the path where the public key is saved (underlined below).
-
[Y]/[I] Now, log into your remote course specific account on
ieng6withssh(using your password as usual) DO NOT run thecs29fa24command to prepare your course-specific environment! -
[I] Run
mkdir .sshin the terminal -
[I]/[Y] Log out of your remote account by pressing
Ctrl-Dor typingexit. -
[Y] Now, we want to copy the public SSH key you created on your local machine onto your remote account; specifically inside the
.sshdirectory you just created, into a file calledauthorized_keys. Scroll up in your terminal to where you were creating the SSH key, find the line where it says:Your public key has been saved in: <path to your public SSH key>, copy the path. Make sure you get the public key file, ending in.pub, here, not the private file.
- [Y] Think about a command that will perform the copying of the public key file from your local machine to the
.sshdirectory on your remote account with the appropriate name (HINT: you used this command in Week 1's lab). Work with your group members if you need help!
If you're really stuck, click here to see the answer
From your local computer, runscp PATH_TO_YOUR_PUBLIC_SSH_KEY USER@ieng6.ucsd.edu:~/.ssh/authorized_keys
Make sure to replace USER with your UCSD username and PATH... with the appropriate path
- [Y]/[I] Try to log onto your remote account again, you shouldn’t be prompted for a
password anymore. If you are, ask for help and carefully review the steps above
with your group. To review:
- You should have a directory called
.sshon your computer in your home directory. - That folder should have a key file created by
ssh-keygenand a corresponding.pubversion of the file. - You should have a directory called
.sshonieng6(that you created withmkdir) in your home directory. - The
.pubfile from your computer should be copied to the.ssh/authorized_keysfile onieng6
- You should have a directory called
Add to your notes: A screenshot of you logging into your ieng6 account without a password prompt.
Part 3 - Working in Terminal
So far, we've been primarily using our terminal to compile our C code (with gcc)
and run our programs, but we've just scratched the service of what the terminal can do.
The terminal is the ultimate gateway into communicating with our computer, and today we're going
to dive more into the different ways we can use the terminal to make our lives easier.
3.1 - VIM
vim is a text editor that runs entirely in the terminal. For better or worse, many times developers find themselves with only terminal access to a remote computer, and need to do some programming – that is, editing source code files. A terminal-based editor makes this possible. (As a side effect you can look like hacker from a movie controlling everything
without needing a mouse.)
There are a lot of online resources available for vim, but thankfully, the program itself comes with a
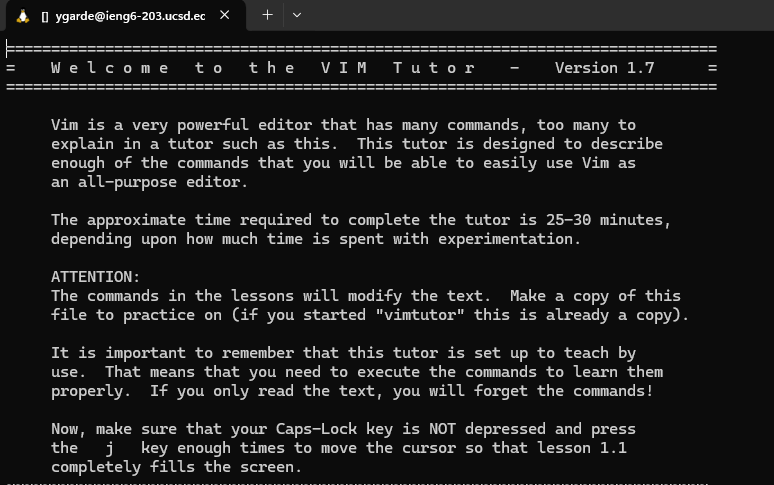
interactive tutorial (that's pretty neat!). We can access this tutorial with the vimtutor command from
our terminal
Task: Open the vimtutor tutorial in your terminal and complete Chapters 1 & 2.
Once you have completed the first 2 chapters of vimtutor, you will now be using some of the commands that you learned to correct a bug in a C program that we have written for you.
Task:
- [Y]/[I] If you aren't logged into
ieng6, log in now. (password-free hopefully!) - [I] Download our buggy C program using
curl. The command would look like
curl https://raw.githubusercontent.com/ucsd-cse29/lab3-starter/refs/heads/main/average.c -o average.c
- [I] Compile and run the
average.cfile. - [I] Open the
average.cfile invimand read through the program. - [I] Determine the bug in the program and correct it in
vim. (Try doing it without introducing a new variable!)
Write in your notes: The keys/commands you are pressing/using while navigating vim
- [I] Re-compile and re-run the program to ensure that it now outputs the correct value.
Write in your notes:
- The original output of the program.
- What do you think the program is supposed to do/output?
- What was the bug and how did you fix it?
- The output of the program after the bug has been fixed.
When you are done, discuss with a partner discuss what was comfortable and what was tricky about correcting the file. Compare the commands you used with other members in your group and note the differences.
3.2 - VIM Telephone
Next, we will see how different members of your group approached fixing the bug in the provided C code. You will be running your group members' vim keystrokes to see the differences in how each of you navigated the vim editor.
Task:
- [I] Redownload our C file using a similar
curlto the previous section.curl https://raw.githubusercontent.com/ucsd-cse29/lab3-starter/refs/heads/main/average.c -o average2.c. - [I] Now, run the commands that another member of your group used to correct the
average.cfile. You should find the commands in your shared Google Doc. - Write in your notes: What were some of the key differences you noticed between your keystrokes and your group members?
Part 4 - Github with ieng6
With the bug fixed, we now want to push our changes to our Github repository. Before we can do that though, we need to be able to perform actions against our Github repository from ieng6. This is where SSH keys come in handy once again!
4.1 - Setting up SSH Keys for Github
- [Y]/[I] Login to
ieng6as usual (hopefully, without typing a password now!) - [I] Run the command
ssh-keygen, and again press<Enter>until the command completes and shows the "randomart image". Just like before, this will put a key file and a.pubversion of it into the.sshdirectory – this time onieng6!
Next, we want to add the public key to your Github account. This is like the step of copying the public key to authorized_keys on ieng6, but instead we're copying to Github.
-
[I] Display the SSH public key generated above using
cat <path of your ssh key .pub file>and copy it to your clipboard; you can copy it by highlighting and right-clicking -
Open your Github account on the browser.
-
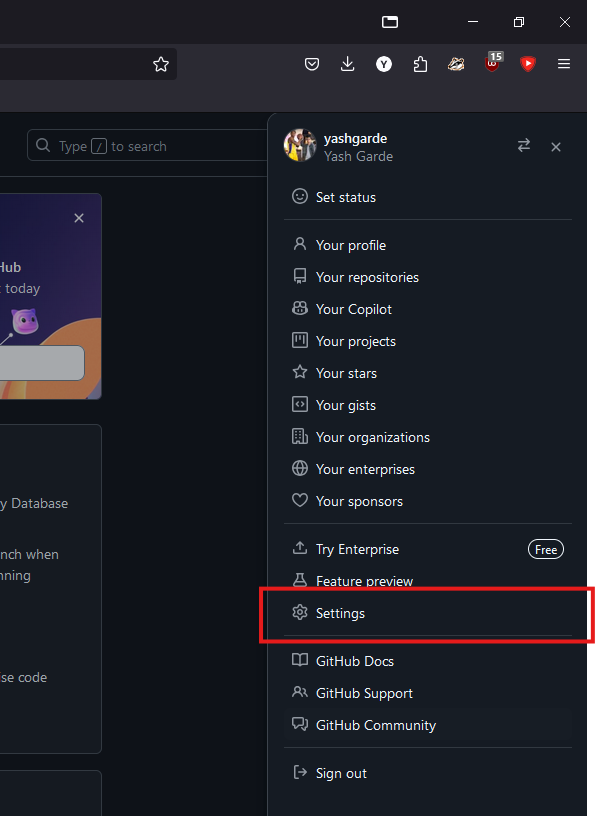
In the upper right corner, click on your profile photo, then click Settings.
-
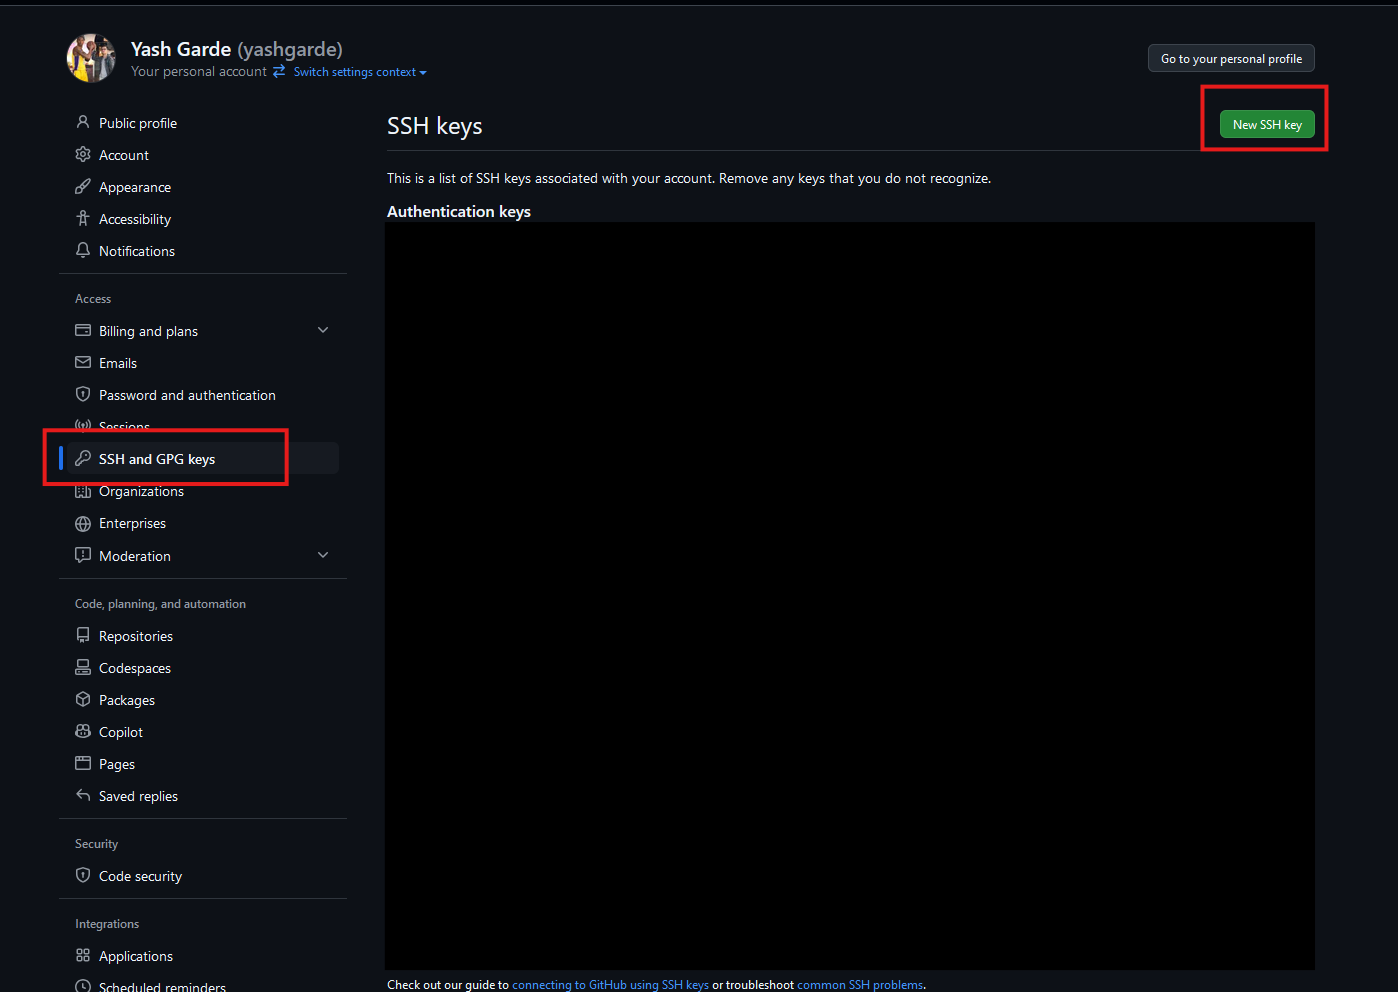
In the “Access” section of the sidebar, click SSH and GPG keys.
-
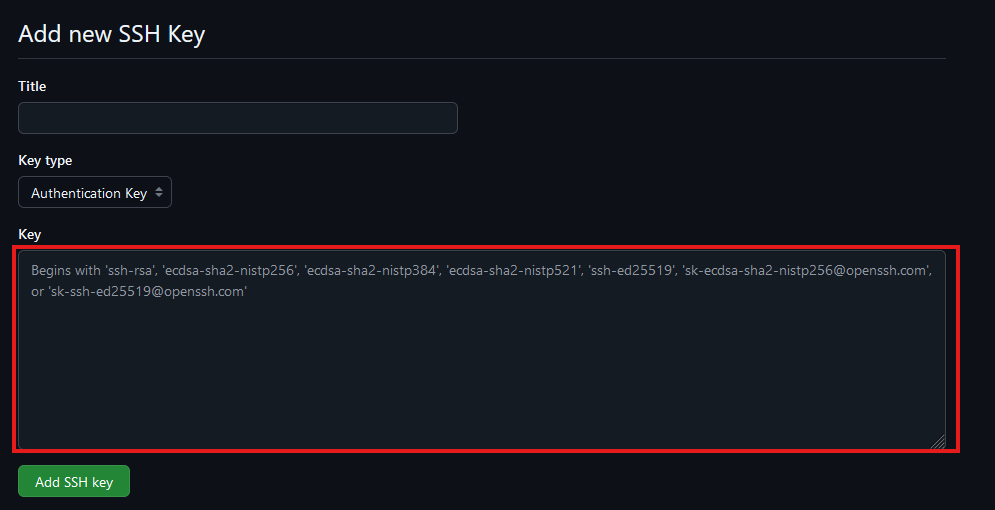
Click New SSH key or Add SSH key under the “SSH keys” section.
-
Add a “Title” to your key (ex: Aaron's ieng6 machine).
-
Select the “Key Type” to be an Authentication Key
-
Copy your public key from the output of the cat command and paste it into the “Key” field
-
Click Add SSH key.
-
If prompted, confirm access to your account on Github.
Go back to the ieng6 terminal and:
- [I] Run the following command to add github.com as a recognized host (this avoids the scary yes/no prompt about accepting new connections the first time you connect)
ssh-keyscan -t rsa github.com >> ~/.ssh/known_hosts>>means "append stdout of the command to file"
- [I] Check your connection by running the following command:
ssh -T git@github.com- It will say something like "Hi supercoolstudent1234! You've successfully authenticated, but GitHub does not provide shell access."
Now we have an SSH key which can be used to authenticate to GitHub! In addition to using https clone URLs, we can now use SSH clone URLs that look like this:
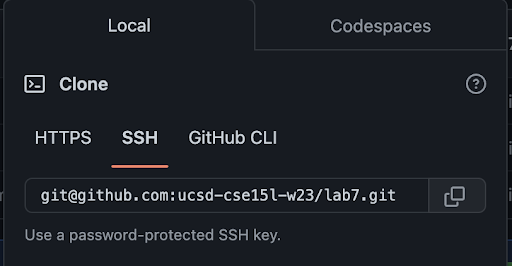
Crucially, these will allow both cloning and pushing to the repository (as long as your account has access) from ieng6!
4.2 - git CLI commands
So far you have been using the "Source Control" tab in your Github codespaces to commit and push your changes. Since we only have our terminal today, we will be learning how to use the git CLI to do the same thing.
- Forking a repository
A fork of a repository is a personal copy of the repository that you can make changes to without affecting the original repository. To fork a repository, click the "Fork" button in the top right corner of the repository page.
Task: Create a fork of the Lab 3 starter repository here.

- Cloning with
git clone
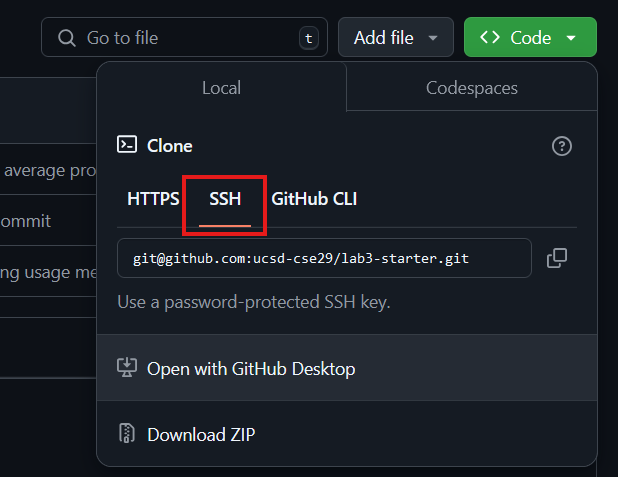
To retrieve a local copy of our git repository, we use the git clone command. clone takes a link from github (usually beginning with https://github.com or git@github.com).
Task: Use the SSH clone URL to clone your forked repository to your ieng6 account into another new directory. Fix the bug that you fixed earlier in the average.c file again and then proceed!
After we are done making changes to our local branch it's now time to push our changes to our remote branch (in this case github)
- Getting the status with
git status
Let's first run git status, to see the status of our repository. status returns which files are untracked (new) modified (changed) and deleted.
Task: After correcting the buggy C code, add the output of running the git status command in your terminal to your notes.
- Staging file with
git add
When we are done making changes to a file, we "stage" it to mark it as ready to be commited. Using the git add command with the path of the changed file(s) will stage each to be included in the next commit. Using git add . will stage all changed and/or new files in the current directory.
Task: Use git add to stage our corrected C file. Compare the output of git status to the output written in your notes.
- Committing with
git commit
A commit is a package of associated changes. Running the git commit command will take all of our staged files, and package them into a single commit. With the -m flag, we can specify a message detailing the changes of the commit. Without -m, git opens a vim window to write the commit message.
Task: Use git commit to commit our staged changes. Use vim to write your commit message.
- Pushing to the remote repository with
git push
With our commit now made, we can use the git push command to upload our changes to our remote branch (github). If this is the first time you are using git push, git may ask you to set the name and email you want associated with your commits.
- Viewing the log with
git log
Git also keeps a log of all the changes. The git log command prints this log into our terminal. From this log we can see the date, author, and message associated with each commit. The HEAD -> marker points to the latest commit locally, while the origin/ marker points to the latest commit on the remote. After running git push, both of these markers should be on the same line.
Task: After pushing your changes, add the output of git log to your notes.